

Last Updated on March 16, 2026 by Indoor Plant Nook
Root pruning is one of the most critical — and most misunderstood — steps in azalea bonsai care. Done right, it refreshes your tree’s vigor, encourages fine feeder roots, and keeps your bonsai thriving in its container for years. Done wrong, it can stress or kill a healthy tree within weeks.
The difference almost always comes down to what you do after the cut.
This guide covers everything you need to know about azalea bonsai root care after pruning: how to treat fresh cuts, the right soil and repotting technique, watering strategy, fertilization timing, aftercare environment, and the most common mistakes to avoid. Whether you’re a first-time bonsai grower or an experienced enthusiast, this step-by-step breakdown will help your azalea recover quickly and come back stronger.
Why Root Care After Pruning Matters for Azalea Bonsai
Azaleas (Rhododendron spp.) are acid-loving, ericaceous plants with a naturally fine, fibrous root system. Unlike many other bonsai species, azaleas are particularly sensitive to root disturbance. Their shallow feeder roots are responsible for absorbing water and nutrients, and when those roots are pruned, the tree temporarily loses some of its ability to support its foliage and branches.
After root pruning, your azalea bonsai enters a recovery phase during which:
- Cut root ends are vulnerable to rot and fungal infection
- The tree’s water uptake is temporarily reduced
- New feeder roots need to be encouraged to grow
- The balance between root mass and canopy must be maintained
Without proper aftercare, you risk transplant shock, root rot, dehydration, or permanent decline. With the right approach, your azalea can establish new roots within weeks and return to active growth.
Best Time to Prune Azalea Bonsai Roots
Before diving into aftercare, it’s worth confirming the correct timing — because when you prune directly impacts how well your aftercare will work.
The ideal time to root-prune azalea bonsai is immediately after flowering, typically in late spring (April–June, depending on your variety and climate). At this point:
- The tree has finished its energy-intensive bloom cycle
- It is entering a period of active vegetative growth
- Temperatures are warm enough to promote root regeneration
- You have several months of growing season ahead for recovery
Avoid root pruning in mid-summer heat, during flower bud formation in late summer/fall, or in winter dormancy. Pruning at the wrong time compounds the stress of aftercare significantly.
Step-by-Step: Azalea Bonsai Root Care After Pruning
Step 1: Inspect and Treat the Cut Roots
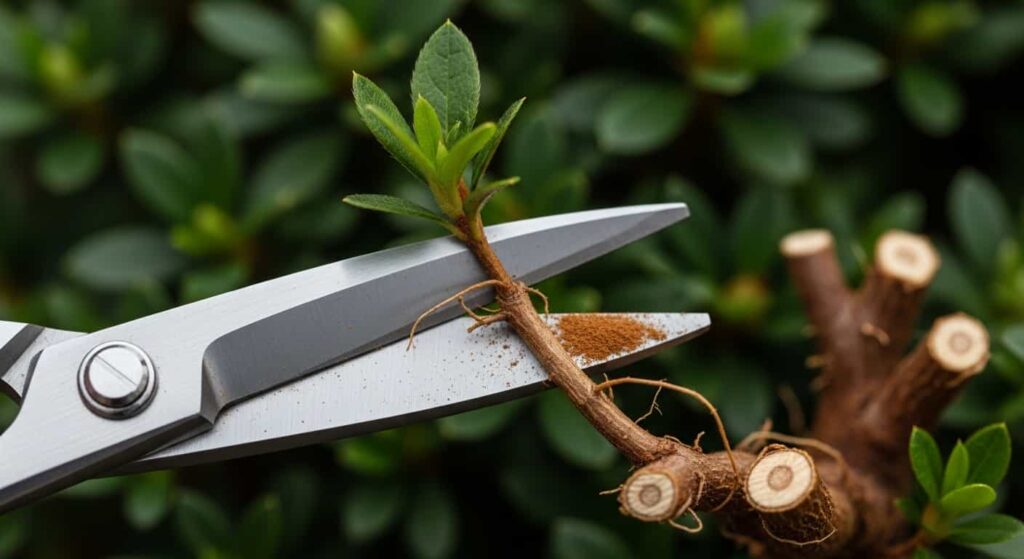
Immediately after pruning, before repotting, take a moment to assess the root work:
- Check for clean cuts. Jagged or torn roots are more susceptible to rot. Use sharp, sterilized scissors or root pruning shears and re-cut any crushed or ragged ends cleanly.
- Remove dead, black, or mushy roots entirely. These will only introduce disease into your fresh soil mix.
- Allow minor air drying. After pruning, let the root mass air for 10–20 minutes in a shaded spot. This helps the cut surfaces begin to callus very slightly before contact with soil.
- Apply optional wound treatment. A light dusting of powdered sulfur or cinnamon (a natural antifungal) on the largest cut ends can help prevent fungal infection. Some growers use a diluted rooting hormone powder to stimulate new root growth on large cuts.
Pro Tip: Avoid leaving exposed roots in direct sun or wind for more than 30 minutes. Desiccation of fine roots is irreversible and will delay recovery.
Step 2: Prepare the Right Soil Mix
Azaleas are acid-loving plants that thrive at a soil pH of 4.5–6.0. Using the wrong soil after root pruning is one of the most common — and most damaging — mistakes.
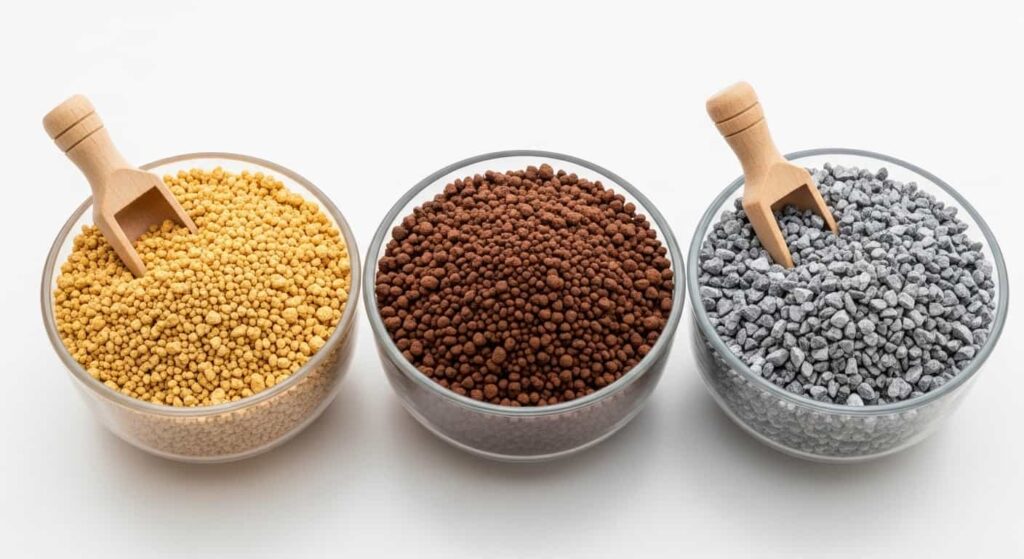
A well-draining, slightly acidic bonsai mix for azaleas typically combines:
- Kanuma (60–70%) — A Japanese pumice-type substrate specifically mined for ericaceous plants. Naturally acidic, excellent drainage, ideal for azalea feeder roots.
- Akadama (20–30%) — Adds moisture retention and breaks down slowly to improve soil structure.
- Fine grit or perlite (10–20%) — Improves aeration and prevents compaction.
Avoid: Standard potting soil, peat-heavy mixes, or alkaline substrates. These can suffocate fine azalea roots and promote rot in a freshly pruned root system.
For azalea bonsai in particular, pure Kanuma is a widely accepted and very forgiving option that supports fast root regeneration after pruning.
Step 3: Repot with Care
Repotting after root pruning requires a deliberate, gentle technique:
- Clean the pot thoroughly. If reusing the same pot, scrub it with a diluted bleach solution and rinse well to eliminate any lingering pathogens.
- Place mesh over drainage holes to keep soil in while allowing water to flow freely.
- Add a thin base layer of fresh Kanuma to the pot.
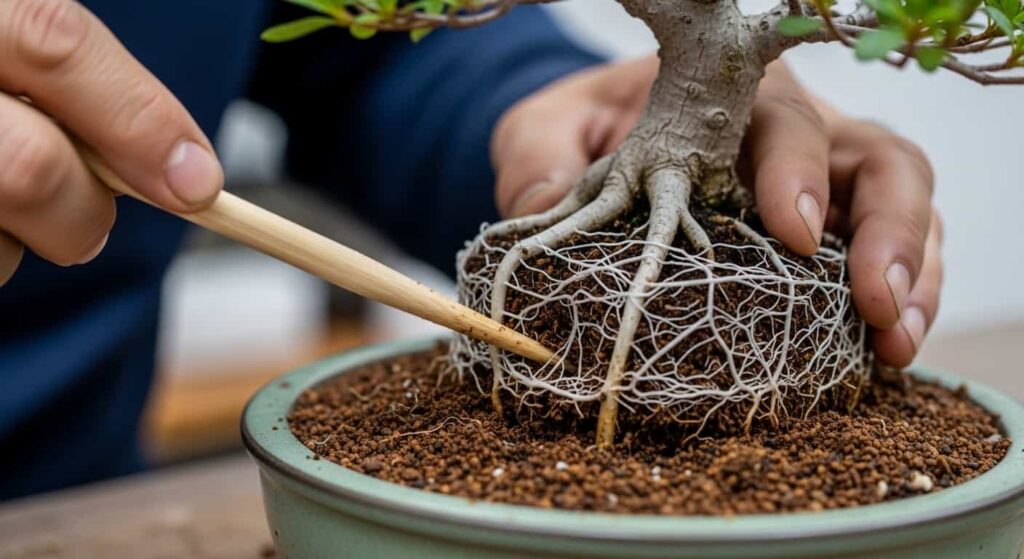
- Position the tree. Place the azalea at the correct planting angle. The nebari (surface roots) should sit just at or slightly above soil level.
- Work the soil around the roots gently. Use a chopstick or root hook to work the fresh substrate between the roots, eliminating air pockets. Do not pack the soil tightly.
- Water in thoroughly once the tree is positioned (see Step 4).
- Secure the tree if needed. For freshly pruned trees, temporary wire anchoring through the drainage holes can help stabilize the root ball while new roots establish.
Step 4: The Right Watering Strategy After Root Pruning
Watering is arguably the most important element of post-pruning root care. Azalea bonsai have specific hydration needs, and these are amplified during recovery.
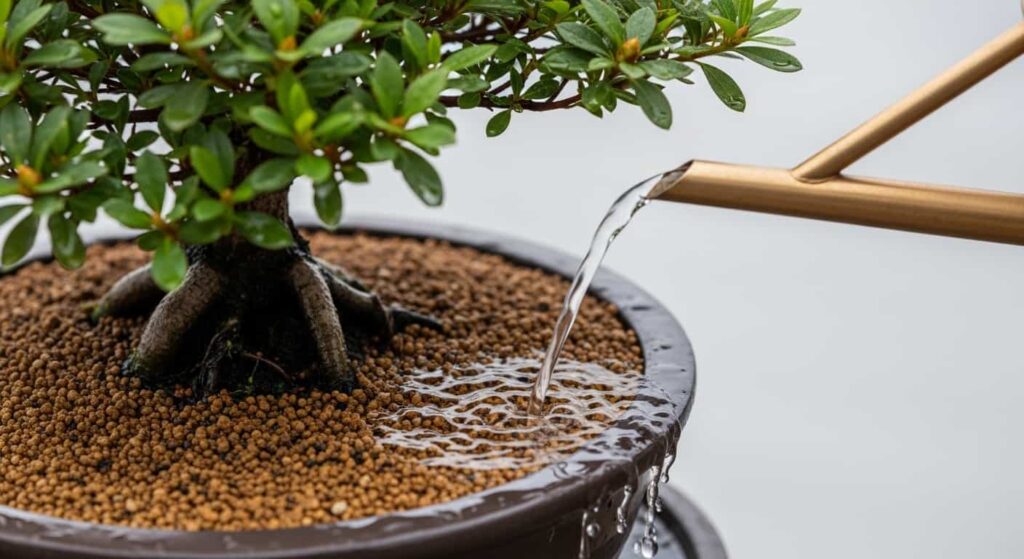
Immediately After Repotting
Water the tree thoroughly right away. Use a gentle rose-head watering can and water until it flows freely from the drainage holes. This:
- Settles the fresh soil around the roots
- Hydrates the root system after air exposure
- Flushes any dust or debris from the substrate
During Recovery (First 4–6 Weeks)
- Check moisture daily. Fresh Kanuma drains quickly. Do not let the substrate dry out completely — but do not keep it waterlogged either.
- The finger test: Insert a finger 1–2 cm into the soil. Water when it feels barely moist, not bone dry.
- Reduce watering frequency slightly compared to pre-pruning levels. With fewer roots to absorb water, the tree uses moisture more slowly. Overwatering a pruned root system is a leading cause of root rot.
- Use room-temperature rainwater or filtered water where possible. Azaleas are highly sensitive to alkaline tap water. If tap water is all you have, let it sit overnight or use a small amount of pH Down solution to bring it to approximately 6.0.
Misting the Foliage
Lightly misting the leaves once or twice daily during the first two weeks after repotting helps reduce transpiration stress while the root system recovers. This is especially useful in warm, dry conditions.
Step 5: Fertilization — When and What to Apply
One of the most common mistakes after root pruning is fertilizing too soon. Fresh-cut roots are vulnerable, and concentrated fertilizer salts can burn the exposed ends, slowing recovery rather than speeding it.
Timing
- Wait at least 4–6 weeks after root pruning before applying any fertilizer.
- Once new growth is visible (a reliable sign that root regeneration is underway), you can begin a light feeding program.
What to Use
Azaleas need an acid-forming, ericaceous fertilizer low in phosphorus and potassium, with a focus on nitrogen during active growth. Good options include:
- Slow-release organic granules (e.g., rapeseed cake, fish emulsion pellets) applied to the soil surface — these release nutrients gently and are forgiving on recovering roots.
- Liquid ericaceous fertilizer diluted to half the recommended strength during recovery. Products with an NPK around 3-1-2 or 5-3-3 are appropriate.
- Chelated iron supplement if leaves begin to yellow between veins (chlorosis), a sign of iron deficiency often triggered by repotting stress.
Avoid: High-nitrogen synthetic liquid fertilizers for at least the first month. These can spike salt levels in the soil and damage fine recovering roots.
Step 6: Create the Ideal Recovery Environment
Where you place your azalea bonsai in the weeks after root pruning has a significant impact on recovery speed.
Light
- Partial shade is ideal during the recovery period — approximately 50–60% shade.
- Avoid full direct sun for the first 3–4 weeks. Without a full root system, the tree cannot replace water fast enough to keep up with the transpiration demands of full sun exposure.
- After 4–6 weeks, when new growth appears, gradually reintroduce the tree to its normal light levels.
Temperature and Airflow
- Keep the tree in stable, moderate temperatures (15–25°C / 59–77°F is ideal).
- Protect from frost. Even cold-hardy azalea varieties are more vulnerable to temperature extremes immediately after root pruning.
- Avoid strong winds. Wind accelerates transpiration and stresses the recovering root-to-canopy water balance.
Humidity
- Elevated ambient humidity supports leaf health while roots regenerate.
- Grouping bonsai or placing the tree near a humidity tray (with pebbles and water beneath the pot, without the pot sitting in water) can help maintain moisture in the air around the foliage.
Step 7: Monitor for Signs of Stress and Recovery

During the 6–8 weeks following root pruning, watch closely for the following indicators:
Signs of Healthy Recovery
- New bud break or leaf elongation — the most reliable sign that root regeneration is progressing
- Firm, upright foliage — indicates adequate hydration
- Stable soil moisture — the substrate is drying at a predictable rate
Signs of Stress to Address
| Sign | Likely Cause | Action |
|---|---|---|
| Wilting leaves | Underwatering or root damage | Check moisture; mist foliage |
| Yellowing leaves | Overwatering, root rot, or pH issue | Reduce watering; check drainage |
| Leaf drop | Transplant shock or fungal infection | Move to shade; inspect roots |
| White mold on soil | Overwatering and poor airflow | Reduce watering; improve ventilation |
| No new growth after 8 weeks | Severe root loss or disease | Unpot and inspect root system |
If you notice widespread leaf drop combined with soft, discolored roots when you gently probe the soil, the tree may have developed root rot. In this case, unpot, remove all affected roots, treat with a fungicide, and repot into fresh, dry Kanuma.
How Much Root Can You Safely Remove?
A general rule for azalea bonsai root pruning is to remove no more than one-third of the total root mass in a single pruning session. Removing more than this significantly increases transplant shock risk.
If your tree has severely pot-bound or neglected roots that require extensive work, consider a two-session approach: remove up to a third now, allow one full growing season for recovery, then continue the following year.
Always balance root pruning with corresponding canopy reduction when significant roots are removed. Reducing the leaf load decreases the tree’s water demand and helps re-establish the root-to-canopy ratio.
Common Mistakes to Avoid After Azalea Root Pruning
- Fertilizing immediately after repotting — burning vulnerable cut roots
- Overwatering — the single most common cause of post-pruning death in azalea bonsai
- Placing in full sun too soon causes rapid dehydration before roots can compensate
- Using alkaline water raises soil pH and locks out nutrients essential for azalea health
- Using the wrong soil — heavy, peat-based mixes suffocate fine azalea roots
- Not securing the tree — movement in the pot tears new root hairs as they form
- Pruning at the wrong time — root pruning during bud formation or flowering causes extreme stress
Azalea Bonsai Root Care After Pruning: Quick Reference Summary
| Task | Timing | Key Action |
|---|---|---|
| Treat cut ends | Immediately | Clean cuts, optional antifungal dust |
| Repot | Same day as pruning | Fresh Kanuma mix, no fertilizer in soil |
| First watering | Immediately after repotting | Thorough soak, then monitor daily |
| Shade placement | Weeks 1–4 | 50–60% shade, protect from wind |
| Foliage misting | Weeks 1–2 | Once or twice daily |
| First fertilization | Week 4–6 | Half-strength ericaceous fertilizer |
| Return to full sun | Week 4–6 | Gradual reintroduction |
| Expect new growth | Week 4–8 | Sign of successful root regeneration |
Frequently Asked Questions
How long does it take for azalea bonsai roots to recover after pruning?
Most azalea bonsai begin showing visible new growth within 4–8 weeks of root pruning under ideal conditions, indicating that root regeneration is well underway. Full re-establishment of the root system typically takes one full growing season.
Should I prune the branches when I prune the roots?
Light canopy reduction — removing roughly the same proportion of foliage as roots removed — is recommended when significant root work is done. This reduces the water demand on the recovering root system. However, avoid heavy branch pruning at the same time as major root work.
Can I root-prune an azalea bonsai that is about to flower?
It is strongly advised to wait until after flowering is complete before root pruning. Pruning during or just before bloom diverts the tree’s recovery energy away from flowering and can cause bud drop.
What if my azalea bonsai loses leaves after root pruning?
Some leaf drop is normal immediately after repotting as the tree adjusts to reduced root capacity. Move the tree to deeper shade, maintain consistent moisture, and mist the foliage daily. If leaf drop is severe and accompanied by soft or discolored roots, inspect for root rot and treat accordingly.
How often should azalea bonsai be root pruned?
Most azalea bonsai benefit from root pruning every 2–3 years, timed to coincide with repotting after flowering. Fast-growing or young trees may need more frequent attention; older, slower-growing specimens may go 3–5 years between root pruning sessions.
Conclusion
Azalea bonsai are among the most rewarding trees to grow — and root pruning is the foundation of keeping them healthy and beautiful in a container long-term. The care you provide in the weeks following a root pruning session is just as important as the pruning itself.
By treating cut roots carefully, using the right acid soil, managing water thoughtfully, waiting to fertilize, and protecting the tree in partial shade during recovery, you give your azalea the best possible chance to regenerate quickly and come back with renewed vigor.
The effort you invest now pays off every spring when your azalea bursts into bloom — a reward well worth the careful attention.