
Last Updated on March 16, 2026 by Indoor Plant Nook
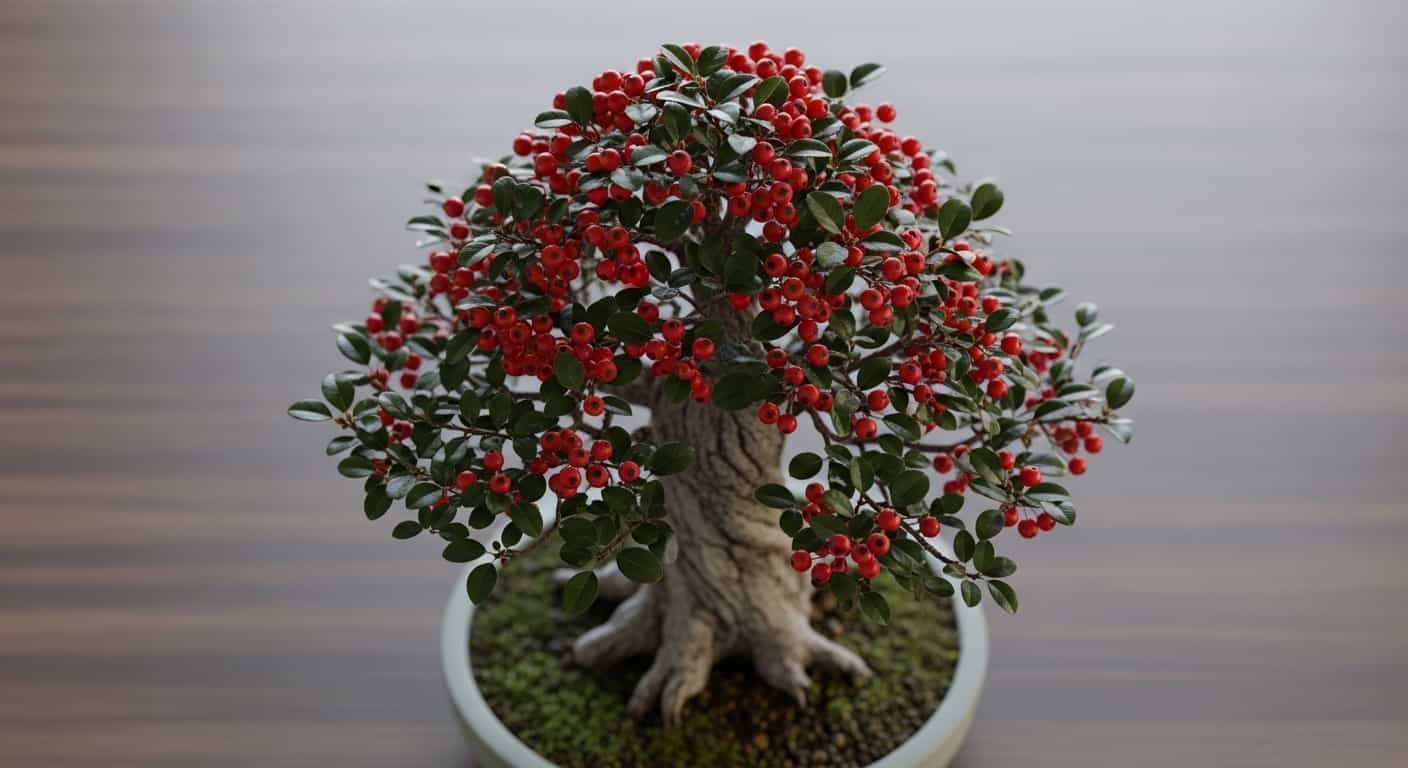
Cotoneaster is one of the most rewarding species for bonsai cultivation. Its fine branching, tiny leaves, white spring flowers, and brilliant red berries make it a favorite among beginners and seasoned practitioners alike. Yet for all its visual appeal, many growers neglect the one practice that determines long-term health most of all: root pruning.
This guide walks you through everything you need to know — from understanding why roots matter, to the exact steps for pruning them safely, to the recovery care that makes the difference between a thriving tree and a struggling one.
Why Root Pruning Matters for Cotoneaster Bonsai
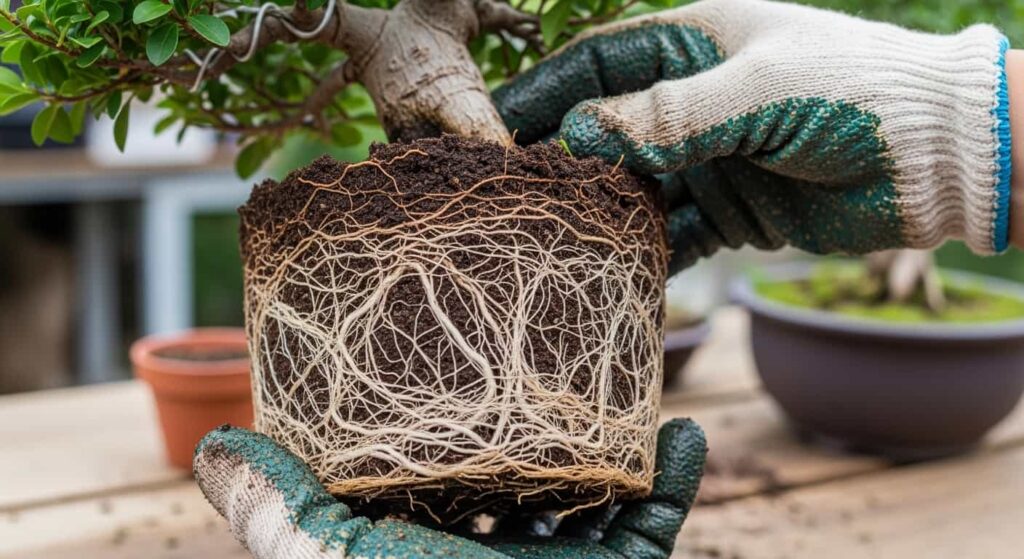
Roots are not just anchors. They are the engine of the tree. When cotoneaster bonsai are confined to a pot, the root system eventually becomes pot-bound — circling, tangling, and compressing until water and nutrients can no longer move efficiently through the soil.
Root pruning solves several problems at once:
- Prevents root-binding: Circling roots left unchecked will eventually girdle the nebari (surface roots) and strangle the tree’s vascular system.
- Encourages fine feeder roots: Cutting back thick, coarse roots stimulates the growth of fine, hair-like feeder roots, which are far more efficient at absorbing water and nutrients.
- Maintains proportional balance: In bonsai, the root volume should be proportional to the canopy. A smaller, more efficient root system supports a more refined tree above the soil line.
- Refreshes the growing medium: Root pruning is done alongside repotting, which replaces compacted, exhausted soil with a fresh, free-draining mix.
- Improves nebari development: Strategic pruning encourages roots to spread radially, creating the flared, dramatic surface-root structure prized in mature bonsai.
Skipping root pruning does not mean the tree stays the same — it means the roots grow unchecked while the tree slowly declines.
When to Prune Cotoneaster Bonsai Roots
Timing is the single most critical factor in root pruning. Get it wrong, and you risk killing or severely stressing the tree.
Best Time: Early Spring (Before Bud Break)
The optimal window is early spring, just as the buds begin to swell but before they open. At this stage:
- The tree is breaking out of dormancy and has strong regenerative energy.
- New root growth will begin immediately after pruning, anchoring the tree quickly.
- Temperatures are mild, reducing stress from heat or cold.
- The tree has reserves from the previous growing season to support recovery.
In most temperate climates, this falls between late February and early April, depending on your local climate.
Secondary Window: Early Autumn
A secondary opportunity exists in early autumn, approximately six to eight weeks before the first expected frost. This gives roots time to establish before winter dormancy. However, spring is strongly preferred for younger trees or those being pruned aggressively.
What to Avoid
- Midsummer root pruning — heat stress compounded by root loss can be fatal.
- Late autumn or winter pruning — the tree cannot regenerate roots before a hard frost.
- Pruning a weak or recently repotted tree — wait until the tree has fully recovered and is growing vigorously.
Repotting Frequency for Cotoneaster Bonsai
| Tree Age / Stage | Repotting Interval |
|---|---|
| Young / developing (under 5 years) | Every 1–2 years |
| Maturing (5–15 years) | Every 2–3 years |
| Mature / refined (15+ years) | Every 3–5 years |
The signs that repotting is overdue include: water sitting on the surface and draining slowly, roots emerging from drainage holes, or visibly deteriorating vigor despite good watering habits.
Tools You Will Need
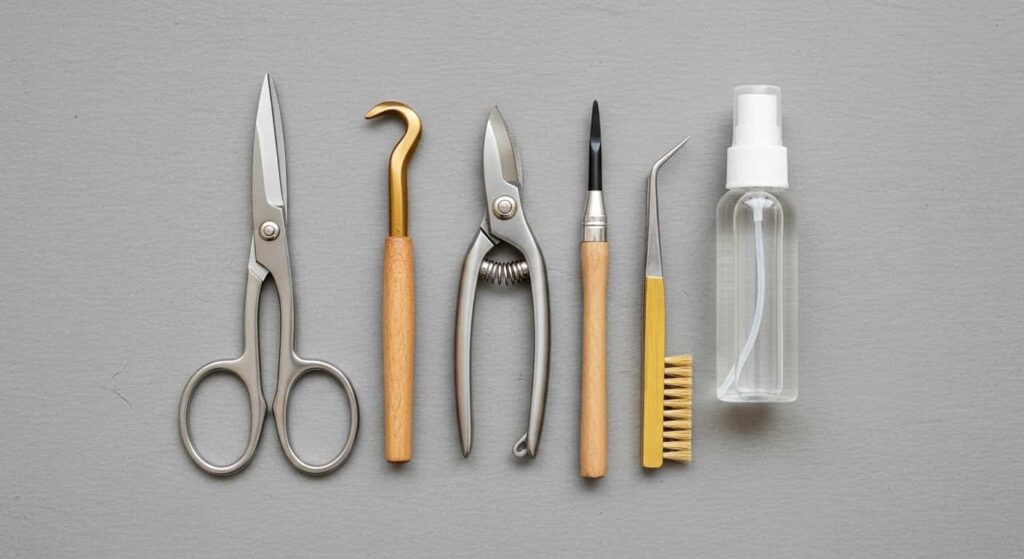
Using the right tools protects the tree and makes the job cleaner and more precise. Dull or dirty tools cause torn roots and introduce pathogens.
| Tool | Purpose |
|---|---|
| Root hook or chopstick | Loosening and untangling the root ball |
| Bonsai root scissors | Cutting fine and medium roots cleanly |
| Sharp bypass pruners | Cutting thicker roots |
| Root saw or serrated knife | Cutting very thick anchor roots |
| Tweezers | Removing old soil from between roots |
| Stiff-bristle brush | Cleaning the root surface and nebari |
| Clean work surface or turntable | Examining roots from all angles |
Sterilize all cutting tools with isopropyl alcohol (70% or higher) before use. This is non-negotiable — Cotoneaster is susceptible to fire blight and other bacterial infections that can be transferred from tool to tree.
Preparing Your Soil Mix
Never repot into the same soil you just removed. Cotoneaster bonsai thrive in a well-draining, slightly moisture-retentive mix. A commonly used blend is:
- 60% akadama (or a baked clay alternative)
- 20% pumice (improves drainage and aeration)
- 20% fine grit or decomposed granite
Younger trees in development can use a slightly richer mix with up to 30% organic content (composted bark or Japanese kiryu). Refined, older trees benefit from a leaner, faster-draining mix to keep root growth in check.
Sieve your soil to remove dust before use. Dust fills air pockets, reduces drainage, and leads to anaerobic conditions at the root level.
Step-by-Step Root Pruning Process
Step 1: Water the Tree 24–48 Hours Before
Water thoroughly one to two days before root pruning. Hydrated roots are more supple and less prone to tearing. Avoid pruning a tree that has been dry for several days.
Step 2: Remove the Tree from Its Pot
Turn the pot upside down and gently press the drainage holes to encourage the root ball to slide free. If it is stuck, run a thin spatula or root knife around the inside edge of the pot.
Avoid pulling by the trunk — this can damage fine surface roots and the nebari.
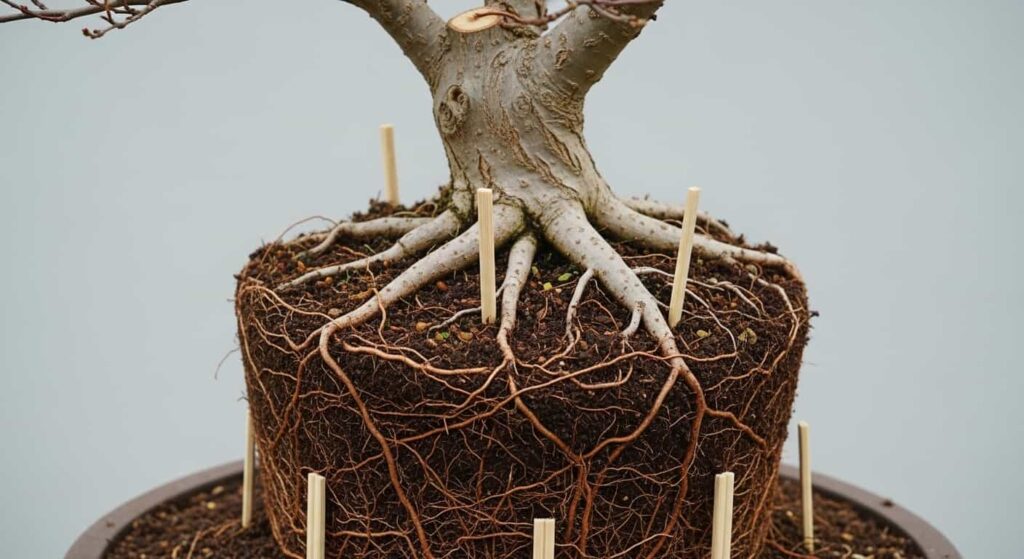
Step 3: Loosen and Examine the Root Ball
Use a root hook or chopstick to carefully tease apart the outer layer of roots. Work from the outside in, removing old soil as you go. You are looking for:
- Circling roots that are wrapping around the outside of the ball
- Crossing roots that are pressing against each other
- Thick, downward-growing anchor roots that take up disproportionate space
- Dead, blackened, or mushy roots, which indicate rot or damage
- Root girdling, where one root is pressing against another at the surface
Take your time here. Rushing leads to unnecessary root damage.
Step 4: Assess How Much to Remove
The general rule of thumb for cotoneaster bonsai is to remove no more than one-third of the total root mass in a single pruning session. For older or weaker trees, stay closer to one-quarter.
If the tree is severely pot-bound and the roots are extremely compacted, you may need to do a more gradual approach over two to three repotting cycles, removing only the worst offenders each time.
Step 5: Prune the Roots
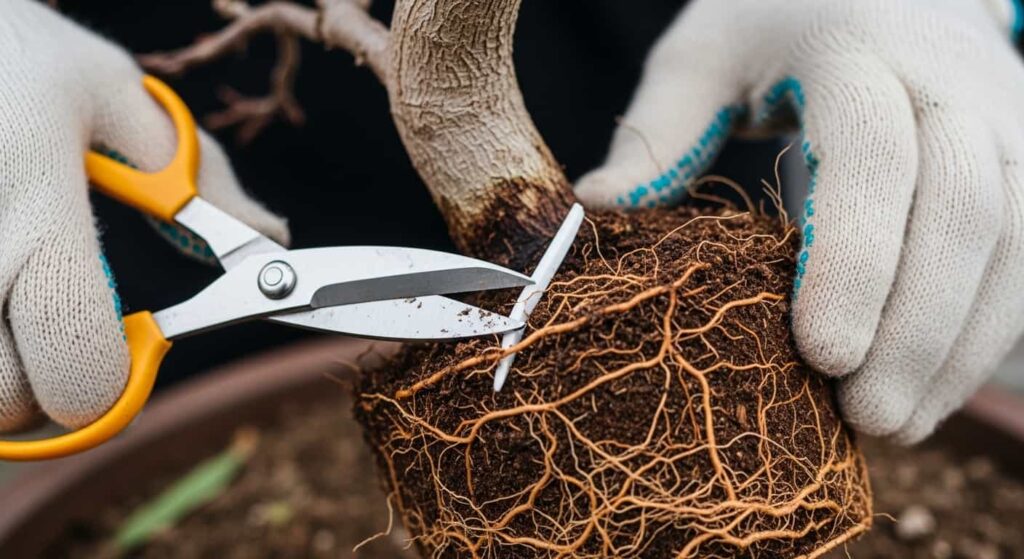
Work systematically, section by section:
- Remove all dead, rotting, or damaged roots entirely, cutting back to clean white tissue.
- Cut circling and crossing roots at the point where they begin to deviate from a radial pattern.
- Shorten thick anchor roots that are displacing the root ball downward. Cut just beyond a healthy lateral root to preserve a branch point.
- Reduce the bottom of the root ball by one-quarter to one-third to create room for new soil beneath the tree.
- Trim the sides to allow space for fresh soil around the perimeter.
Always cut cleanly in a single motion. Tearing or crushing roots invites rot and disease.
Step 6: Address the Nebari
While the roots are exposed, this is your opportunity to improve the nebari:
- Gently spread surface roots radially and remove any that cross over others at the surface.
- Remove roots growing vertically downward directly from the base of the trunk — these inhibit lateral nebari spread.
- If you wish to encourage a particular root to develop, leave it slightly longer and position it in the direction you want it to grow.
Step 7: Prepare the New Pot
Ensure the pot has adequate drainage holes. Cover each hole with a piece of drainage mesh (plastic or metal) secured with wire. This keeps soil in and pests out.
Add a thin layer of coarse grit to the bottom of the pot before adding your soil mix. This further improves drainage directly beneath the root ball.
Step 8: Position the Tree and Backfill
Place the tree in the pot, positioning it slightly off-center (toward the back and to one side) according to bonsai aesthetics. The nebari should sit at or just above the soil line.
Hold the tree in place and use a chopstick to work fresh soil down and between the roots, eliminating air pockets. Work from the outside toward the trunk. This step requires patience — air pockets around roots cause them to desiccate and die.
Step 9: Secure the Tree
Young or recently pruned trees benefit from being secured in the pot with wiring passed through the drainage holes and over the root ball. This prevents the tree from rocking in the wind, which would tear the new fine roots before they establish.
Step 10: Water Thoroughly
Once potted, water the tree thoroughly — until water runs freely and consistently from the drainage holes. This settles the soil, fills remaining air pockets, and hydrates the roots immediately.
Post-Pruning Care
The first four to six weeks after root pruning are the most critical for recovery. The tree is at its most vulnerable.
Placement After Repotting
Keep the tree in a sheltered, semi-shaded location for the first two to four weeks. Direct sun, strong wind, and extreme temperatures all stress a tree with a reduced root system.
- Avoid full sun until you see new shoots extending (not just buds opening, but actual new growth).
- Protect from frost for at least four weeks post-repotting, even if temperatures are normally safe.
- A cold frame or sheltered position against a south-facing wall works well in most climates.
Watering After Root Pruning
Water more carefully than usual. With a reduced root mass, the tree takes up water more slowly. Overwatering now is more dangerous than underwatering.
- Water when the top centimeter of soil begins to dry out.
- Avoid letting the soil become completely dry.
- Use a fine-rose watering can or misting head to avoid washing soil away from exposed roots.
Fertilizing After Root Pruning
Do not fertilize for the first four to six weeks after root pruning. The damaged root system cannot process nitrogen efficiently, and fertilizing too early can cause chemical burn and further stress.
Once new growth is clearly extending, introduce a balanced, low-nitrogen fertilizer at half strength. Gradually move to a standard fertilizing schedule as the growing season progresses.
Signs of Healthy Recovery
- Buds opening and extending within two to four weeks of repotting
- Leaves unfurling with normal color (mid-green, not yellow or bronze)
- Steady new shoot extension through spring
- No signs of wilting when watering is consistent
Warning Signs to Watch For
| Sign | Likely Cause | Action |
|---|---|---|
| Wilting despite watering | Severe root damage or rot | Check roots, improve drainage |
| Yellow leaves | Overwatering or nitrogen deficiency (too early to fertilize) | Adjust watering; wait to fertilize |
| No bud break after 4–6 weeks | Tree too cold, or root damage too severe | White mold on the soil surface |
| White mold on soil surface | Fungal growth from overwatering | Reduce watering, improve airflow |
| Drooping with dry soil | Roots not yet re-established | Mist foliage; water carefully |
Common Root Pruning Mistakes to Avoid
Removing Too Much at Once
The most common and damaging mistake. Removing more than one-third of the root mass in a single session leaves the tree without sufficient uptake capacity. The canopy wilts, the tree enters survival mode, and recovery can take an entire growing season.
Pruning at the Wrong Time
Root pruning in summer or late autumn creates an imbalance that the tree cannot easily recover from. Always aim for early spring or, secondarily, early autumn.
Using Dirty or Blunt Tools
Blunt tools crush rather than cut, leaving ragged wounds that take longer to callous and are more vulnerable to infection. Dirty tools carry pathogens directly into fresh cuts.
Skipping Soil Replacement
Repotting into the same old soil negates most of the benefit of root pruning. Old soil compacts, loses drainage capacity, and is depleted of beneficial microbial activity. Always use a fresh mix.
Neglecting Post-Pruning Placement
Putting a freshly repotted cotoneaster back in full sun or a windy spot causes unnecessary water stress at exactly the moment the tree is least equipped to handle it.
Ignoring the Nebari
Root pruning sessions are the ideal time to address nebari development. Neglecting this over successive repotting results in an imbalanced, underdeveloped surface root structure that is difficult to correct later.
Special Considerations for Cotoneaster Species
Cotoneaster horizontalis
The most commonly used species for bonsai, C. horizontalis, produces a distinctive herringbone branching pattern that mirrors its root structure. Roots tend to spread laterally and widely, making it especially important to remove downward-growing anchor roots early in development to encourage a broad, flat root base.
Cotoneaster microphyllus
Smaller leaves and a more compact root system than C. horizontalis. Roots are finer overall, making aggressive root pruning less necessary but more precise. Root scissors are preferable to pruners for most work on this species.
Cotoneaster dammeri
A creeping species occasionally used for informal or literary styles. The root system is shallower than that of other cotoneasters, so extra care is needed when reducing the bottom of the root ball.
Long-Term Root Development Strategy
Root pruning is not a one-time corrective procedure — it is part of an ongoing development strategy. Over years of consistent repotting and root work, you are building toward:
- A wide, radial surface root spread (nebari) that mirrors the canopy spread above
- A dense, fine feeder root system close to the base of the trunk
- A compact, manageable root ball that fits a progressively smaller and more refined pot
- A tree in perfect balance between root volume and canopy volume
Each repotting session is a small step toward this long-term goal. Keep records of what you observe each time — root health, growth since the last repotting, soil condition — and use that information to guide each successive session.
Frequently Asked Questions
Can I root-prune a cotoneaster bonsai that has never been repotted before?
Yes, but assess the root system carefully before committing to heavy pruning. A severely neglected tree may need a gentler initial approach over two or three repotting cycles.
My cotoneaster roots are black and mushy in one section. What should I do?
Cut back to clean, white, healthy root tissue. Remove all diseased material. Dust cuts with powdered sulfur or apply a dilute fungicide solution. Improve drainage in the new potting mix and water more carefully going forward.
How do I know if my cotoneaster is old enough to root prune?
Any healthy cotoneaster in a pot can be root pruned. Age is less relevant than the health of the tree and the condition of the root system.
Should I prune roots and branches at the same time?
This is debated among practitioners. In general, it is safest to do light branch pruning at the same time as root pruning, but to avoid heavy branch removal simultaneously. Reducing both the root system and the canopy in one session can overstress the tree. Major branch work is better completed in autumn or early winter, ahead of spring root pruning.
My cotoneaster lost most of its leaves after repotting. Is this normal?
Some leaf drop after root pruning is normal and not necessarily a sign of serious distress. As long as the buds are still plump and the twigs remain flexible (not brittle), the tree is likely to recover. Keep it in a sheltered position, water carefully, and wait.
Conclusion
Root pruning is one of the most important skills in cotoneaster bonsai cultivation — and one of the most neglected. Done correctly, at the right time, with sharp tools and good aftercare, it transforms a pot-bound, struggling tree into a vigorous, well-structured specimen. Done poorly, it can set a tree back by years.
The principles are straightforward: prune in early spring, remove no more than one-third of the roots, use sterile tools, repot into fresh soil, and protect the tree during recovery. Follow these principles consistently over years of cultivation, and your cotoneaster bonsai will reward you with strong health, refined structure, and the seasonal spectacle of berries and flowers that makes this species so beloved.