
Last Updated on March 16, 2026 by Indoor Plant Nook
A Japanese maple bonsai with weak roots is a beautiful tree living on borrowed time. No matter how refined the canopy or elegant the nebari, everything above the soil depends entirely on what happens below it. Root care is not a once-a-year task — it is the foundation of long-term bonsai health.
This guide covers every aspect of Japanese maple (Acer palmatum) root care: understanding root biology, recognizing problems early, pruning with precision, repotting at the right time, and building the ideal soil environment. Whether you are caring for your first bonsai or refining decades of practice, this is your definitive reference.
1. Why Root Care Is Critical for Japanese Maple Bonsai
Japanese maples are beloved for their delicate, palmate leaves, vivid seasonal color, and graceful branching. But these aesthetic qualities are only possible when the root system is functioning well.
Roots perform three essential jobs:
- Anchoring the tree and stabilizing it in the pot
- Absorbing water and dissolved nutrients from the soil
- Storing carbohydrates that fuel spring growth and recovery from stress
In a bonsai container, roots are confined to a small volume of soil. Unlike their counterparts in open ground, they cannot extend outward to find water or nutrients. This means the bonsai practitioner must actively manage the root environment — pruning congested roots, refreshing exhausted soil, and maintaining optimal drainage — to compensate for what nature would otherwise handle automatically.
Neglecting root care leads to a predictable cascade: root-bound pots starve the tree of oxygen; waterlogged soil invites fungal rot; compacted fine roots die back and reduce the tree’s ability to support its canopy. Consistent root care, by contrast, keeps a Japanese maple bonsai vigorous for generations.
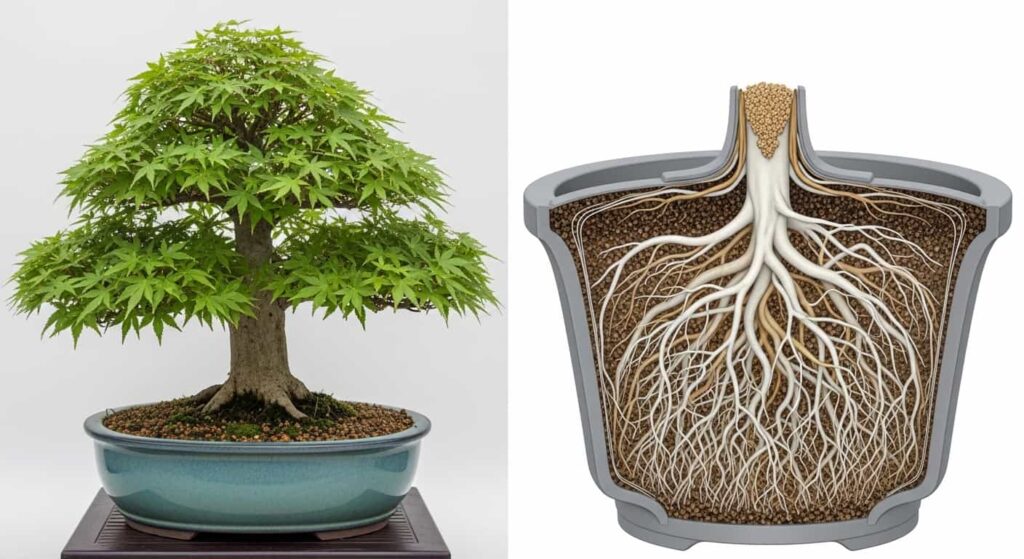
2. Understanding Japanese Maple Root Structure
To care for roots intelligently, you need to understand what they look like and how they function.
Structural (Primary) Roots
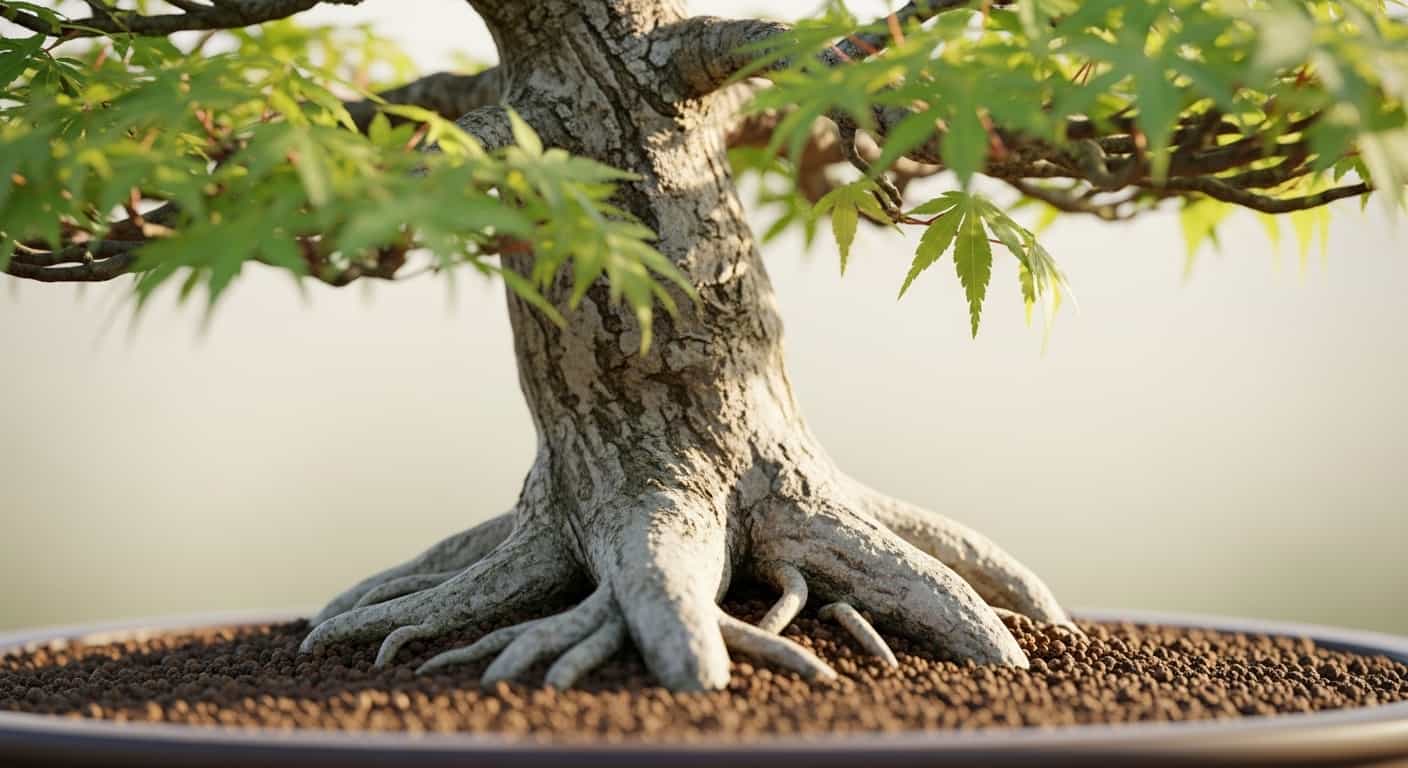
These are the thick, woody roots that radiate from the base of the trunk. In mature bonsai, they become the nebari — the visible surface roots that contribute to the tree’s sense of age and stability. Structural roots anchor the tree and transport water and nutrients through their vascular tissue.
Feeder (Fine) Roots
Feeder roots are the thin, hair-like roots that branch from structural roots. These are the tree’s primary absorptive organs. They are short-lived — most die and are replaced within weeks — and extremely sensitive to waterlogging, drought, and soil compaction.
In a bonsai container, the majority of your active horticultural work targets feeder roots: encouraging their development, preventing overcrowding, and maintaining the soil conditions they need to thrive.
Root Hairs
At the very tips of feeder roots are microscopic root hairs — single-cell extensions that dramatically increase surface area for water and mineral absorption. Root hairs are destroyed by rough handling and dry out within minutes of air exposure, which is why speed and moisture management during repotting are so important.
Mycorrhizal Associations
Japanese maples form beneficial relationships with mycorrhizal fungi in the soil. These fungi extend the effective reach of the root system, improving access to phosphorus and water. Healthy, living soil supports these associations; sterilized or chemically exhausted soil does not. This is one reason experienced bonsai practitioners retain a small amount of old soil when repotting.
3. Signs Your Japanese Maple Bonsai Needs Root Attention
Early detection prevents serious damage. Watch for these warning signs throughout the growing season.
Roots Escaping the Drainage Holes
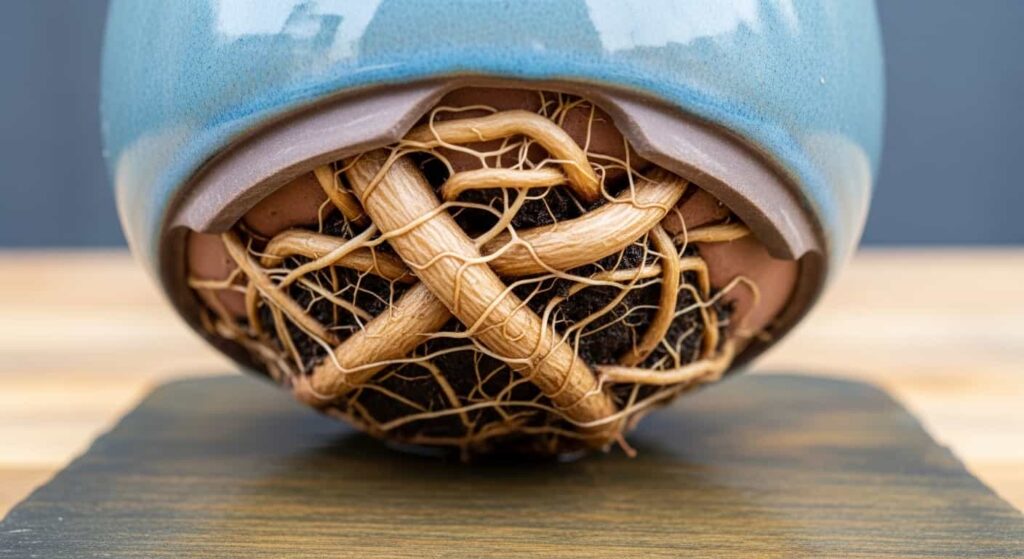
When roots emerge from the bottom of the pot and circle the drainage holes, the tree is telling you it has run out of room. This is one of the clearest indicators that repotting is overdue.
Soil Drying Out Unusually Fast
A root-bound pot is so densely filled with roots that it holds very little soil — and therefore very little water. If you find yourself watering twice a day in conditions that previously required once-daily watering, the root-to-soil ratio has tipped too far.
Lifting Out of the Pot
A severely root-bound Japanese maple can become almost impossible to push down into its pot. If the rootball rises when you press on the soil surface, the roots are pushing upward from beneath.
Yellowing, Wilting, or Stunted Leaves
Poor root function reduces the tree’s ability to supply water and nutrients to the canopy. Yellowing between leaf veins (interveinal chlorosis), general leaf wilting despite moist soil, and unusually small or stunted new growth all suggest compromised root health.
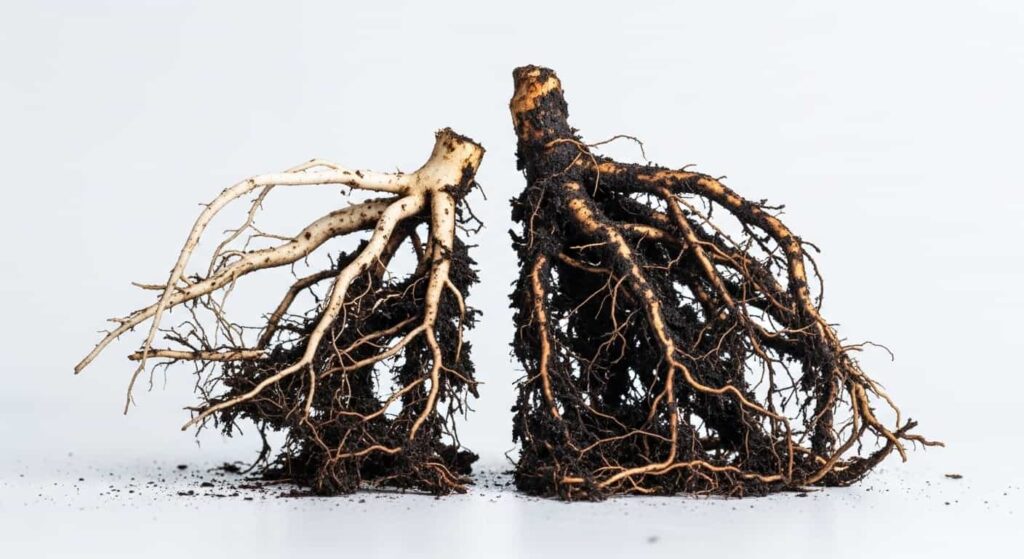
Mushy or Blackened Roots
If you investigate and find roots that are soft, dark, and foul-smelling, root rot is likely present. Healthy Japanese maple roots are firm and range from creamy white (young feeder roots) to tan or light brown (older structural roots).
4. When to Repot a Japanese Maple Bonsai
Timing is one of the most important variables in bonsai root work. Repotting at the wrong time weakens the tree; done correctly, it is a rejuvenating procedure.
The Optimal Window: Early Spring
The best time to repot a Japanese maple bonsai is in early spring, just as the buds begin to swell but before they break open into leaf. At this stage:
- The tree is coming out of dormancy and metabolically active
- Root regeneration capacity is at its peak
- The canopy has not yet leafed out, so the tree places minimal demand on damaged roots during recovery
- Cooler temperatures reduce stress and the risk of fungal infection
In most temperate climates, this window falls roughly between late February and early April, depending on local conditions and the year’s weather.
Repotting Frequency by Tree Age
| Tree Age / Stage | Repotting Frequency |
|---|---|
| Young trees in development | Every 1–2 years |
| Established shohin and medium bonsai | Every 2–3 years |
| Mature, refined specimens | Every 3–5 years |
These are guidelines, not rules. Always assess the tree’s actual root condition rather than following a fixed schedule. A vigorous young tree may need annual repotting; a slow-growing older specimen may be fine for five or more years.
Avoid Repotting During These Times
- Midsummer: Heat stress combined with root disturbance can be fatal
- Late autumn/early winter: The tree cannot regenerate roots before dormancy
- During or immediately after a disease episode: The tree lacks the reserves to recover from both problems simultaneously
- When the tree is already stressed: A weakened tree should recover before being subjected to root work
5. Root Pruning: Step-by-Step
Root pruning is both a maintenance technique and an art form in bonsai practice. Done thoughtfully, it rejuvenates the root system, improves the nebari, and keeps the tree in balance with its container.
Tools and Materials
Before you begin, gather everything you need so the roots are never left exposed and drying:
- Sharp, clean bonsai root scissors or pruning shears
- Root hook or chopstick for untangling
- Spray bottle with water to keep roots moist
- Pre-mixed, fresh bonsai soil
- Clean bonsai pot (or the existing pot, cleaned and disinfected)
- Drainage mesh cut to fit the pot holes
- Anchor wire (if re-securing the tree)
- Fungicide powder (optional, for large cuts)
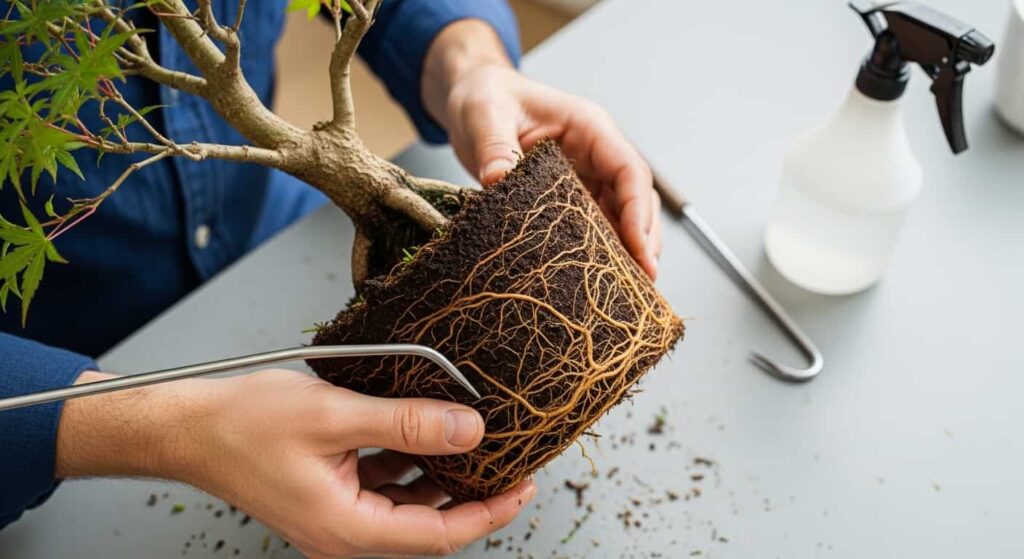
Step 1: Remove the Tree from the Pot
Work gently. Run a root hook around the inside edge of the pot to loosen the rootball. Tip the pot at an angle and ease the tree out; never yank or force it. If the tree is severely root-bound, you may need to use a chopstick or root hook to work the rootball free from all sides.
Step 2: Remove Old Soil
Use a root hook or chopstick to tease old soil away from the roots, working from the outside inward. Work methodically and keep a spray bottle nearby to mist the roots periodically. Your goal is to expose the root structure clearly without tearing feeder roots unnecessarily.
You do not need to remove every particle of old soil. Retaining 10–20% of the original soil preserves beneficial microbial communities, including mycorrhizal fungi.
Step 3: Assess the Root System
Before cutting anything, take a moment to evaluate what you have:
- Identify the primary structural roots and their direction
- Note any roots that are circling (pot-bound roots)
- Look for dead, diseased, or damaged roots (dark, soft, or hollow)
- Identify the roots contributing to nebari development
Step 4: Prune the Roots
Use the following principles to guide your cutting:
- Remove dead and diseased roots first. Cut back to healthy tissue, which appears white or light tan in cross-section.
- Remove circling roots. These will eventually girdle the tree if left unchecked.
- Shorten excessively long roots. A root that has doubled back on itself or grown far past the container wall should be shortened.
- Thin congested root masses. Where fine roots have matted into a dense pad, thin them so air and water can penetrate.
- Preserve the nebari roots. Roots radiating horizontally near the soil surface form the visible nebari — protect these.
- Never remove more than one-third of the total root mass in a single session. Removing too much at once shocks the tree and limits its capacity to support the canopy.
Make clean cuts. Torn or crushed root ends are slower to heal and more vulnerable to infection. Large cuts can be dusted with sulfur or a bonsai-specific fungicide powder.
Step 5: Repot in Fresh Soil
Place drainage mesh over the pot holes. Add a layer of coarse drainage material (such as akadama or pumice) to the bottom of the pot. Position the tree, checking front angle and tilt. Fill with fresh soil mix, working it carefully into the spaces between roots using a chopstick.
Secure the tree with anchor wire threaded through the drainage holes if needed — a tree that moves in the pot cannot regenerate roots effectively.
Step 6: Water Thoroughly and Provide Aftercare
Water the repotted tree slowly and thoroughly until water runs freely from the drainage holes. Place it in a sheltered location out of direct wind and strong afternoon sun for two to four weeks. The tree is most vulnerable during this recovery period.
Avoid fertilizing for at least four to six weeks after repotting. New feeder roots are tender and easily burned by concentrated nutrients.
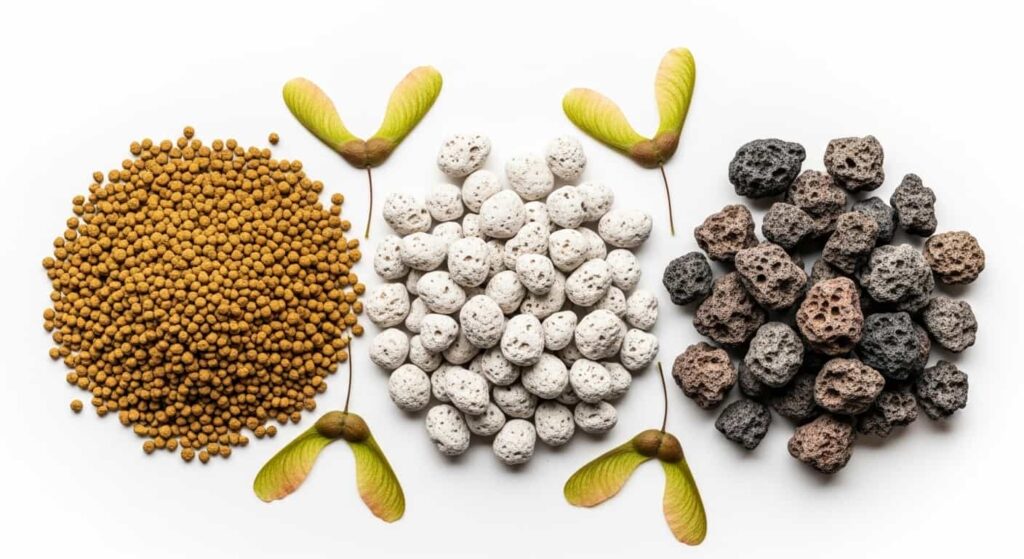
6. The Ideal Soil Mix for Japanese Maple Bonsai
Soil is the environment your roots live in. The right mix balances water retention, drainage, aeration, and long-term structural stability.
The Three-Part Framework
Most experienced practitioners work with three categories of component:
Akadama — A fired Japanese clay that retains moisture and nutrients, breaks down gradually over time, and supports fine root development. It is the cornerstone of most Japanese maple mixes.
Pumice — A volcanic mineral that drains freely, resists compaction, and lasts indefinitely in the pot. Pumice improves aeration and prevents the mix from becoming waterlogged.
Lava rock (or grit) — Another inorganic component that adds drainage, structural stability, and long-term durability to the mix.
Recommended Ratios
| Climate / Growing Condition | Mix Ratio |
|---|---|
| Humid climates (UK, Pacific Northwest, etc.) | 1:1:1 Akadama : Pumice : Lava Rock |
| Temperate climates | 2:1:1 Akadama : Pumice : Lava Rock |
| Hot, dry climates | 3:1:1 Akadama : Pumice : Lava Rock |
These ratios favor more akadama in drier conditions to retain moisture longer, and less in humid conditions to improve drainage and prevent rot.
Particle Size
Use particles in the 2–6mm range for most bonsai containers. Finer particles compact over time and restrict aeration; coarser particles hold too little water for fine feeder roots.
What to Avoid
- Pure organic mixes (bark, peat, compost): These compact over time, retain too much moisture, and break down into anaerobic layers that suffocate roots.
- Garden soil or potting compost: Too dense, too water-retentive, and completely unsuitable for bonsai culture.
- Kiryuzuna alone: While useful in some contexts, it breaks down too quickly for long-term use without other components.
7. Watering and Root Health
No aspect of day-to-day bonsai care has a greater effect on root health than watering. Both overwatering and underwatering are harmful; learning to read your tree is essential.
The Correct Watering Approach
Water thoroughly — enough that water drains freely from the bottom of the pot — and then allow the surface of the soil to begin drying before watering again. In practice, this means:
- Checking soil moisture by pressing a finger 1–2cm into the soil surface
- Watering when the surface is approaching dryness, but before the roots become fully dry
- Never following a rigid schedule that ignores actual soil conditions
Factors That Affect Watering Frequency
- Temperature: Hotter weather means faster evaporation and more frequent watering
- Pot size: Smaller pots dry out faster than larger ones
- Season: Active growth in spring and summer demands more water than winter dormancy
- Soil mix: Coarser, more inorganic mixes drain faster and dry faster
- Tree vigor: A vigorous, leafy tree transpires more water than a recently pruned or recovering tree
Watering Technique
Use a fine-rose watering can or a hose with a gentle rose attachment. Water the entire soil surface, not just the center. Allow the water to drain, then water again. Two passes ensures even saturation throughout the rootball.
Avoid overhead watering that force-splashes soil out of the pot, as this can expose and damage surface roots.
8. Root Rot: Identification, Treatment, and Prevention
Root rot is one of the most serious threats to Japanese maple bonsai. It is caused by waterlogging that creates anaerobic conditions in the soil, enabling pathogenic fungi (Phytophthora, Pythium, and Fusarium species are the most common culprits) to colonize and destroy root tissue.
Identifying Root Rot
- Roots appear dark brown, black, gray, or mushy rather than white or tan
- Affected roots have a foul, rotten smell
- Tissue is soft and falls apart when touched rather than being firm
- Black discoloration may travel up into the lower trunk in severe cases
Treatment Protocol
Act quickly. Root rot spreads rapidly in warm, wet conditions.
- Remove the tree from its pot immediately
- Wash the entire rootball gently with clean water to expose the roots
- Cut back all affected roots to clean, healthy white tissue using sterilized scissors
- Rinse the exposed roots with a diluted fungicide solution
- Allow the roots to dry slightly in open air for 30–60 minutes (no more)
- Repot in fresh, fast-draining soil in a clean pot
- Withhold heavy watering for one week; mist the roots gently instead
- Move the tree to a sheltered position with good air circulation
Prevention
Prevention is far easier than treatment:
- Use a well-draining inorganic soil mix
- Ensure drainage holes are large and unobstructed
- Never allow the pot to sit in standing water
- Avoid overwatering, particularly during cool, cloudy weather when evaporation is slow
- Repot on schedule before roots become so densely packed that drainage is impeded
- Ensure adequate air circulation around the pot
9. Developing Nebari (Surface Roots)
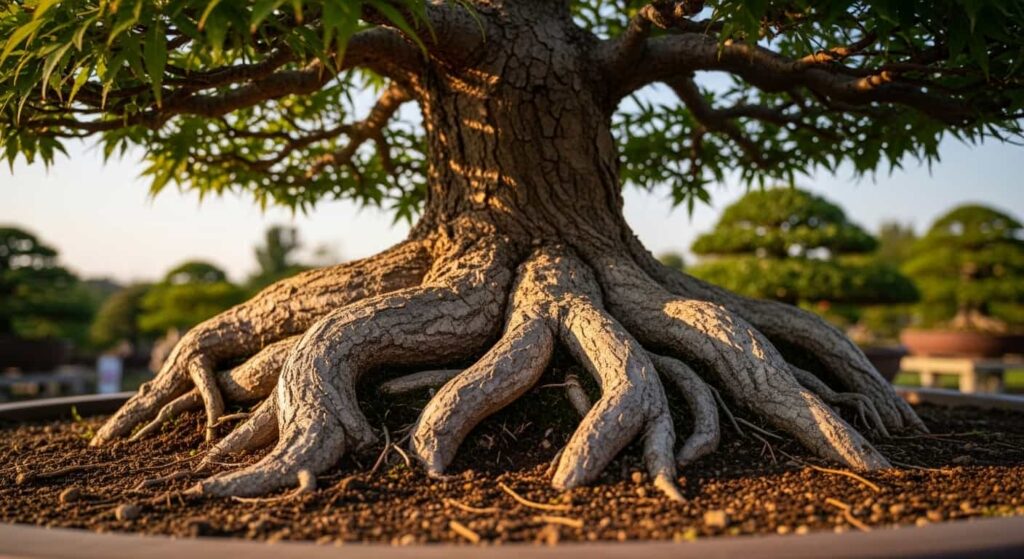
The nebari — the radiating surface roots visible at the base of a bonsai — is one of the most admired features of a mature tree. In Japanese maple bonsai, a well-developed nebari adds immensely to the sense of age, stability, and natural dignity.
What Makes a Good Nebari
- Roots radiate evenly in all directions from the base of the trunk
- Roots are clearly visible at or just above the soil surface
- Individual roots are distinct, not fused into a single mass
- Root distribution is balanced, with no large gaps or clustering on one side only
Techniques for Improving Nebari
Root combing during repotting: Each time you repot, use a root hook to gently spread surface roots outward and downward. Encourage them to radiate horizontally rather than growing straight down.
Flat potting: Repot the tree into a wide, shallow pot. This encourages roots to spread laterally rather than circling the base.
Tourniquet wire: A thin wire wound once around the trunk base, just below the soil, creates a slight constriction that encourages roots to flare outward above the wire. Remove the wire before it cuts into the bark — typically after one or two growing seasons.
Air layering: For trees with poor lower trunk and root development, air layering can create an entirely new rootball at a point on the trunk where the nebari would be ideally positioned.
Selective root pruning: During repotting, shorten downward-growing roots to redirect the tree’s energy into lateral surface roots.
Patience
Nebari development is a multi-decade project on older trees. Each repotting is an opportunity to make small improvements that compound over years. Do not rush this process or attempt drastic interventions that stress the tree.
10. Seasonal Root Care Calendar
Root care is not confined to the repotting table. Roots require attention — and respond to different interventions — across all four seasons.
Spring (March–May)
- Primary repotting and root pruning season — act as buds begin to swell
- Begin regular watering as temperatures rise
- Apply a balanced, slow-release fertilizer once new leaves have fully emerged (4–6 weeks after repotting)
- Monitor recovering trees closely for signs of stress
Summer (June–August)
- Water daily or twice daily in hot weather; check soil moisture morning and evening
- Avoid root disturbance — roots are actively growing and feeding the canopy
- Provide afternoon shade in temperatures above 32°C (90°F) to reduce water stress
- Watch for signs of root rot during prolonged wet weather
Autumn (September–November)
- Reduce watering frequency as temperatures fall and transpiration slows
- Apply a low-nitrogen, high-potassium fertilizer to harden growth and build root reserves for winter
- Do not repot — the tree needs this period to consolidate root growth before dormancy
Winter (December–February)
- Protect the rootball from hard freezing — roots in containers are more vulnerable than in-ground roots
- Water sparingly; the tree is dormant and water uptake is minimal, but roots must never dry out completely
- Inspect the pot for cracking; frozen, saturated soil expands and can split ceramic or unglazed pots
- Begin planning repotting work for early spring
11. Common Root Care Mistakes to Avoid
Even experienced bonsai practitioners make these errors. Knowing them in advance saves your tree.
Repotting in summer or autumn. The two windows to avoid at nearly all costs. Summer heat combined with root disturbance is brutal; autumn repotting leaves no time for root regeneration before dormancy.
Removing too much of the root system at once. The one-third rule exists for a reason. Over-pruning leaves the tree unable to support its canopy and vulnerable to environmental stress.
Using garden soil or potting compost. These are not bonsai soils. They compact, waterlog, and encourage root rot. There is no substitute for a proper bonsai mix.
Letting roots dry out during repotting. Root hairs die within minutes of air exposure. Keep a spray bottle nearby and work quickly.
Failing to secure the tree after repotting. A tree that rocks in its pot cannot regenerate roots effectively. Always wire-secure the tree firmly.
Over-fertilizing immediately after repotting. Fresh, healing root tissue burns easily. Wait four to six weeks before resuming fertilization.
Ignoring drainage hole blockage. Blocked drainage holes turn a well-draining soil mix into a swamp. Check them at every watering.
Pot-bound trees left too long. Severely root-bound trees are harder to rescue than mildly root-bound ones. Stick to your repotting schedule.
12. Frequently Asked Questions
How do I know if my Japanese maple bonsai is root-bound?
Lift the tree slightly from the pot — if the entire soil mass moves as one rigid unit, or if roots are visibly emerging from drainage holes, the tree is root-bound and needs repotting.
Can I repot a Japanese maple in autumn?
It is not recommended. Autumn repotting leaves the tree with insufficient time to regenerate roots before winter dormancy. Early spring, just before budbreak, is the ideal window.
How much root can I safely remove?
As a general rule, remove no more than one-third of the total root mass in a single repotting session. For a stressed or weakened tree, remove even less.
Should I use mycorrhizal inoculant when repotting?
Some practitioners do, particularly when repotting into completely fresh soil that has no existing fungal community. Retaining a small amount of old soil achieves a similar result and is usually sufficient.
My Japanese maple has root rot. Can it survive?
Yes, if caught early and treated promptly. Remove all diseased tissue, treat with fungicide, repot in fast-draining soil, and provide a careful recovery environment. The prognosis worsens significantly the longer rot is left untreated.
How often should I fertilize after repotting?
Wait at least four to six weeks before applying any fertilizer. When you do resume, start with a half-strength application to avoid burning newly regenerated roots.
What is the best pot for Japanese maple bonsai root health?
Unglazed ceramic pots with multiple drainage holes promote the best root health. They allow slight gas exchange through the pot walls, drain freely, and their weight provides stability. Avoid glazed pots for trees in active development — glaze restricts gas exchange.
Final Thoughts
The roots of your Japanese maple bonsai are invisible, but they determine everything you can see. A disciplined approach to root care — repotting at the right time, pruning with intention, building the right soil environment, and watering intelligently — creates the conditions for a tree that thrives year after year.
The investment is not large in terms of time. A repotting session takes a few hours every few years. But the difference between a tree managed with root care awareness and one that is neglected below the soil surface is dramatic, and becomes more apparent with every passing decade.
Give the roots the attention they deserve, and the Japanese maple will reward you with decades of beauty.