

Last Updated on March 18, 2026 by Indoor Plant Nook
Repotting your bonsai after root pruning is one of the most critical — and most misunderstood — steps in bonsai care. Do it right, and your tree bounces back stronger than ever. Do it wrong, and weeks of careful pruning work can unravel overnight.
This guide walks you through everything: when to repot, how to prepare your soil and pot, the repotting process itself, and how to nurse your tree back to full health afterward.
Why Repotting After Root Pruning Matters
Root pruning and repotting go hand in hand. When you prune a bonsai’s roots, you remove a significant portion of the tree’s nutrient and water absorption system. The fresh soil you introduce during repotting gives those newly cut roots a clean, well-draining medium to regenerate in — one free of the compacted, nutrient-depleted mix that slowed growth in the first place.
Skipping repotting after root pruning — or doing it in the wrong soil — forces your bonsai to heal in a compromised environment, increasing stress and the risk of root rot.
When to Repot a Bonsai After Root Pruning
Timing is everything. The best window for repotting after root pruning is early spring, just before the tree breaks dormancy. At this point, the tree’s energy reserves are intact, but it hasn’t yet pushed new growth — meaning the stress of transplanting is minimized, and new roots can establish quickly once growth begins.
General repotting frequency by tree age:
| Tree Age | Repotting Interval |
|---|---|
| Young trees (under 5 years) | Every 1–2 years |
| Maturing trees (5–10 years) | Every 2–3 years |
| Mature/established trees | Every 3–5 years |
Signs that your bonsai is ready for repotting, even outside the normal schedule:
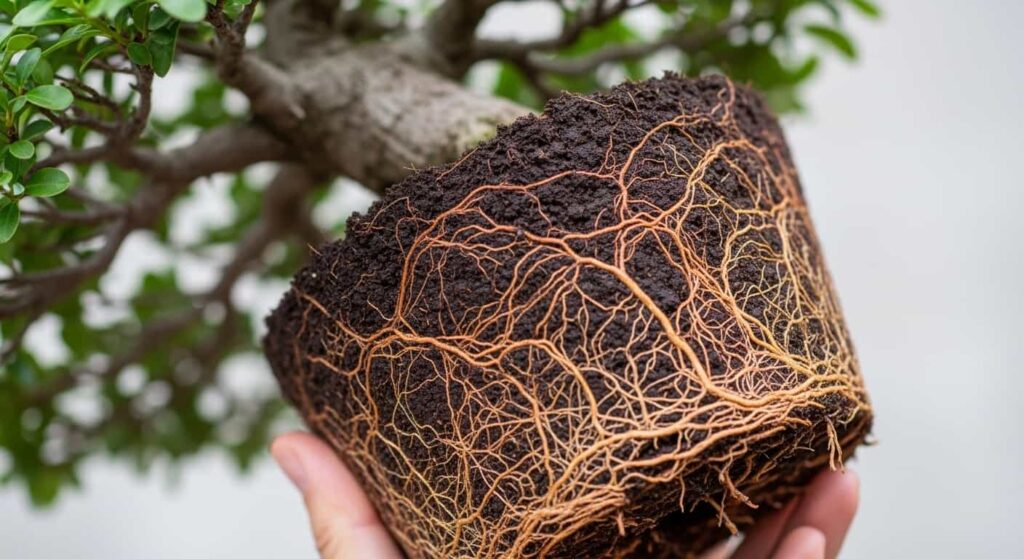
- Roots circling the base of the pot or escaping from drainage holes
- Water drains unusually slowly or pools on the surface
- The root ball lifts cleanly out of the pot in one solid mass
- Stunted or yellowing foliage despite proper watering
Tools and Materials You’ll Need
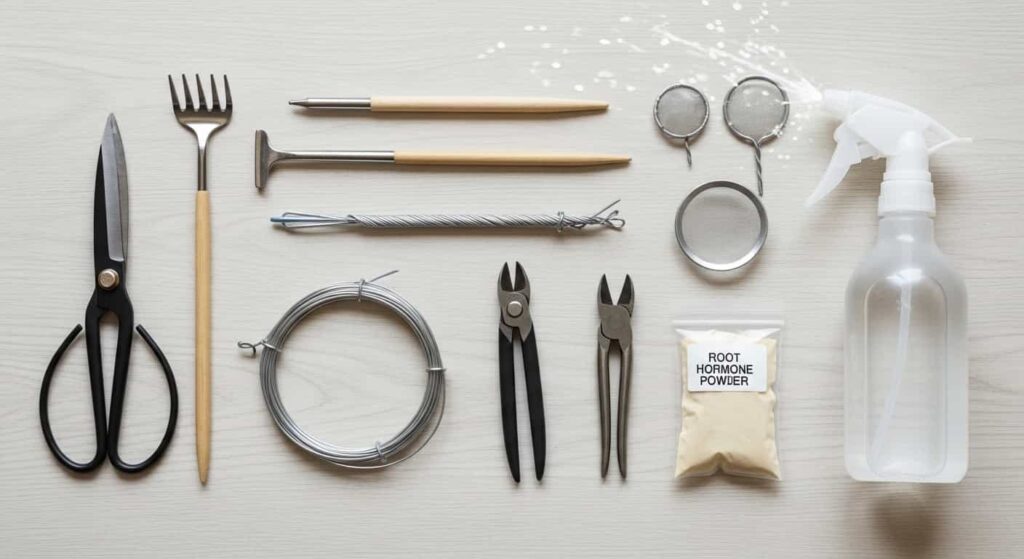
Gather everything before you begin. Working quickly after root pruning reduces the time roots are exposed to air.
- Bonsai soil mix (species-appropriate — see below)
- New or cleaned pot with adequate drainage holes
- Mesh screens to cover drainage holes
- Anchor wire (aluminum, 2–2.5 mm)
- Root rake or chopstick
- Sharp, sterilized bonsai scissors or shears
- Wire cutters
- A clean workspace — a table covered with newspaper works well
- Spray bottle filled with water
- Rooting hormone powder (optional but beneficial)
Choosing the Right Bonsai Soil After Root Pruning
Freshly pruned roots are vulnerable. The wrong soil — too dense, too moisture-retentive — can suffocate new root growth and invite fungal rot.
The ideal bonsai repotting soil must:
- Drain freely and do not retain standing moisture
- Hold enough moisture between waterings
- Allow oxygen to reach the roots
- Provide a stable structure for roots to grip
Recommended soil mixes by species type:
Deciduous Trees (Maple, Elm, Oak)
- 50% Akadama
- 30% Pumice
- 20% Lava rock
Coniferous Trees (Pine, Juniper, Spruce)
- 33% Akadama
- 33% Pumice
- 33% Lava rock
Tropical/Subtropical Trees (Ficus, Jade, Fukien Tea)
- 60% Akadama
- 20% Pumice
- 20% Organic compost or fine bark
Avoid regular potting soil. It retains too much moisture, compacts over time, and deprives roots of the oxygen they need to recover after pruning.
Step-by-Step: How to Repot a Bonsai After Root Pruning
Step 1: Prepare the New Pot
Clean your pot thoroughly with hot water — no soap residue. Cover each drainage hole with a mesh screen, securing it with a short loop of wire bent into a U-shape pressed through the hole from the inside.
Thread your anchor wires (two lengths) up through the drainage holes so the ends extend above the pot’s rim. You’ll use these to secure the root ball after planting.
Step 2: Add a Base Layer of Soil
Place a thin layer of coarser grit or lava rock at the bottom of the pot for added drainage, then add your prepared bonsai soil mix on top — enough to support the tree at your desired height. Create a small central mound where the root base will sit; this prevents air pockets from forming under the root ball.
Step 3: Remove the Tree and Prune the Roots
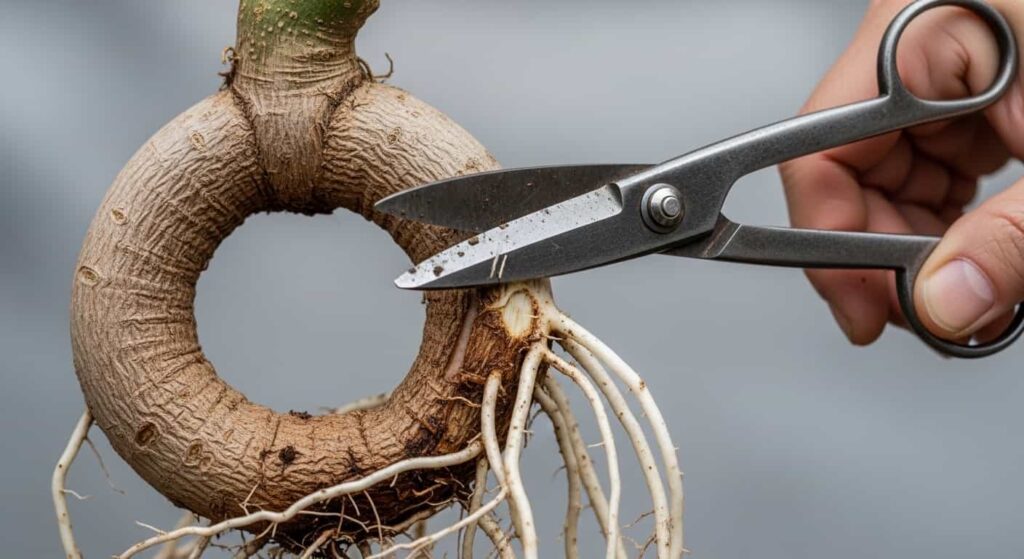
If you haven’t yet pruned the roots, now is the time:
- Gently ease the tree out of its old pot. If it’s stuck, run a root hook or chopstick around the inner edge.
- Use a root rake or chopstick to gently tease away old soil from the root ball, working from the outside in. Don’t rush — aggressive raking tears fine feeder roots.
- With sterilized scissors, cut back thick, circling, or downward-growing roots. Aim to remove no more than one-third of the total root mass in a single session.
- Trim any dead, black, or mushy roots back to healthy white tissue.
- Lightly mist the exposed roots with water to prevent them from drying out while you work.
Tip: If using rooting hormone, dust the cut root ends lightly before placing the tree in its new pot.
Step 4: Position the Tree
Place the tree on the soil mound. The nebari (surface roots and base flare) should sit just at or slightly above the pot rim — not buried. Adjust the soil height beneath the root ball until you achieve your desired front and angle.
Step back and check the positioning from multiple angles. The best time to adjust is now, not after you’ve wired it in.
Step 5: Secure the Tree with Anchor Wire
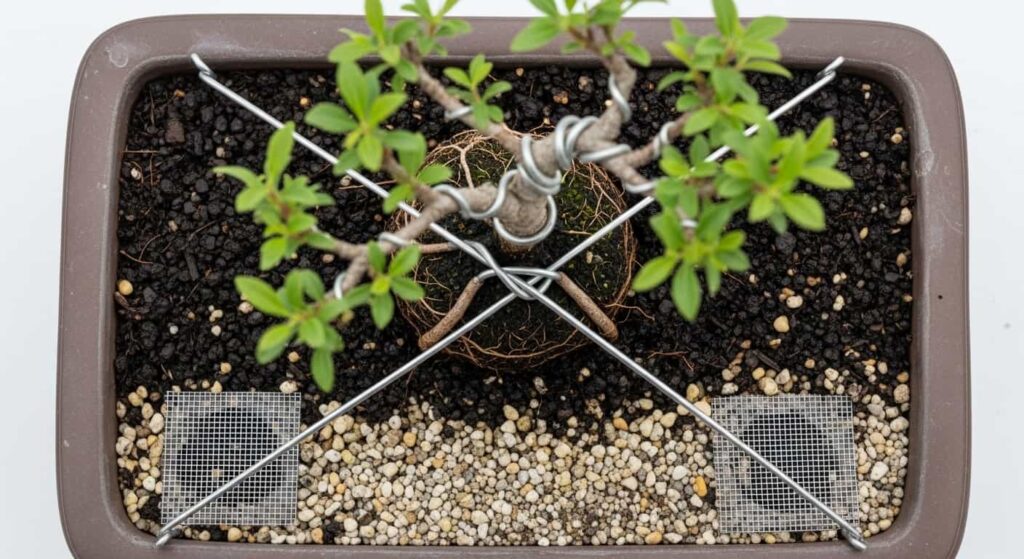
Cross the anchor wires over the root ball and twist them together firmly using wire cutters or pliers. The tree should feel stable with no rocking. Avoid over-tightening — you don’t want the wires cutting into roots.
Step 6: Fill with Soil and Work Out Air Pockets
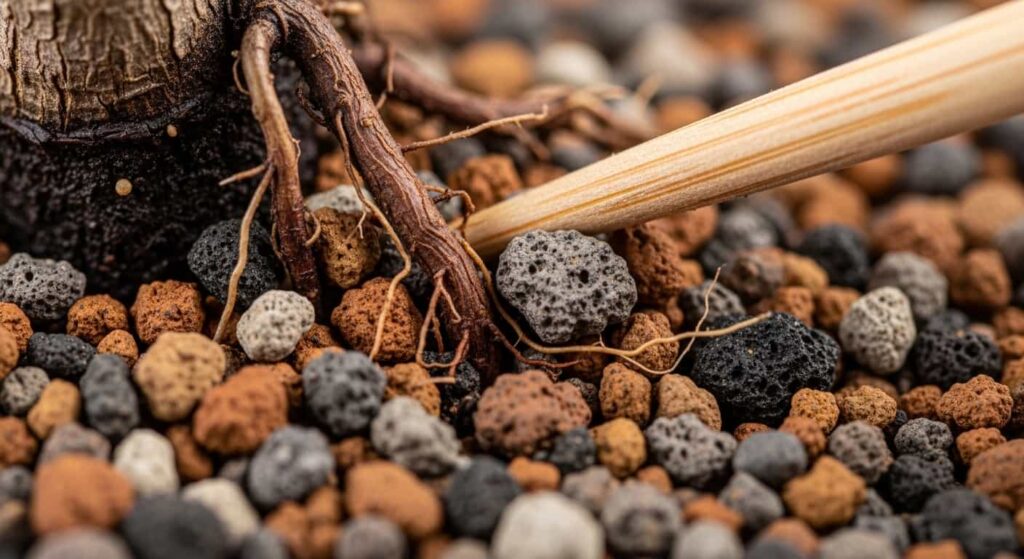
Add bonsai soil around and over the root ball, filling all spaces. Use a chopstick to gently work soil into gaps between roots — this step is crucial. Air pockets dry out roots and prevent proper root-to-soil contact needed for new root growth.
Continue adding and working soil until the pot is filled to about 1 cm below the pot rim (to hold water during irrigation).
Step 7: Water Thoroughly
Water the newly repotted bonsai slowly and deeply — ideally by submerging the pot up to the rim in a basin of water for 5–10 minutes, then allowing it to drain. This settles the soil, eliminates remaining air pockets, and gives roots their first deep drink.
Alternatively, water slowly from above using a gentle rose attachment until water flows freely from the drainage holes.
Post-Repotting Care: The Recovery Period
The weeks following repotting are the most delicate. Your bonsai’s ability to absorb water and nutrients is temporarily reduced while roots heal and regenerate.
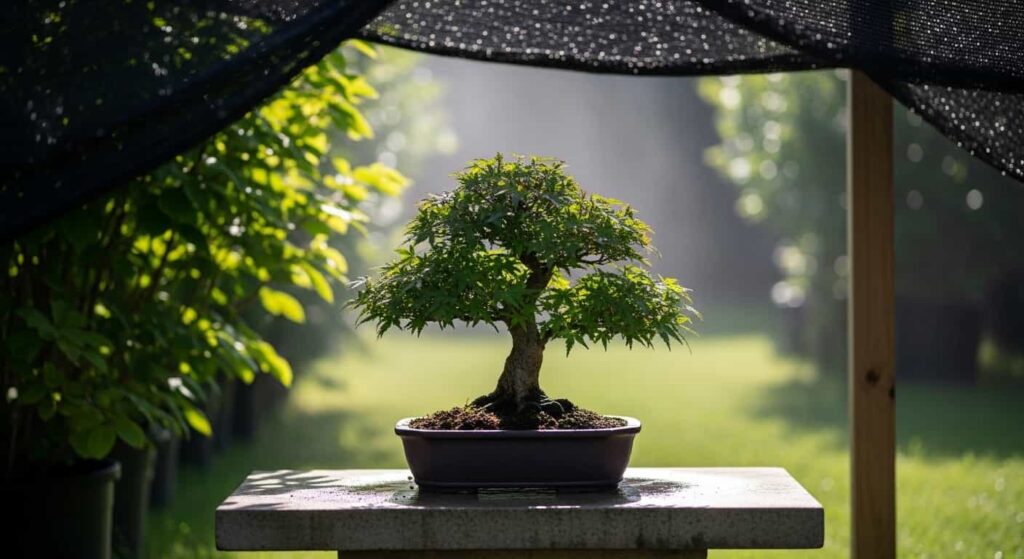
Placement
Move your bonsai to a sheltered location — out of direct midday sun, protected from strong wind. Dappled light or morning sun only for the first 4–6 weeks. Outdoors is generally better than indoors (better air circulation), but avoid frost.
Watering
- Check soil moisture daily by pressing a finger 1–2 cm into the soil
- Water when the top layer begins to dry — don’t let it fully dry out, but don’t keep it soggy
- The tree will use less water than usual initially since its root mass is reduced
Fertilizing
Do not fertilize for at least 4–6 weeks after repotting. Freshly cut roots are sensitive — fertilizer salts can burn wounded tissue. Once you see new leaves or shoots pushing out, that’s your cue that the root system is recovering, and light feeding can begin.
Avoid Repotting Stress Compounding
Don’t prune the foliage heavily in the same season as root pruning and repotting. The canopy and roots are interdependent — the leaves fuel root recovery through photosynthesis. Protect the foliage.
Common Mistakes to Avoid
Removing too many roots at once. Never prune more than one-third of the root system in a single session. If the roots are severely congested, plan a two-stage root pruning over consecutive seasons.
Repotting into a much larger pot. It’s tempting, but oversized pots hold excess moisture your reduced root system can’t use — leading to root rot. Move up only one pot size at a time.
Planting too deeply. Burying the nebari doesn’t protect the tree — it promotes rot at the trunk base and hides the tree’s most aesthetically interesting feature.
Using garden soil or potting compost. These compact, hold too much moisture, and lack the aeration bonsai roots need post-pruning.
Skipping anchor wires. An unstable tree rocks with wind and watering, constantly breaking the delicate new root hairs, trying to establish into fresh soil.
Species-Specific Notes
Japanese Maple (Acer palmatum)
Highly sensitive to root disturbance. Repot in early spring before bud break. Keep shaded for 6–8 weeks post-repotting. Avoid repotting and heavy branch pruning in the same year.
Juniper (Juniperus spp.)
Tolerates root pruning well. Can be repotted in early spring or after summer growth hardens. Needs excellent drainage — increase lava rock content in the mix if your climate is wet.
Ficus (Ficus spp.)
Tropical species can be repotted almost year-round in warm climates, but spring is still optimal. Recovers quickly from root pruning. Keep warm (above 15°C/59°F) post-repotting.
Chinese Elm (Ulmus parvifolia)
A forgiving beginner species. Repot in early spring. Tolerates moderate root reduction. Semi-evergreen varieties may drop leaves briefly after repotting — this is normal.
Pine (Pinus spp.)
Never remove more than 25% of roots. Pines rely on mycorrhizal fungi in their root systems. Preserve as much of the old soil as possible by only loosening the outer edges of the root ball, and always repot into a mix containing some of the original soil.
Frequently Asked Questions
Can I repot immediately after root pruning?
Yes — in fact, you should. Root pruning without repotting leaves the tree in depleted, compacted soil where new roots struggle to regenerate. Repot on the same day you prune the roots.
How long does recovery take after repotting?
Most healthy trees show signs of new growth within 4–8 weeks. Full root recovery and a return to normal feeding/watering schedules typically takes one full growing season.
Should I use rooting hormone when repotting bonsai?
It’s optional but beneficial, especially for slow-growing or older trees. Dust cut root tips lightly with a powdered rooting hormone (IBA-based) before positioning in the pot.
Can I repot in autumn?
Early autumn works for some species in mild climates, but spring remains the safest window. Autumn repotting leaves little time for root recovery before winter dormancy. Avoid repotting in summer heat or winter cold.
My tree lost all its leaves after repotting — is it dead?
Not necessarily. Leaf drop after repotting is a stress response, particularly common in tropical and semi-tropical species. Keep the tree in a warm, sheltered spot, maintain soil moisture, and wait. New buds should appear within a few weeks if the roots are still healthy.
Summary
Repotting after root pruning is not complicated, but it demands attention at every step — from timing and soil selection to post-repotting care. Treat the process as a continuum: root pruning and repotting are one event, not two, and the recovery period that follows is just as important as the repotting itself.
Give your bonsai the right soil, a stable home, protected placement, and patience — and it will reward you with vigorous, healthy growth for years to come.
For best results, keep a repotting log noting the date, root condition observed, soil mix used, and the tree’s recovery progress. Over time, this record becomes an invaluable guide tailored specifically to your tree and your growing conditions.