
Last Updated on May 1, 2026 by Indoor Plant Nook
Propagation is where pothos (Epipremnum aureum and familiar cultivars) feels almost unfairly easy: give it a node, moisture, and reasonable light, and roots often arrive like clockwork. Water propagation is especially popular because progress is visible, satisfying, and approachable for beginners who are not ready to manage soil moisture for fragile cuttings. This guide walks through the exact steps, the common failures, and how to transition rooted cuttings to soil without drama.
Why water propagation works so well for pothos
Each pothos stem segment includes nodes, the slightly raised junctions where leaves attach and where roots are programmed to emerge when conditions favor adventitious rooting. Submerging a node in aerated water signals the plant to produce water roots—specialized for submerged life—while the cutting still draws on stored carbohydrates in the stem until roots can absorb moisture and minerals.
Water propagation’s main advantage is transparency: you see rot before it silently spreads through soil, you see root length, and you can change water before anaerobic conditions develop. The main disadvantage is the later transition to soil, because water roots differ from soil roots structurally; a careless transplant can cause temporary setbacks.
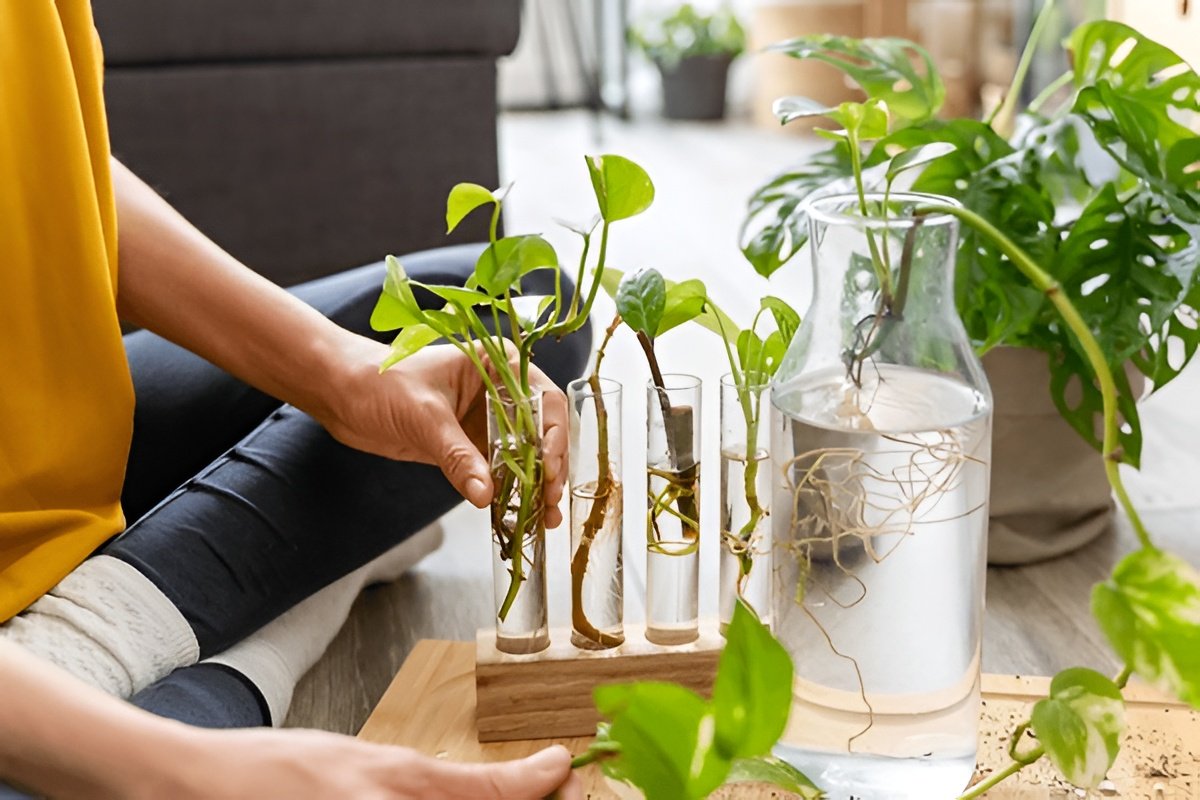
What you need
- A healthy mother plant
- Clean scissors or pruners; sanitize with rubbing alcohol between cuts
- Clear or translucent vessels (jars, bottles, propagation stations)
- Water: dechlorinated tap left to stand overnight is fine in many regions; some growers prefer filtered water to reduce mineral film on roots
- Bright indirect light; avoid cooking cuttings on a hot windowsill
- Optional: rooting hormone (usually unnecessary for pothos, but harmless if used lightly)
Step 1: Choose vines with healthy nodes
Look for stems with firm leaves and no obvious pest film. Avoid taking cuttings from yellowing vines unless you are rescuing the last healthy nodes; stress reduces success rates.
Identify nodes: bumps where petioles meet stems. Your cuttings should each include at least one node intended for submersion and usually one leaf (or two) for photosynthesis—though extremely large leaves can be trimmed to reduce transpiration while roots form.
Step 2: Make clean cuts
Cut just below a node that will sit in water. Some growers also include a second node above the waterline for structure. Use a clean blade to minimize crushing.
If a cutting is long, you can divide it into multiple segments as long as each submerged piece includes the node you expect to root.
Step 3: Remove leaves that would submerge
Leaves underwater decay and foul the jar. Strip any foliage that would sit below the waterline. If a leaf is close to the water surface, leave enough stem clearance so it does not creep into water as the vessel fills.
Step 4: Place cuttings in water
Add enough water to cover the target node but not the entire stem unnecessarily. Clear jars help you monitor root color and emerging slime.
Arrange cuttings so they lean naturally without snapping; narrow-neck bottles can support a single cutting elegantly; wider jars can hold bundles—just avoid crowding that mashes leaves into rot.
Step 5: Location and light
Set the vessel where it receives bright indirect light. Direct sun through glass can heat water and cook stems. Dim light may slow rooting enough that stems rot first.
If your home is cool, rooting slows; if excessively hot without airflow, algae may bloom. A stable indoor table a few feet from a good window is often ideal.
Step 6: Water changes and hygiene
Change water when it clouds, smells off, or develops obvious films—often every few days early on, later weekly if it stays clean. Gentle rinsing of roots removes algae and biofilm before it becomes a blanket.
If you see slimy dark tissue at the submerged node, remove the mush, recut above healthy tissue if needed, and restart with fresh water and a clean jar.
Step 7: Wait for roots—what “ready” looks like
Initial bumps may appear in days to a couple of weeks depending on conditions. Functional readiness for soil is less about “any root” and more about enough root to support transpiration: multiple roots a few inches long, with pale healthy tips, generally signals readiness.
If roots remain only tiny nubs for a long time, reassess light and temperature before assuming failure.
Step 8: Transitioning to soil (the stage beginners mishandle)
Water roots are more fragile than soil roots; transplant shock can look like wilt or yellowing. To reduce shock:
- Plant into moist, fluffy mix, not mud
- Water lightly after planting, then allow the top layer to begin normal dry-down while humidity around the plant stays moderate
- Avoid immediate full sun
Some growers “harden off” by letting roots become substantial before soil transfer, which reduces the odds the cutting collapses when soil moisture fluctuates.
Optional: keep it in water long term
Some people maintain pothos in water indefinitely with nutrient management; that is a different care track (water changes, feeding, algae control). This article focuses on propagation, but know that rooted cuttings need not rush to soil if you prefer an aquatic display—just adopt the maintenance that sustained hydro culture requires.
Troubleshooting common issues
Cutting turns black at the node: Usually rot from dirty water, submerged leaves, or cold damage. Recut, clean vessel, improve conditions.
No roots, leaves yellow: Often insufficient light, overly cold water, or a cutting that was too weak to begin with.
Roots appear but leaves stay wilted: Rare vascular damage; sometimes resolves; sometimes the cutting fails—try another node.
Algae: Not always lethal, but excessive growth can coat roots and reduce oxygen exchange. Darken water with opaque sleeves or reduce intense light hitting the jar; change water and gently rinse roots.
Mineral crust: Hard water can leave deposits; switch to filtered water or rinse roots periodically.
Jar size, temperature swings, and dissolved oxygen basics
Small volumes of water change temperature quickly beside a window: morning chill and afternoon sunlight can shock tender new root initials before you notice foliage distress. A slightly larger jar buffers modestly—within reason—while still keeping most of the stem above water for photosynthesis. If you watch roots closely, you will see healthy tips looking firm and pale; if tips brown or stop extending while water turns cloudy fast, prioritize cooler stable placement and more frequent gentle changes rather than fertilizer guesses.
Dissolved oxygen is the invisible ingredient: roots respire even underwater. Stagnant, warm, organically enriched water holds less oxygen and encourages anaerobic bacteria. That is why “clean enough” beats “nutrient tea” early in propagation—save feeding for later phases when roots can handle mineral loads without slime taking over first.
From water roots to soil: a transition checklist without melodrama
When roots are long but fragile, pot into a mix that holds moisture without suffocating—think moist fluff, not marsh. Some growers keep a baggie tent for three to five days to lift humidity while soil roots begin forming; others rely on careful watering alone. If leaves yellow dramatically after potting, pause fertilizer, verify you did not sink the crown into mud, and ensure light is bright but not scalding. A partial haircut of the oldest leaf sometimes reduces transpiration demand while plumbing reconnects underground.
Bench hygiene, labeling, and multi-jar rhythm
If you keep more than a couple jars alive at once, treat the bench like a tiny lab: clear dates on tape, cultivar initials (with question marks when uncertain), and enough spacing that jars do not sweat against each other’s condensation. Scrub glass monthly with hot water and mild unscented soap to reset biofilm; rotate jars weekly so algae does not colonize only one sun-facing wall while roots on the shaded side gasp.
When several green cultivars look similar, honest labeling prevents awkward swaps later. If you gift a cutting, include the date it was cut and whether it has transitioned to soil yet—transparency keeps beginner friends from drowning babies out of enthusiasm.
Ethics of sharing
Pothos is among the easiest plants to share with friends—clean cuts, labeled jars, and honest advice about eventual potting make gifts that actually survive.
Closing thought
Water propagation is not a hack; it is basic plant biology made visible. If you can keep water fresh, light reasonable, and nodes clean, pothos will usually meet you halfway—and then you get the private theater of roots reaching into clear water, which remains one of indoor gardening’s simplest pleasures.
FAQ: water propagation without guesswork
How many nodes per jar? One strong node can root; two nodes (one submerged, one leafy above water) often succeed faster because the cutting stays balanced and photosynthesizes steadily.
Should I add fertilizer to the jar? Early rooting rarely needs it—fresh water changes beat “nutrient tea.” After roots branch, extremely dilute feeding can help only if you keep oxygen high through regular changes.
Is cloudy water always doom? No—biofilm happens—but chronic odor, slime, and black nodes mean hygiene slipped; restart clean.
Can I propagate variegated pothos the same way? Yes. Highly variegated stems sometimes root a touch slower; give them stable warmth and avoid roasting jars on hot glass.
Myth vs. reality
| Myth | Reality |
|---|---|
| “Roots must be huge before soil.” | Aim for several branching roots a few inches long—not one brittle inch that collapses in mix. |
| “Dark bathrooms root fastest.” | Humidity helps leaves; dim rooms slow the whole process—bright indirect light wins. |
| “Ice water shocks roots into growing.” | Cold shocks tissue—room-temperature water is safer. |
Mini case study: the crowded windowsill
Situation: Six jars on one sill; outer jars root slower while inner jars cloud faster.
Why: Heat gradients and unequal light; condensation breeds biofilm on crowded glass.
Fix: Space jars, rotate positions weekly, and sleeve sun-facing glass lightly so water stays cooler without starving photons.
Seasonal notes
- Winter propagation indoors often needs gentler expectations—roots still form, but timelines stretch unless you add modest supplemental light.
- Summer rooting can race ahead—watch jars beside AC drafts that chill stems overnight while afternoons roast roots against glass.
Soil transition checklist
- Roots pale with firm tips; minimal slime after rinsing
- Mix pre-moistened like a wrung sponge
- Pot snugly; crown not buried in mud
- Bright indirect light; skip fertilizer for two weeks
- If leaf yellow spikes after potting, verify drainage and pause feeding until new growth steadies
When water propagation succeeds, you already own the hardest habit—looking closely. Carry that habit into soil care and your pothos collection compounds effortlessly from each pruning session.
Related Pothos Guides
- How to Propagate Pothos in Soil — Tips for Better Root Success
- Propagating Pothos in LECA / Semi-Hydroponics: A Beginner’s Guide
- How Long Does It Take for Pothos Cuttings to Root?
- Can You Grow Pothos from Seeds? (The Truth About Pothos Seeds)
- How to Make Pothos Grow Long and Full — Pruning & Training Tips