

Orchids have a reputation for being beautiful but difficult houseplants. Their elegant blooms and unique forms can make any room feel more sophisticated, but many plant enthusiasts are hesitant to bring one home. The fear is that these exotic flowers require a level of care that’s just too demanding for the average person.
The truth is, while orchids do have specific needs, they are not nearly as high-maintenance as their reputation suggests. With the right knowledge and a bit of attention, anyone can successfully grow vibrant, healthy orchids indoors. This comprehensive orchid growing guide will walk you through everything you need to know, from choosing the right variety to troubleshooting common problems. By the end, you’ll have the confidence to not only keep an orchid alive but help it thrive and rebloom for years to come.
Understanding Your Orchid’s Needs

The key to successful indoor orchid care is recreating the plant’s natural habitat as closely as possible. Most orchids sold as houseplants are epiphytes, meaning they grow on other plants (like tree branches) in tropical forests. They don’t grow in soil, and their roots are adapted to absorb moisture and nutrients from the air and rain. Understanding this is fundamental to their care.
Light Requirements

Proper lighting is arguably the most critical factor for indoor orchids. They need plenty of bright, indirect light. A spot near an east-facing window is often ideal, as it provides gentle morning sun that isn’t too harsh. South or west-facing windows can also work, but you’ll need to filter the intense afternoon sun with a sheer curtain to prevent the leaves from getting scorched.
How do you know if your orchid is getting the right amount of light? Look at the leaves.
- Bright, olive-green leaves indicate your plant is happy.
- Dark green leaves suggest it’s not getting enough light, which can prevent it from blooming.
- Yellowish-green or red-tinged leaves mean the light is too intense.
Watering Tips
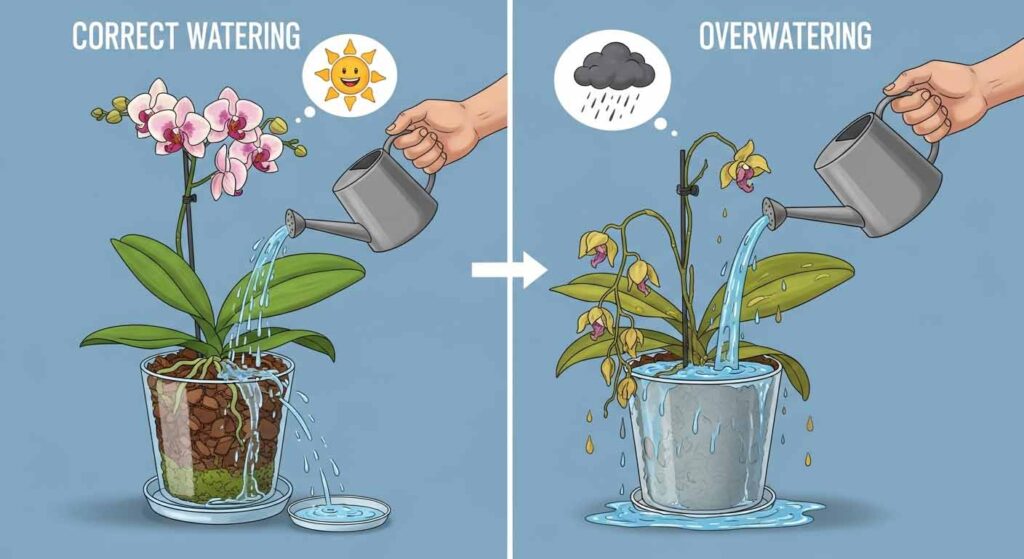
Overwatering is the most common mistake new orchid owners make and a fast track to root rot. Since orchids don’t grow in traditional soil, their watering needs are different from other houseplants. Their roots need a cycle of being thoroughly watered and then allowed to dry out.
A good rule of thumb is to water your orchid every 7 to 10 days. However, this can vary based on the humidity, temperature, and potting medium. The best way to know when to water is to check the roots and the potting mix. If the potting medium (usually bark chips) feels dry and the roots inside the pot look silvery-green, it’s time to water.
When you do water, do it thoroughly. Place the pot in a sink and let lukewarm water run through it for about a minute, ensuring all the roots are saturated. Let the pot drain completely before returning it to its decorative pot or saucer. Never let an orchid sit in standing water.
Temperature and Humidity
Most popular indoor orchids are native to tropical climates, so they prefer warm temperatures and high humidity. They generally thrive in daytime temperatures between 65-80°F (18-27°C) and a slight drop at night. Avoid placing your orchid near drafts from windows, doors, or air conditioning vents.
Orchids also love humidity. The average home is often too dry for them, especially in the winter when heating systems are running. A humidity level of 50-70% is ideal. You can increase humidity around your plant in several ways:
- Use a humidifier.
- Place the pot on a tray filled with pebbles and water (ensure the pot sits on the pebbles, not in the water).
- Mist the plant’s leaves in the morning a few times a week.
- Group it with other plants to create a more humid microenvironment.
Choosing the Right Orchid for Your Home

While there are thousands of orchid species, only a few are commonly grown as houseplants. Selecting a variety that is well-suited for indoor environments is the first step toward success.
Phalaenopsis (Moth Orchid)
This is the most popular and widely available orchid for a reason. Phalaenopsis orchids are very beginner-friendly and adapt well to typical indoor conditions. They have long-lasting blooms that can appear for several months and come in a wide array of colors. They prefer lower light conditions than other orchids, making them perfect for homes and apartments.
Cattleya
Known as the “corsage orchid,” Cattleyas produce large, fragrant, and incredibly showy flowers. They require more light than Phalaenopsis orchids, so a south-facing window with a sheer curtain is a good spot. Their vibrant colors make them a stunning addition to any collection, though they can be slightly more demanding.
Dendrobium
Dendrobiums are a diverse group of orchids with varying care needs. Some varieties are evergreen, while others are deciduous and require a dry winter rest period to encourage blooming. They generally need bright light and have tall canes that produce clusters of flowers. They are a great choice for someone looking to move beyond the beginner level.
Oncidium (Dancing Lady Orchid)
Oncidiums are famous for their sprays of small, intricate flowers that often look like dancing figures. They typically produce yellow and brown blooms and thrive in bright, indirect light. Many Oncidium varieties are also fragrant, adding another layer of enjoyment.
Step-by-Step Orchid Care Guide
Once you’ve brought your orchid home, a consistent care routine will help it flourish.
Planting and Potting Medium
Orchids should never be planted in regular potting soil. They need a special orchid mix that provides excellent drainage and airflow to the roots. Most commercial orchid mixes are made from bark chips, sphagnum moss, perlite, or charcoal. The right mix depends on the orchid type and your watering habits. Bark-based mixes dry out faster, while moss-based mixes retain more moisture.
Repotting Orchids
Repotting is an essential part of long-term orchid care. You should plan to repot your orchid every one to two years, or when you notice the potting medium has started to break down and become mushy. Repotting gives the roots fresh medium and a bit more room to grow.
How to Repot an Orchid:
- Choose the Right Time: The best time to repot is just after the plant has finished blooming.
- Select a New Pot: Choose a new pot that is only one to two inches larger in diameter than the current one. Orchids prefer to be slightly root-bound. Ensure the pot has plenty of drainage holes.
- Remove the Orchid: Gently ease the orchid out of its old pot. If it’s stuck, you may need to carefully cut the plastic pot away.
- Clean the Roots: Shake off the old potting medium and use sterilized scissors to trim any dead, mushy, or papery roots. Healthy roots are firm and white or green.
- Repot: Place a small amount of new potting mix in the bottom of the new pot. Hold the orchid in the center of the pot and fill in around the roots with the new mix, gently tapping the pot to help the mix settle. The base of the plant should be level with the rim of the pot.
- Water: Wait about a week before watering to allow any cut roots to heal.
Orchid Fertilizer
To support healthy growth and blooming, you’ll need to fertilize your orchid. Use a balanced orchid fertilizer (e.g., 20-20-20) diluted to half or quarter strength. A good rule of thumb is to fertilize “weekly, weakly.” This means applying a weak fertilizer solution once a week during the growing season (spring and summer). Reduce fertilizing to once a month during the fall and winter. Always water your orchid thoroughly before fertilizing to avoid burning the roots.
Pruning
After your orchid has finished blooming, the flower spike will begin to fade. What you do next depends on the type of orchid. For Phalaenopsis orchids, you can encourage reblooming from the same spike. Look for a small, triangular node below the lowest faded flower. Cut the spike about an inch above this node. A new flower spike may emerge from that spot in a few weeks. If the entire spike turns brown, cut it off at the base of the plant. For other orchid types like Cattleya or Dendrobium, simply cut the spent flower spike off at the base.
Troubleshooting Common Orchid Issues
Even with the best care, you might encounter some problems. Here’s how to handle them.
- Yellowing Leaves: This can be caused by too much direct sunlight, overwatering, or natural aging. If only the bottom leaves are yellowing and falling off, it’s likely a natural process. If multiple leaves are turning yellow, check your watering and light conditions.
- Lack of Blooming: The most common reason an orchid won’t rebloom is insufficient light. Try moving it to a brighter location. A slight drop in temperature at night can also trigger blooming in some varieties.
- Pests: Mealybugs and scale are common orchid pests. They can be treated by wiping them off with a cotton swab dipped in rubbing alcohol. For larger infestations, you may need to use an insecticidal soap or neem oil.
- Root Rot: This is caused by overwatering. If you suspect root rot, you’ll need to repot the plant immediately, trimming away all the soft, mushy, brown roots.
Your Path to Orchid Success
Growing orchids indoors is an incredibly rewarding hobby. Watching a new leaf unfurl or a flower spike emerge brings a unique sense of accomplishment. While they require specific care, the joy of seeing these stunning flowers bloom in your home is well worth the effort. By understanding their needs for light, water, and humidity, and by providing a consistent care routine, you can confidently grow beautiful orchids that will brighten your space for years.