

Orchids are one of the most popular houseplants, known for their stunning beauty and exotic appeal. With thousands of species, their delicate flowers come in a breathtaking array of colors, shapes, and sizes. Many people receive an orchid as a gift or buy one on impulse, captivated by its elegant blooms. However, keeping that orchid healthy and encouraging it to bloom again can be a challenge. The secret often lies in one simple factor: placement.

Finding the right spot for your orchid is the most important part of indoor orchid care. These plants have specific needs for light, temperature, and humidity that must be met for them to thrive. Placing your orchid in the wrong location can lead to problems like yellowing leaves, root rot, or a frustrating lack of flowers.
This guide will walk you through everything you need to know about orchid placement. We’ll cover the essential needs of orchids, identify the best (and worst) spots in your home, and offer tips for different types of orchids. By understanding how to provide the right environment, you’ll be well on your way to enjoying beautiful blooms for years to come.
Understanding Your Orchid’s Needs
Before you can pick the perfect spot, it’s crucial to understand what indoor orchids need to flourish. These aren’t your typical houseplants. In their natural habitat, most orchids are epiphytes, meaning they grow on other plants, like tree branches. They aren’t rooted in soil but instead use their roots to cling to surfaces, absorbing moisture and nutrients from the air and rain.
Replicating this unique environment in your home is the key to success. Here are the four fundamental requirements for happy orchids:
- Light: This is arguably the most critical factor. Orchids need plenty of bright, indirect light. Direct sunlight can scorch their leaves, while too little light will prevent them from blooming. The ideal orchid light needs to mimic the dappled sunlight they would receive under a tropical forest canopy.
- Humidity: Orchids come from humid, tropical regions and crave moisture in the air. Most homes are much drier than what orchids prefer, especially during winter when heating systems are running. A humidity level of 40-70% is ideal for most common orchid types.
- Temperature: Most orchids enjoy the same temperatures that humans do, typically between 60-80°F (15-27°C). However, many types, like the popular Phalaenopsis orchid, need a slight drop in temperature at night to trigger blooming.
- Air Circulation: Good air movement is vital. In their natural environment, a constant breeze helps dry their roots after rain, preventing fungal and bacterial diseases. Stagnant air can lead to root rot and other issues.
Optimal Locations in Your Home
Now that you know what your orchid needs, let’s explore some potential locations in your house. Each spot has its pros and cons, so you’ll need to weigh them against your orchid’s specific requirements.
Windowsills: The Classic Choice
Windowsills are often the go-to spot for houseplants, and for good reason. They offer abundant light, but not all windows are created equal.
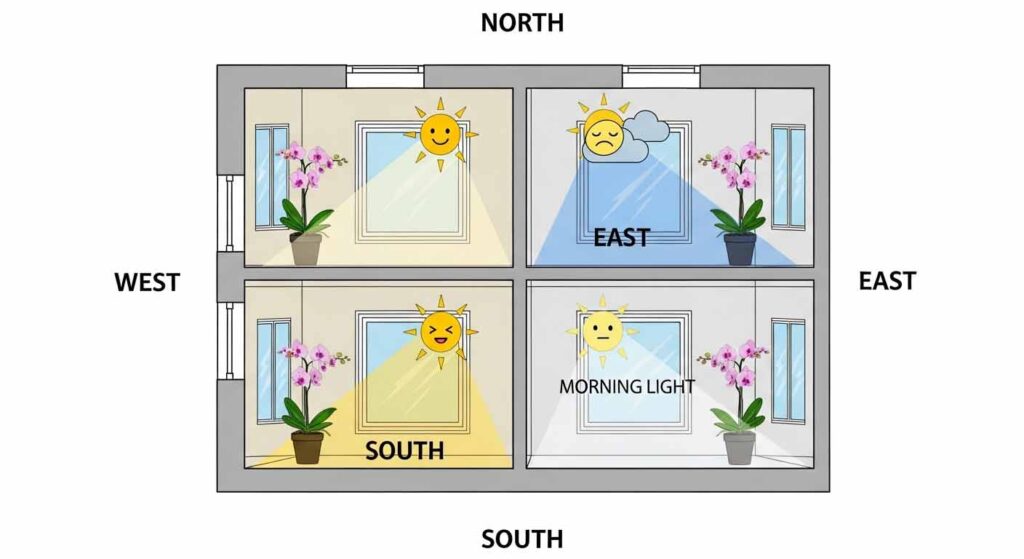
- East-Facing Windows: This is often considered the perfect location for many orchids, especially Phalaenopsis (Moth Orchids). They provide gentle, bright morning sun that isn’t strong enough to burn the leaves. The light intensity decreases throughout the day, protecting the plant from harsh afternoon rays.
- West-Facing Windows: These windows get more intense afternoon sun, which can be too much for some orchids. If you only have a west-facing window, you can place your orchid there, but be sure to use a sheer curtain to diffuse the light. Cattleyas and Dendrobiums, which have higher light needs, may do well here with some protection.
- South-Facing Windows: These windows receive the most intense, direct sunlight all day long. This is generally too harsh for most indoor orchids and can easily scorch their leaves. If a south-facing window is your only option, place the orchid several feet away from the glass or use a thick curtain to filter the light significantly. Highlight orchids like Vanda might tolerate this spot, but careful monitoring is essential.
- North-Facing Windows: These windows provide the least amount of light. While it might be sufficient for some low-light plants, it’s usually not enough for an orchid to bloom. You may need to supplement with artificial lighting if you use a north-facing window.
Bathrooms and Kitchens: Humidity Havens
Bathrooms and kitchens can be excellent places for orchids because they naturally have higher humidity levels due to steam from showers and cooking.
- Bathrooms: A bathroom with a window that provides bright, indirect light can be an orchid paradise. The daily steam from showers creates a humid environment that orchids love. Just make sure the bathroom gets enough light; a windowless bathroom won’t work without a grow light.
- Kitchens: Kitchens also tend to have higher humidity. A spot on a countertop near a window can be a great home for an orchid. Be careful to keep it away from direct heat sources like the stove or oven, and avoid placing it where it might be exposed to drafts from an open window or vent.
Mastering Light for Your Orchid
Getting the light right is a game-changer for indoor orchid care. Understanding the different types of light and how to provide them is essential.
Types of Light
- Direct Light: This is unfiltered sunlight that shines directly on the plant. It’s often too intense for orchids.
- Indirect Light: This is bright light that has been filtered or diffused. You can achieve this by placing the plant near a window with a sheer curtain or in a spot that receives bright light but not direct sunbeams.
- Artificial Light: If you don’t have enough natural light, grow lights can be a lifesaver. Full-spectrum LED or fluorescent bulbs work well. Position the light about 6-12 inches above the orchid and keep it on for 12-16 hours a day.
How to Assess Light Levels
A simple way to test the light in a potential spot is the “hand test.” Place your hand between the light source and the plant.
- If you see a sharp, well-defined shadow, the light is likely too direct and intense.
- If the shadow is soft and blurry, the light is probably perfect—bright but indirect.
- If there’s barely a shadow, the light is too low.
Boosting Humidity and Air Circulation
Creating a humid microclimate and ensuring good air movement are key orchid humidity tips that can make a big difference.
Ways to Increase Humidity
- Pebble Trays: Fill a shallow tray with pebbles and water, then place your orchid pot on top. Make sure the bottom of the pot isn’t touching the water, as this can lead to root rot. As the water evaporates, it will increase the humidity around the plant.
- Humidifiers: A small room humidifier is an easy and effective way to raise the ambient humidity, benefiting both your orchids and your own skin during dry winter months.
- Grouping Plants: Plants naturally release moisture through a process called transpiration. Grouping your orchid with other houseplants can create a small pocket of higher humidity.
- Misting: While many people mist their orchids, it’s often not very effective. The moisture evaporates quickly and only provides a temporary boost. If done too often or late in the day, it can also lead to fungal issues if water sits on the leaves overnight.
Improving Air Circulation
Good airflow helps prevent diseases. You can improve it by:
- Using a Small Fan: Place a small, oscillating fan in the room and set it to low. This will create a gentle breeze that mimics an orchid’s natural environment.
- Proper Spacing: Don’t crowd your plants. Leaving enough space between them allows air to circulate freely.
Temperature Control for Healthy Orchids
Most common orchids are happy with typical indoor temperatures. However, temperature fluctuations are important. Many orchids, particularly Phalaenopsis, need a nighttime temperature drop of about 10°F (5-6°C) to initiate flower spikes. This often happens naturally in the fall near a window. Avoid placing orchids near drafts from air conditioners, heaters, or open doors, as sudden temperature changes can cause stress and bud blast (where buds fall off before opening).
Placement for Specific Orchid Types
Different orchids have slightly different needs. Here’s a quick guide for some popular varieties:
- Phalaenopsis (Moth Orchid): The best orchid for beginners. It prefers low to medium light, making an east-facing window ideal. It thrives in average home temperatures and humidity.
- Dendrobium: This large group has varied needs, but many popular types require bright light, more than a Phalaenopsis. A shaded west or south-facing window can work well. They also need a distinct dry rest period in the winter.
- Cattleya (Corsage Orchid): Known for their large, fragrant flowers, Cattleyas need bright light. A west-facing window with a sheer curtain or a bright south-facing window a few feet from the glass is a good choice.
- Oncidium (Dancing Lady Orchid): These orchids like bright, indirect light, similar to Cattleyas. An east or west-facing window is usually suitable. They have thin leaves that are more susceptible to sunburn.
Troubleshooting Common Placement Issues

Your orchid will tell you if it’s unhappy with its spot. Here are some signs to watch for:
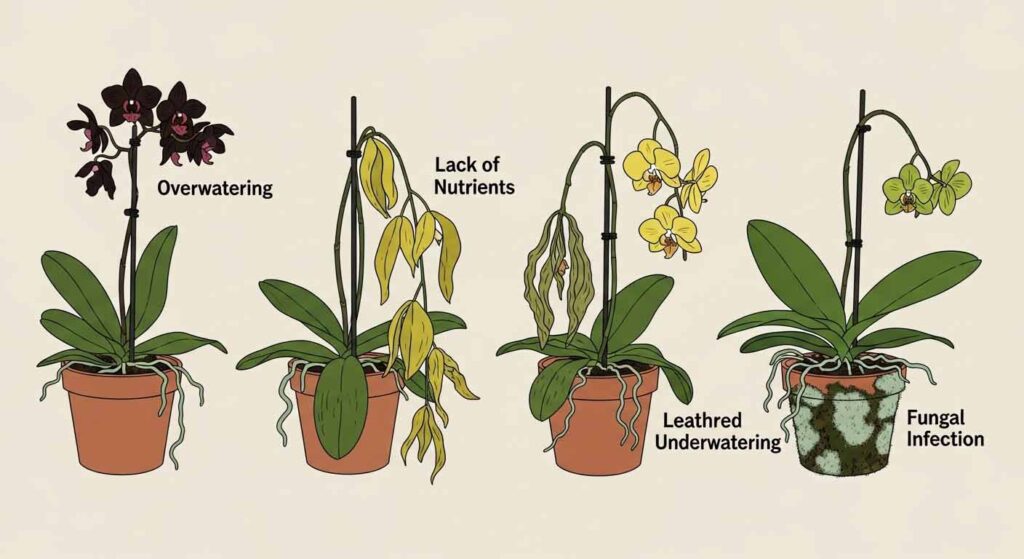
- Yellowing Leaves: This can be caused by too much direct sunlight. The leaves may look bleached or scorched. Move the plant to a shadier location.
- Dark Green, Limp Leaves: This is a classic sign of too little light. The plant doesn’t have enough energy to grow strong leaves or produce flowers. Move it to a brighter spot.
- Lack of Blooms: The most common reason an orchid won’t rebloom is insufficient light. Another cause could be a lack of the necessary temperature drop at night.
- Wrinkled, Leathery Leaves: This usually indicates underwatering or low humidity. The plant is losing moisture faster than it can absorb it.
- Black or Mushy Roots: This is a symptom of root rot, caused by overwatering or poor air circulation around the roots.
Seasonal Adjustments for Your Orchid
The light and temperature in your home change with the seasons. You may need to adjust your orchid placement accordingly.
- Winter: The sun is lower in the sky, and the light is less intense. You might be able to move your orchid closer to a window or into a spot that gets more direct sun, like a south-facing window.
- Summer: The sun is stronger. You may need to move your orchid further from the window or add a sheer curtain to prevent its leaves from burning.
Creative Display Ideas
Your orchid is a work of art, so display it like one!
- Decorative Pots: Place the plastic nursery pot inside a more attractive ceramic or decorative pot. This also makes watering easier.
- Orchid Mounts: For a more natural look, you can mount epiphytic orchids on pieces of cork bark or driftwood. This requires more frequent watering but provides excellent air circulation for the roots.
- Grouping: Create a stunning display by grouping several orchids. Just be sure to give them enough space.
Finding the Perfect Spot
Proper orchid placement is the foundation of successful indoor orchid care. By providing the right balance of light, humidity, temperature, and air circulation, you create an environment where your orchid can not only survive but truly thrive.