
Last Updated on March 18, 2026 by Indoor Plant Nook
Root pruning and repotting are two of the most powerful — and most misunderstood — techniques in bonsai cultivation. Done correctly, they extend the life of your tree, promote healthy fine-root development, and keep your bonsai vigorous for decades. Done carelessly, they can set your tree back by a full growing season or worse.
This guide covers everything you need to know: when to repot, how to prune roots safely, what soil to use, how to position the tree, and how to nurse it back to full health after the procedure.
Why Repotting and Root Pruning Matter
A bonsai tree lives in a drastically limited volume of soil. Over time — typically one to five years depending on species, pot size, and growing conditions — the roots fill every available space. When that happens, the soil loses its structure, drainage becomes poor, and the tree can no longer uptake water and nutrients efficiently.
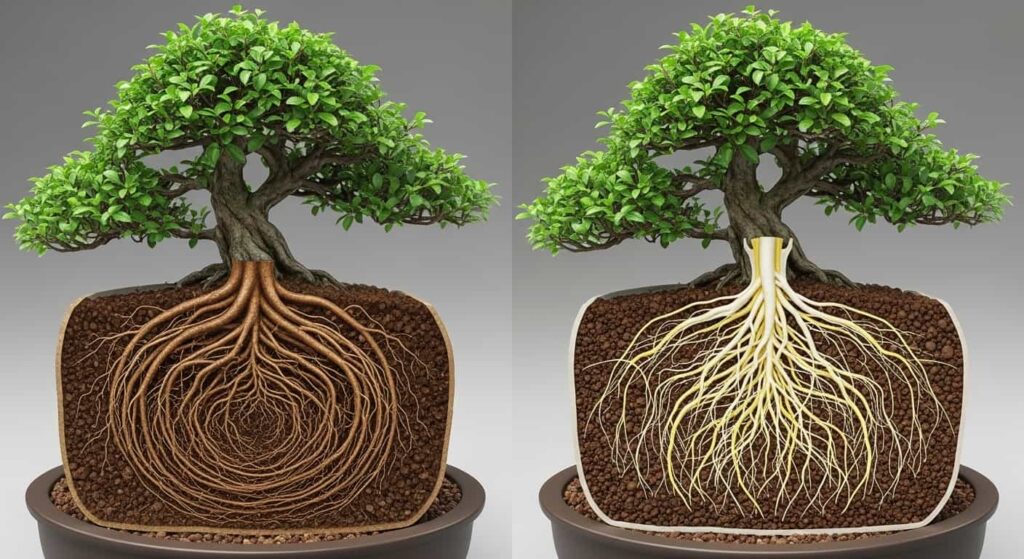
Root pruning solves this problem in two ways. First, it removes old, thick, circling roots that no longer serve the tree well. Second, it stimulates the growth of a dense network of fine feeder roots — the roots that actually absorb water and dissolved nutrients. A tree with a well-developed feeder root system grows more vigorously, responds better to styling, and is overall healthier than one with a tangled mass of thick roots.
Repotting after root pruning gives those new roots fresh, well-draining soil to grow into. The combination is a reset button for your bonsai’s root system.
When to Repot Your Bonsai
Timing is the single most important factor in successful repotting. Repot at the wrong time, and the tree may struggle to recover. Repot at the right time, and it will barely notice the procedure.
The Golden Window: Early Spring
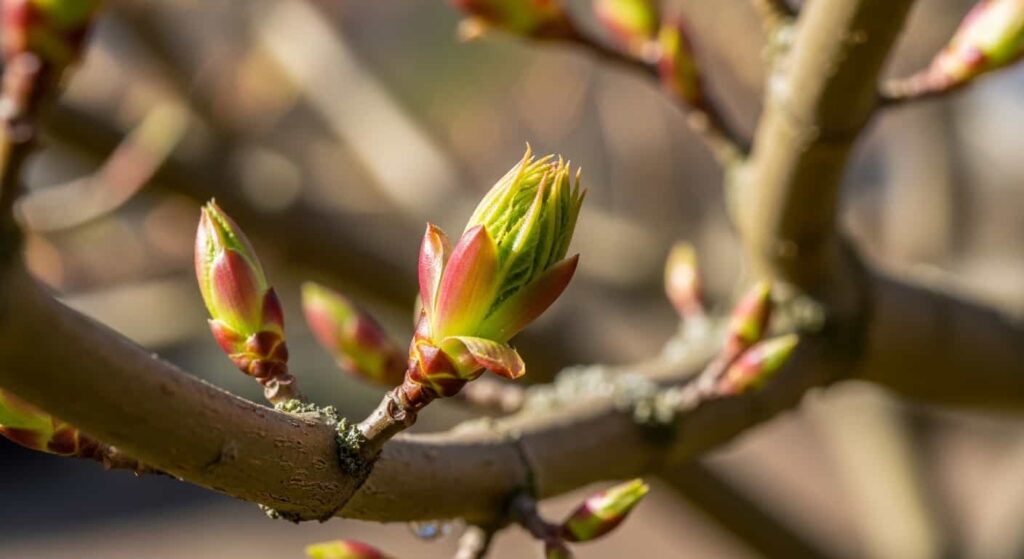
The best time to repot most bonsai is early spring, just as the buds begin to swell but before any leaves have opened. At this point:
- The tree is breaking dormancy and entering its highest-energy growth phase.
- It has stored energy (carbohydrates) in its roots and trunk throughout winter.
- New roots will begin growing almost immediately after the procedure.
- Temperatures are mild, reducing the risk of dehydration and heat stress.
Secondary Window: Late Summer to Early Autumn
Some experienced growers repot deciduous species in late summer after the year’s growth has hardened off. This can work, but the recovery window before winter is narrow. Unless you have a specific reason, early spring is safer.
When NOT to Repot
- Mid-summer: Heat stress is too high; evaporation from leaves will outpace water uptake from a pruned root system.
- Winter dormancy (for outdoor species): The tree has minimal metabolic activity and will not regenerate roots until spring.
- During flowering: The tree is under significant energy demand already.
- When the tree is sick or stressed: A weakened tree cannot recover from root pruning.
Repotting Frequency by Age and Species
| Tree Type | Young Tree (fast-growing) | Mature Tree |
|---|---|---|
| Tropical (Ficus, Fukien Tea) | Every 1–2 years | Every 2–3 years |
| Deciduous (Maple, Elm) | Every 2 years | Every 3–5 years |
| Conifers (Pine, Juniper) | Every 3–4 years | Every 4–6 years |
These are guidelines, not rules. Always check the root mass directly.
Signs Your Bonsai Is Root-Bound
You should always inspect the roots before deciding to repot, rather than relying on a rigid schedule. Here is what to look for:
- Roots circling the inside of the pot — Lift the tree gently; if you see a thick mat of roots following the pot’s contour, it is time.
- Roots emerging from drainage holes — A clear sign the pot is full.
- Water running straight through the pot — When soil structure collapses, water passes through without being absorbed.
- Dramatically reduced growth — A suddenly sluggish tree that was previously vigorous may be root-bound.
- Soil that dries out extremely fast — Roots have displaced most of the soil volume.
- The tree lifting slightly in the pot — Root pressure can physically push the tree upward.
Tools You Will Need
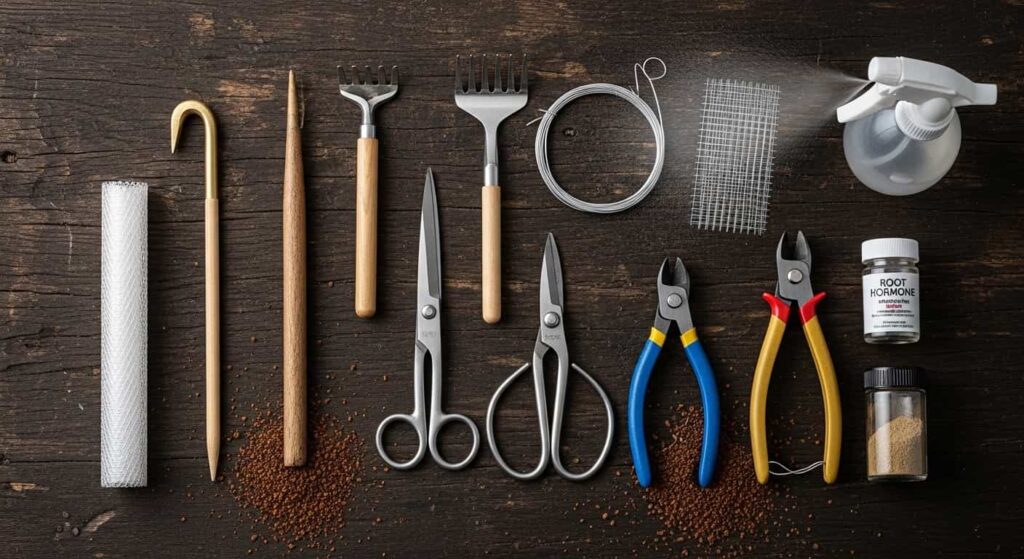
Having the right tools prepared before you begin is essential. Once a tree is out of the pot, you do not want to be searching for equipment.
- Root hook or chopstick — For loosening compacted soil from the root ball without tearing fine roots.
- Root rake — A wider tool for combing through tangled root masses.
- Sharp bonsai scissors or root pruning shears — Must be clean and sharp. Dull tools crush roots rather than cutting them, increasing die-back.
- Concave cutters — For removing any large, thick anchor roots flush to the nebari (surface root structure).
- Wire cutters — To remove the anchor wire holding the tree to the pot.
- Mesh screens — To cover drainage holes and prevent soil loss.
- Anchor wire — To secure the tree in the new pot during root regeneration.
- Spray bottle — To mist exposed roots and keep them from drying out during the process.
- Rooting hormone (optional) — Powder or gel applied to cut root ends to speed regeneration.
Sterilize your cutting tools with isopropyl alcohol or a diluted bleach solution before you begin. This prevents introducing fungal or bacterial pathogens to fresh cuts.
Choosing the Right Bonsai Pot
The pot you choose after root pruning affects both the health and aesthetics of your tree.
Size
The most common mistake is choosing a pot that is too large. A pot that is far bigger than the root ball holds too much moisture, which can lead to root rot in a freshly pruned root system.
As a general rule:
- Width: The pot should be roughly two-thirds the height of the tree, or two-thirds the width of the tree’s canopy (use the larger measurement).
- Depth: Roughly equal to the trunk diameter at the base for most trees. Conifers can go slightly deeper; cascade styles require tall pots by design.
Drainage
A repotted bonsai with freshly pruned roots is extremely vulnerable to waterlogging. Ensure the pot has adequate drainage holes — ideally two or more.
Material
- Unglazed ceramic/stoneware: Best for most trees. Breathable, regulates temperature.
- Glazed ceramic: Retains moisture slightly longer; good for trees that prefer consistent moisture (like Fukien Tea or tropical species).
- Plastic: Excellent for recovery pots or trees in intensive development; not traditional but very functional.
Best Soil Mix for Repotting
The soil you use after root pruning may be the most consequential decision in the entire process. Bonsai roots regenerating from pruning cuts are fragile and highly vulnerable to two things: waterlogging and soil compaction.
What Bonsai Soil Must Do
- Drain freely — Water should pass through within seconds of watering.
- Retain some moisture — The mix should not dry out instantly.
- Allow gas exchange — Roots need oxygen. Compact soil suffocates them.
- Provide some mineral nutrient base — Though bonsai rely heavily on fertilizer, the soil should not be completely inert.
Recommended Components
Akadama is the foundation of most quality bonsai mixes. It is a hard-baked Japanese clay that breaks down slowly, retains moisture while draining freely, and has a slightly acidic pH. It makes up 50–60% of most mixes.
Pumice is a volcanic mineral that improves drainage and aeration. It does not break down, which helps maintain soil structure long-term. Use 20–30%.
Kiryu or decomposed granite is excellent for conifers. Very fast draining and gritty. Use 20–30% for pines and junipers.
Coarse perlite can substitute for pumice and is widely available.
Organic material (fine pine bark, composted bark): Small amounts — 10–20% maximum — can help moisture retention and provide some organic matter. More than this compromises drainage.
Example Mixes by Tree Type
| Species Type | Akadama | Pumice | Kiryu/Grit | Organic |
|---|---|---|---|---|
| Deciduous (Maple, Elm) | 50% | 30% | 10% | 10% |
| Conifers (Pine, Juniper) | 33% | 33% | 34% | 0% |
| Tropical (Ficus, Jade) | 40% | 30% | 10% | 20% |
Avoid garden soil, potting compost, or peat-based mixes entirely. They compact quickly, retain excessive moisture, and will harm a freshly pruned root system.
Step-by-Step Root Pruning Process
Work methodically and keep the tree shaded and misted throughout. Never let exposed roots dry out — even five minutes of direct sun on bare roots can kill them.
Step 1: Remove the Tree from the Pot
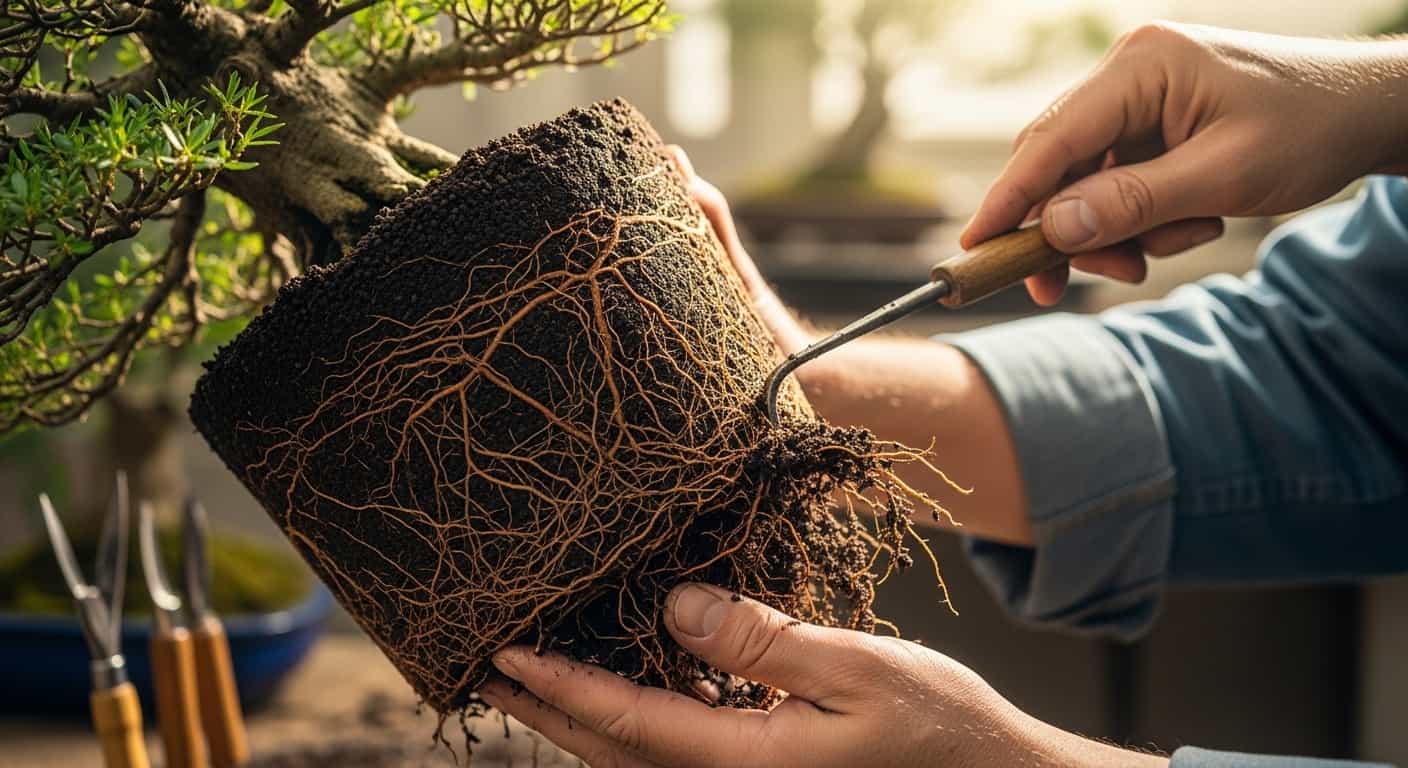
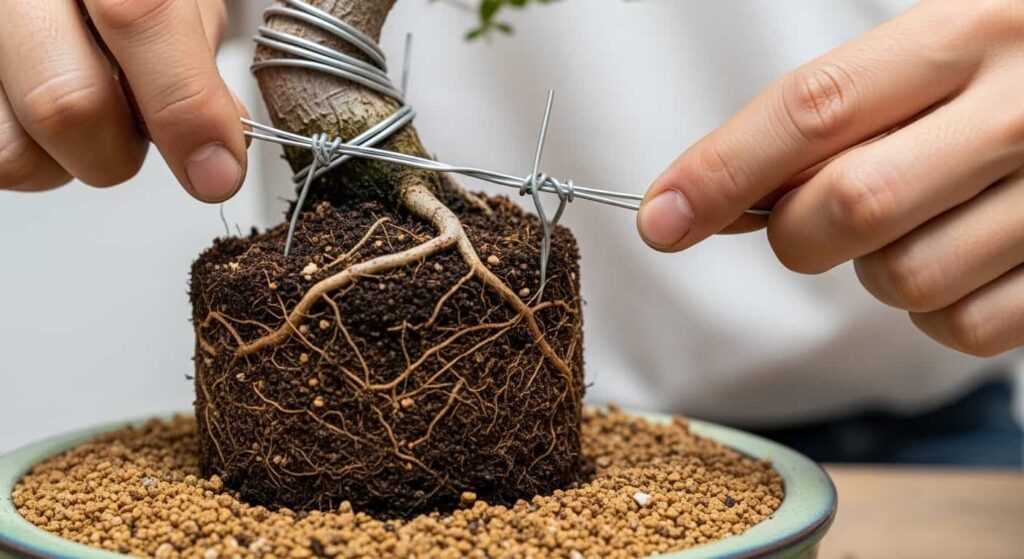
Cut or untwist any anchor wire holding the tree in place. Run a root knife or spatula around the inside edge of the pot to loosen the root ball. Gently lift the tree straight up. Do not twist or rock aggressively — this can snap large surface roots.
Step 2: Remove Old Soil
Using a root hook or chopstick, begin loosening the soil from the outside of the root ball and working inward. Work carefully. The goal is to expose individual roots, not to rip them free. Remove as much of the old soil as practical — ideally 50–75% of the volume.
Pay attention to the nebari (the surface root structure). Gently clean around these roots, as they are both functionally important and aesthetically significant.
Step 3: Assess the Root System
Before cutting anything, examine what you have. Look for:
- Circling roots — Roots that have grown around the pot’s circumference and are now competing with themselves.
- Downward-growing tap roots — These are appropriate for trees in the ground but undesirable in a shallow bonsai pot.
- Dead or rotting roots — Brown, mushy roots with no live tissue.
- Excessively thick roots — Old, woody roots that are taking up space without contributing much feeder root development.
- Fine feeder roots — Healthy pale or white hair-like roots. Preserve as many of these as possible.

Step 4: Prune the Roots
Work from the bottom of the root ball first, then the sides.
- Remove dead or rotting roots entirely, cutting back to live tissue.
- Shorten circling roots, cutting them back to a point where they grow in a more radial direction.
- Remove any roots growing straight downward if you are moving to a shallow pot.
- Cut large, thick anchor roots that are dominating the lower portion of the root ball.
- Trim the outer perimeter of the root ball to fit the new pot with a small amount of clearance on all sides.
Make each cut clean and decisive. Angle cuts slightly so the cut face points downward, which helps with water shedding and reduces the chance of rot.
Step 5: Apply Rooting Hormone (Optional)
If using rooting hormone, dust or apply gel to the cut ends of the larger roots. This is particularly helpful for trees that are slower to regenerate roots, such as pines and some maples.
How Much Root to Remove
This is the question most beginners struggle with. The answer depends on the species and the current health of the tree.
General guideline: Remove no more than one-third of the root mass in a single repotting.
For vigorous, healthy species like Japanese elm, Ficus, or Chinese elm, you can push toward the one-third limit.
For slower-growing or more sensitive species — particularly pines, azaleas, and older trees — be more conservative. Removing 20–25% is safer.
Why the one-third rule? The root system supports the entire canopy. When you reduce roots, the tree temporarily cannot move as much water and nutrients. If the root reduction is too severe, the canopy wilts faster than the tree can compensate, causing dieback. If this happens consistently, the tree weakens progressively.
If a tree is severely root-bound and needs dramatic pruning, consider doing it in two stages across two repotting cycles rather than all at once.
Repotting After Root Pruning: The Full Process
Step 1: Prepare the New Pot
Cover drainage holes with mesh screens, cut to size and secured with thin wire or the same anchor wire you will use for the tree. This keeps soil in and pests out while maintaining drainage.
Step 2: Lay the Drainage Layer
Add a thin layer (1–2 cm) of coarser grit or larger pumice to the very bottom of the pot. This prevents the fine soil mix above from slowly migrating into the drainage holes and aids drainage directly at the bottom of the root mass.
Step 3: Add a Base Layer of Fresh Soil
Add enough fresh bonsai soil to elevate the tree to the correct height when placed in the pot. The surface roots (nebari) should sit slightly above the pot’s rim — typically 2–5 mm — to account for slight settling and to allow the nebari to be visible.
Step 4: Position the Tree
This is both a horticultural and an aesthetic decision. Take a moment to consider:
- Front: Which angle shows the trunk line, nebari, and branching structure most compellingly?
- Off-center placement: In most traditional styles, the tree is not centered in the pot but placed slightly off-center, at roughly one-third to two-fifths from one side.
- Tilt: A very slight forward tilt (1–3 degrees) gives the impression of the tree leaning naturally toward the viewer.
Once satisfied with positioning, hold the tree steady and begin adding soil.
Step 5: Wire the Tree into the Pot
Thread anchor wire up through the drainage holes and over the root ball, twisting it firm to hold the tree securely. This is not optional — it is critical. A freshly pruned root system cannot anchor the tree. Any movement during the early recovery period will tear new root growth from the cuts, severely delaying recovery. The tree should have absolutely zero movement when you push it gently from the side.
Step 6: Work In the Soil
Add fresh soil in increments, using a chopstick or root hook to work the soil down into air pockets between roots. This is patient, methodical work. Do not rush it.
Work the chopstick vertically in a gentle jabbing motion to consolidate the soil without compacting it. Pay particular attention to the area directly beneath the trunk and around the major surface roots.
Continue adding and working soil until the pot is filled to just below the rim (leaving about 5–10 mm for watering).
Step 7: Water Thoroughly
Water the tree slowly and completely. Allow water to penetrate the entire soil column. Water until it runs clear from the drainage holes. This initial watering also helps settle the soil and eliminates remaining air pockets.
If you have access to rainwater or filtered water, use it. Hard tap water is acceptable but may affect soil pH over time.
Post-Repotting Care and Recovery
The first four to six weeks after repotting are the most critical. During this period the tree must regenerate its root system before it can fully support the canopy.
Placement
Place the repotted tree in a sheltered location with bright, indirect light. Avoid:
- Full sun (excessive transpiration stress)
- Strong wind (increases moisture demand)
- Heavy rain for the first week (can displace fresh soil or waterlog the mix)
- Frost (cold soil inhibits root regeneration)
A cold greenhouse, polytunnel, or shaded outdoor bench is ideal. After two to four weeks, as new growth begins to appear, gradually reintroduce the tree to its normal growing conditions.
Watering
Water when the top layer of soil begins to feel slightly dry. Freshly pruned roots are more vulnerable to both drying out and waterlogging. Check daily and adjust based on conditions.
Do not water on a fixed schedule during recovery. Learn to read the soil and the tree.
Fertilizing
Do not fertilize for four to six weeks after repotting. The tree’s root system cannot absorb fertilizer efficiently yet, and concentrated fertilizer salts can damage freshly cut root tips.
After the initial recovery period, introduce a balanced, low-nitrogen fertilizer at half strength. After approximately eight weeks, once healthy new growth confirms successful recovery, resume a normal feeding program.
Foliar Misting
Lightly misting the foliage once or twice daily during the first few weeks reduces transpiration stress, particularly for deciduous trees that have leafed out. Do not mist to the point of creating standing water on the leaves.
Do Not Style Immediately
Resist the urge to wire or prune the canopy for at least one full growing season after repotting. The tree needs all its energy for root regeneration. Styling imposes additional stress. Wait until the following year when the root system has fully re-established.
Signs of Successful Recovery
- New leaf and shoot growth emerging on schedule
- Firm, upright posture in the pot
- Normal watering interval returning (soil taking the usual time to dry)
- No wilting during the warmest part of the day
Signs of Problems
- Wilting that does not recover after watering — possible severe root damage or root rot
- Yellowing leaves across the entire canopy — overwatering or root rot
- Browning leaf tips — dehydration stress; increase humidity and reduce direct sun
- No new growth after four to six weeks in spring — assess the root system; there may have been a problem during repotting
Common Mistakes to Avoid
Repotting at the Wrong Time
Repotting in summer heat or mid-winter is the most common cause of failure. Always time repotting to the early spring bud-swell window.
Using the Wrong Soil
Heavy potting compost or garden soil retains too much water and compacts around new root growth. It will cause decline even in a healthy tree. Invest in proper bonsai substrate.
Removing Too Many Roots
Aggressive root pruning in a single session stresses the tree severely. Follow the one-third rule, and be more conservative with slow-growing or older trees.
Leaving Air Pockets
Air pockets in the soil cause root segments to dry out and die. Work soil thoroughly into all spaces around the root ball using a chopstick.
Skipping the Anchor Wire
A tree that moves in the pot cannot regenerate roots efficiently. New rootlets are torn from cut surfaces every time the tree shifts. Always wire the tree down securely.
Fertilizing Too Soon
Fertilizer salts applied to freshly cut roots cause tip burn and cell damage. Wait a minimum of four to six weeks.
Placing in Direct Sun Immediately
A freshly repotted tree cannot move enough water to handle full sun exposure. The canopy loses moisture faster than the damaged root system can replace it. Shade is essential during recovery.
Using a Pot That Is Too Large
Excess soil volume stays wet too long. Root rot in a freshly pruned root system is fast and often fatal. Size the pot appropriately.
Species-Specific Repotting Tips
Japanese Maple (Acer palmatum)
Repot in early spring just as buds begin to swell. Maples are relatively forgiving. Use an akadama-heavy mix. Cut roots cleanly; maples respond well to root pruning and regenerate quickly. Avoid repotting every year — every two to three years is sufficient for mature specimens.
Japanese Black Pine (Pinus thunbergii)
Pines require special treatment. Repot in late winter to very early spring before any candle extension. Pines rely on mycorrhizal fungi in their root zone; retain a small portion of old soil when repotting to preserve this fungal community. Never remove more than 20–25% of root mass.
Juniper (Juniperus spp.)
Repot in early spring. Junipers are moderately tolerant of root pruning. Use a very fast-draining mix (kiryu-heavy or grit-heavy). Junipers dislike waterlogging intensely; err toward a drier soil mix compared to deciduous species.
Chinese Elm (Ulmus parvifolia)
One of the most forgiving bonsai subjects. Can be repotted in spring or late summer. Regenerates roots aggressively. An excellent species for beginners learning root pruning. Standard akadama/pumice mix works well.
Ficus (Ficus spp.)
Tropical species; repot when temperatures are warm — late spring to early summer is ideal in temperate climates. Ficus tolerate aggressive root pruning. They appreciate a slightly more moisture-retentive mix than conifers. Keep warm during recovery (above 15°C / 60°F).
Azalea (Rhododendron spp.)
Repot immediately after flowering in late spring. Azaleas require an acid soil (pH 4.5–5.5). Use kanuma (a Japanese acid pumice) as the primary substrate or a mix of kanuma and fine bark. Do not use akadama as the primary component. Be very gentle with their fine, fibrous root systems.
Trident Maple (Acer buergerianum)
Extremely vigorous. Can be repotted every year when young. Develops excellent nebari quickly with regular root pruning. Responds well to aggressive root work. Use standard deciduous mix.
Frequently Asked Questions
Can I repot a bonsai that is flowering or fruiting?
It is best to wait. The tree is under significant metabolic demand during flowering and fruiting. Repot before flowering in spring, or wait until flowering is complete. Fruiting trees should be repotted well before fruit set.
My tree lost most of its leaves after repotting. Is it dying?
Not necessarily. Some leaf drop after repotting is normal, particularly in deciduous species. Place the tree in shade, keep the soil lightly moist, and watch for new growth over the next few weeks. As long as the buds remain plump and green, the tree is likely recovering.
Should I seal the root pruning cuts?
For most deciduous species, this is not necessary — clean cuts heal quickly. For large cuts on pines or junipers, a small amount of cut paste or wound sealant may reduce the chance of infection, but it is not universally required.
How long until I can style my bonsai after repotting?
Wait at least one full growing season. Ideally, repot in spring and style the following spring or autumn once the root system is fully re-established.
Can I repot into the same pot?
Yes. If the pot is the right size and style, simply clean it thoroughly, remove any algae or mineral deposits, and reuse it. Scrub with a stiff brush and rinse well before use.
My new soil seems to dry out very fast. Is that a problem?
Fast drainage is actually desirable in bonsai soil. It means the mix is performing correctly. Simply water more frequently. Slow-draining soil that stays wet is far more dangerous than fast-draining soil that requires frequent watering.
What if I accidentally remove too many roots?
Immediately reduce the leaf area by removing up to one-third of the foliage to balance the reduced root capacity. Place the tree in deep shade with high humidity. Mist foliage frequently. The tree will need careful management through the rest of the growing season.
Final Thoughts
Repotting and root pruning are not emergencies to be dreaded — they are essential maintenance that keeps your bonsai alive and vigorous over the long term. A tree that is regularly repotted on the right cycle, with clean root pruning and fresh substrate, will reward you with increasingly refined roots, responsive growth, and long-term health.
The most important principles to take away are these: time it to early spring, use proper free-draining soil, never remove more than one-third of the root mass, secure the tree firmly in the pot, and give it a quiet, shaded recovery period before returning it to full sun and a normal care routine.
Master these fundamentals, and repotting will become one of the most satisfying rituals in your bonsai practice.