
Last Updated on March 16, 2026 by Indoor Plant Nook
Root pruning is one of the most important — and most misunderstood — aspects of juniper bonsai care. Done correctly, it promotes vigorous growth, maintains the tree’s compact size, and keeps your bonsai thriving for decades. Done incorrectly, it can stress or even kill your tree.
Whether you’re repotting for the first time or refining a mature specimen, this guide covers everything you need to know about juniper bonsai root pruning: when to do it, how to do it safely, and how to care for your tree afterward.
Why Root Pruning Matters for Juniper Bonsai
In nature, a juniper’s roots spread outward through the soil, seeking water and nutrients. In a bonsai pot, those same roots circle, tangle, and eventually become root-bound. When this happens:
- The tree struggles to absorb water and nutrients efficiently
- Thick, woody roots crowd out the fine feeder roots that actually sustain the tree
- The soil breaks down and loses its drainage capacity
- The overall health and vigor of the tree declines
Root pruning solves all of these problems at once. By removing old, thick roots and encouraging a dense network of fine roots close to the trunk, you give your juniper the foundation it needs to flourish in its container.
When to Prune Juniper Bonsai Roots
Timing is critical. Root pruning at the wrong time of year can seriously damage or kill your tree.
Best Time: Early Spring
The ideal window for pruning juniper bonsai roots is early spring, just as the buds begin to swell but before new growth pushes out. At this point:
- The tree is coming out of dormancy and has the energy to recover
- Soil temperatures are warming, stimulating new root growth
- You can observe the tree’s health before committing to a major procedure
Acceptable Alternative: Late Summer to Early Fall
If you miss the spring window, late summer (August) can work for light root pruning, especially in warmer climates. The tree still has several weeks of warm weather to establish new roots before winter. However, avoid this timing in regions with early, hard frosts.
Times to Absolutely Avoid
- Midsummer: Heat stress combined with root disturbance is a dangerous combination
- Late fall and winter: The tree is entering or in dormancy and cannot generate new roots effectively
- Immediately after heavy pruning: Never prune roots and branches in the same session unless absolutely necessary — each procedure stresses the tree
Rule of thumb: If your juniper looks sick, weak, or stressed, do not prune its roots. Nurse it back to health first.
How Often Should You Root Prune?
Most juniper bonsai benefit from root pruning every 2 to 3 years, though this varies depending on:
- Tree age: Young, vigorous trees may need repotting annually. Older, established trees can go 3 to 5 years between root prunings.
- Pot size: Trees in smaller pots become root-bound faster
- Growth rate: Fast-growing cultivars like Juniperus chinensis may need more frequent attention
How to check: In late winter, gently tip the tree out of its pot. If you see a tight mass of circling roots with little visible soil, it’s time to repot and prune. If the root ball holds its shape loosely and you can see plenty of soil, you can wait another year.
Tools You’ll Need
Having the right tools makes root pruning safer and more precise. Gather these before you begin:
- Root rake or chopstick: For loosening and combing out the root mass
- Bonsai root scissors or shears: Sharp, clean cuts are essential
- Concave branch cutters: For removing thick, woody anchor roots
- Wire brush: To clean old soil from surface roots
- Fresh bonsai soil mix: A well-draining mix suited to junipers (akadama, pumice, and lava rock is a popular blend)
- Clean bonsai pot: Or the same pot, thoroughly washed
- Mesh drainage screens: To keep soil in and pests out
- Rooting hormone powder (optional): Can encourage faster root regeneration
- Spray bottle with water: To keep roots from drying out while you work
Always sterilize your cutting tools with isopropyl alcohol before and after use to prevent transferring disease between trees.
Step-by-Step: How to Prune Juniper Bonsai Roots
Step 1: Water the Tree the Day Before
Water your juniper thoroughly 24 hours before root pruning. Moist roots are less brittle and easier to work with. Do not water immediately before, as wet, dripping roots are harder to handle.
Step 2: Prepare Your Workspace
Set up in a shaded, wind-protected area. Direct sun and wind dry out roots very quickly during the pruning process. Have your fresh soil, pot, and tools within easy reach so you can work efficiently.
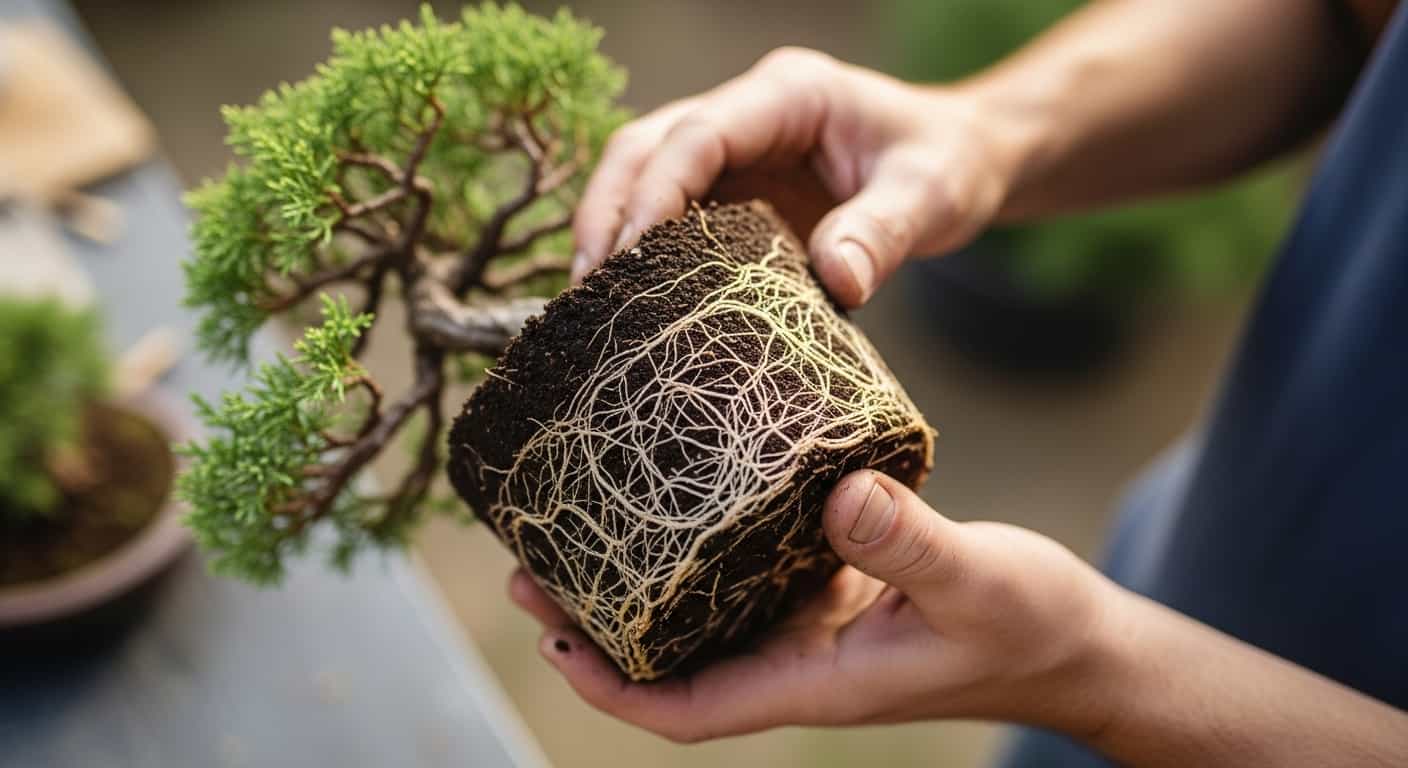
Step 3: Remove the Tree from Its Pot
Turn the pot sideways and gently ease the tree out. If it’s stuck, use a chopstick or root hook to loosen the edges. Avoid pulling on the trunk.
Step 4: Loosen and Remove Old Soil
Use a root rake or chopstick to comb out old soil from the root mass, working from the outside inward. Be gentle — you don’t want to tear roots unnecessarily. Remove roughly one-third to one-half of the old soil, focusing on the bottom and sides.
This step reveals the root structure so you can make informed pruning decisions.
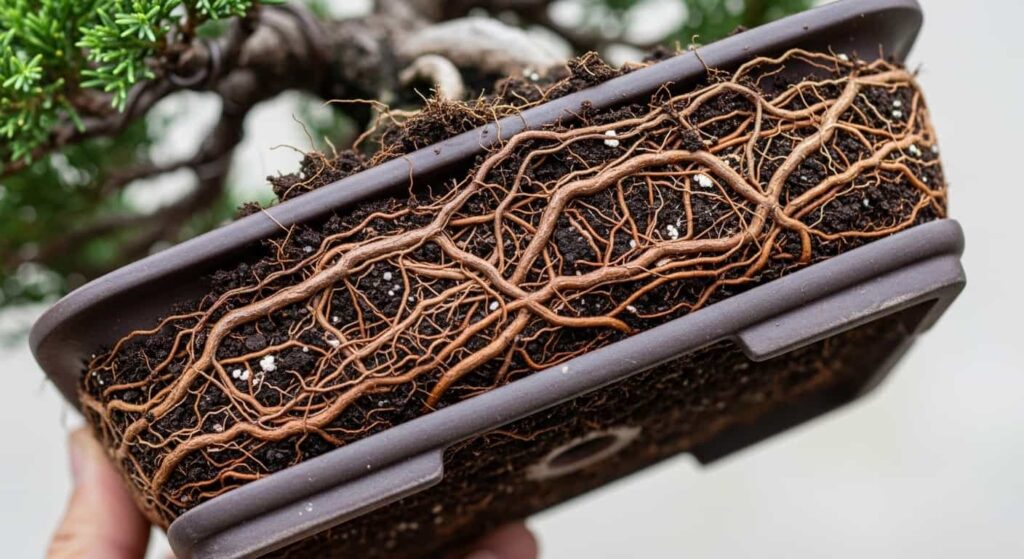
Step 5: Evaluate the Root System
Before cutting anything, take a moment to assess what you’re working with:
- Identify the nebari (surface roots) — these are aesthetically important and should be preserved
- Look for thick, downward-diving taproots — these usually need to be reduced
- Note any circling roots that are girdling others — these should be removed or redirected
- Identify dead, mushy, or dark roots — these are signs of rot and must be cut away
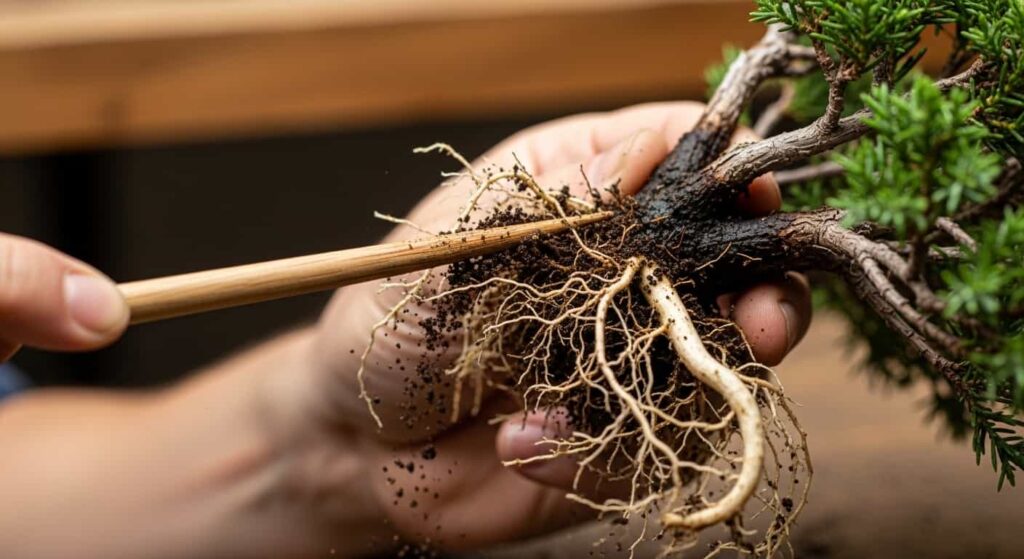
Step 6: Prune the Roots
Now comes the actual pruning. Follow these principles:
Remove these roots:
- Dead, rotten, or darkened roots
- Roots that are circling tightly around the trunk base
- Long roots with no fine branching near their tips
- Excessively thick anchor roots that are out of proportion
Keep these roots:
- Fine, white or tan-colored feeder roots
- Well-distributed radial surface roots (for good nebari development)
- Healthy roots with visible fine branching
How much to remove: As a general rule, never remove more than one-third of the total root mass in a single pruning session. For stressed or weak trees, reduce this to one-quarter or less.
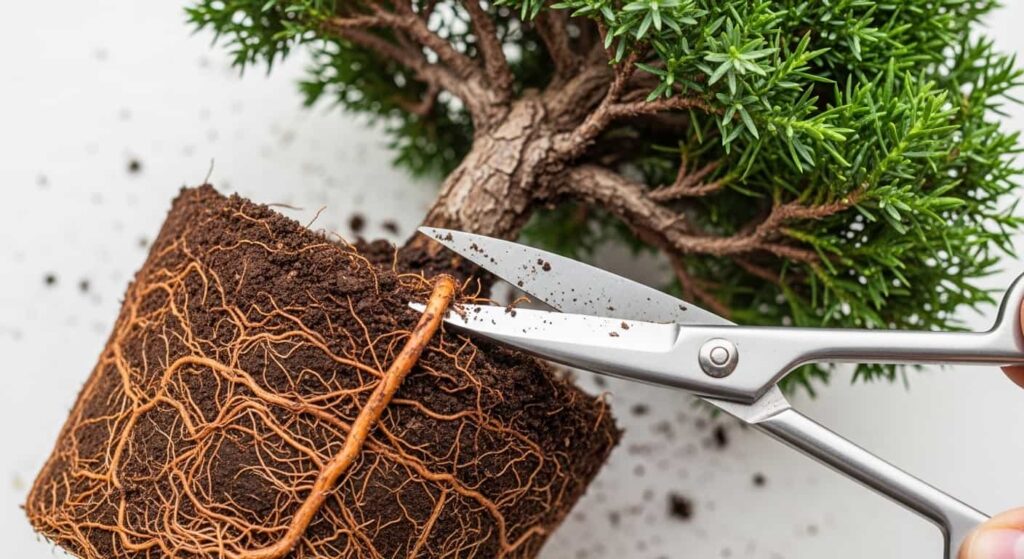
Use your root scissors for fine roots and concave cutters for thicker roots. Cut cleanly — ragged cuts invite disease and heal slowly.
Step 7: Trim the Bottom of the Root Ball
After removing problem roots, trim the bottom of the root ball so it sits properly in the pot. This also removes old, exhausted roots at the base and stimulates new growth.
Step 8: Repot with Fresh Soil
Prepare your pot with drainage screens and a layer of coarse soil at the bottom. Position the tree, then fill in with fresh bonsai soil mix, using a chopstick to work the soil into all the gaps and around the roots. Avoid air pockets — they lead to dry spots and root death.
Secure the tree in the pot using wire through the drainage holes if needed. The tree should not rock or wobble.
Step 9: Water Thoroughly
Water the freshly repotted tree until water runs freely from the drainage holes. This settles the soil and ensures good root-to-soil contact.
Aftercare: The Critical Recovery Period

The weeks following root pruning are when most failures happen. Give your juniper the right conditions to recover successfully.
Placement
For the first 4 to 6 weeks, keep your juniper in a sheltered location with bright, indirect light. Avoid:
- Full afternoon sun, which can cause excessive transpiration when roots are limited
- Strong winds, which dry out foliage faster than weakened roots can supply moisture
- Frost or freezing temperatures (if repotting in early spring)
After new growth appears and the tree looks vigorous, you can gradually reintroduce it to its normal position.
Watering
Water carefully during recovery. The soil should stay consistently moist but never waterlogged. With a reduced root system, the tree can’t tolerate drought — but saturated soil will cause rot in the fresh cut surfaces.
Check the soil daily by pressing your finger into the top layer. Water when it begins to dry out.
Fertilizing
Do not fertilize for at least 4 to 6 weeks after root pruning. The cut root surfaces are vulnerable, and fertilizer salts can burn them. Once you see vigorous new growth — a sign that the root system has recovered — you can resume a regular fertilizing schedule.
Use a balanced fertilizer (such as a 10-10-10 or organic bonsai fertilizer) at half strength for the first application.
Resist the Urge to Prune Branches
After root pruning, the tree is in recovery mode. Unless there’s a dead, diseased, or dangerously crossing branch, hold off on any significant branch pruning for at least one full growing season. The foliage is doing the work of fueling root regeneration — removing it slows recovery.
Common Mistakes to Avoid

Even experienced bonsai growers sometimes make these errors. Here’s what to watch for:
1. Pruning roots and branches at the same time This double-stress is one of the most common causes of post-repotting failure. Space out root and branch work by at least a few weeks — ideally a full season.
2. Removing too many roots at once More is not better. Removing more than one-third of the root mass at once can push the tree into severe stress. If the roots are extremely congested, you may need to spread the work over two repotting cycles.
3. Using dull or dirty tools Dull blades crush root tissue rather than cutting it cleanly. Crushed tissue is more susceptible to rot and disease. Sharpen and sterilize your tools before every session.
4. Exposing roots to air for too long Juniper roots dry out quickly. Work as efficiently as possible, and mist the root ball with water if you need to pause. Roots that dry out significantly during repotting often fail to recover.
5. Repotting into the wrong soil Junipers need excellent drainage. Dense, water-retentive soils (including many commercial potting mixes) are not suitable. Stick to a well-draining bonsai mix with a high percentage of inorganic material.
6. Skipping the recovery period Placing a freshly repotted juniper in full sun or strong wind immediately after root pruning is asking for trouble. Respect the recovery period.
Special Considerations for Different Juniper Species
Different juniper species have slightly different tolerances. Here are notes on the most commonly cultivated varieties:
Juniperus chinensis (Chinese Juniper)
Hardy and vigorous — one of the most beginner-friendly species for root pruning. Tolerates moderate root reduction well and recovers quickly.
Juniperus procumbens (Japanese Garden Juniper)
A popular choice for bonsai, especially the ‘Nana’ variety. Generally robust, but the shallow root system requires care to preserve the nebari structure.
Juniperus rigida (Temple Juniper)
Highly prized in Japanese bonsai. More sensitive than Chinese juniper — keep root reduction conservative (no more than one-quarter of the root mass) and provide extra shelter during recovery.
Juniperus squamata (Flaky Juniper)
Less common but equally rewarding. Follows the same general guidelines as Chinese juniper, with good recovery ability.
Quick Reference: Juniper Root Pruning at a Glance
| Factor | Recommendation |
|---|---|
| Best timing | Early spring (buds swelling) |
| Frequency | Every 2–3 years (young trees) / 3–5 years (mature) |
| Max root removal | One-third of total root mass |
| Tools | Root scissors, concave cutters, root rake |
| Soil | Well-draining bonsai mix (akadama, pumice, lava) |
| Post-pruning sun | Bright indirect light for 4–6 weeks |
| First fertilizer | 4–6 weeks after new growth appears |
| Branch pruning | Wait at least one growing season |
Final Thoughts
Root pruning is a fundamental skill that separates casual bonsai owners from committed practitioners. For juniper bonsai especially, a well-maintained root system is the foundation of everything — vigorous foliage, fine branching, and the kind of long-term health that lets a tree be passed down through generations.
The key principles are simple: prune in early spring, never remove more than a third of the roots, work quickly to protect exposed roots, and give the tree time and shelter to recover. Follow these guidelines, and your juniper will reward you with stronger growth every season.
With each repotting cycle, you’ll develop a better understanding of your specific tree’s root habits and recovery patterns. Over time, root pruning becomes less intimidating and more rewarding — a quiet ritual that deepens your relationship with the tree.