
Last Updated on March 18, 2026 by Indoor Plant Nook
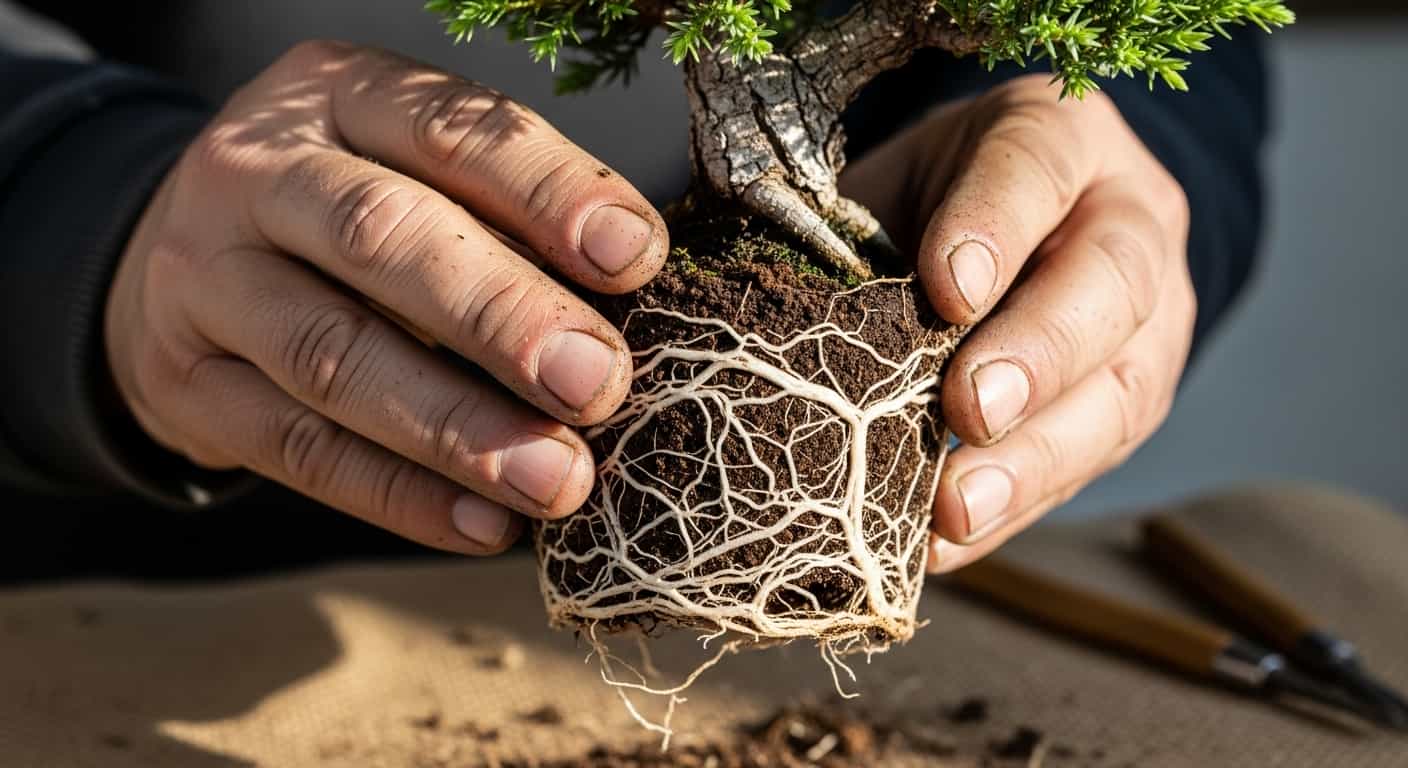
Root washing is one of the most transformative — and nerve-wracking — techniques in bonsai care. Done right, it gives you full visibility of the root structure, lets you remove old compacted soil completely, and sets your tree up for a decade of healthy growth. But the real work begins after the wash.
This guide walks you through every step of repotting your bonsai after root washing, from choosing the right pot to aftercare that ensures survival.
What Is Root Washing and Why Does It Matter?
Root washing (also called bare-rooting) is the process of removing all old soil from a bonsai’s root system — typically done with a gentle stream of water — exposing bare roots for inspection and pruning.
It’s most commonly performed:
- During the repotting of collected trees (yamadori)
- When switching from heavy clay or organic soil to a free-draining inorganic mix
- To diagnose root rot or pest issues
- To reset a neglected or overpotted tree
After a thorough root wash, the tree is completely bare-rooted and extremely vulnerable. How you repot it in the next 20–30 minutes directly determines whether it thrives or declines.
Best Time to Repot Bonsai After Root Washing
Timing matters. Root washing followed by repotting is best done:
- Early spring, just before buds begin to swell — this is the gold standard for most deciduous and conifer species
- Late winter for tropical and subtropical species kept indoors
- Avoid late summer or autumn — the tree needs a growing season ahead of it to recover
If you’re root-washing due to an emergency (root rot, pest infestation), timing is secondary to necessity. Act immediately regardless of season, and provide extra aftercare.
Tools and Materials You’ll Need
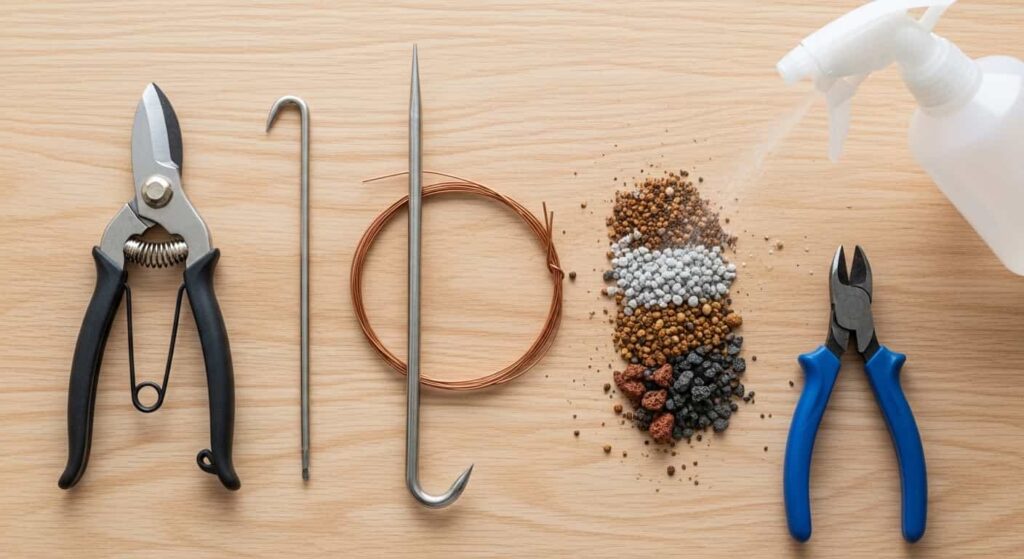
Gather everything before you begin. Once roots are exposed, the clock is ticking.
Tools:
- Root rake or chopstick (for untangling)
- Sharp bonsai scissors or root pruners
- Wire cutters
- Soft brush
- Spray bottle filled with water
Materials:
- Clean the bonsai pot with drainage holes
- Aluminum or copper training wire (for anchoring)
- Mesh drainage screens
- Fresh bonsai soil mix (see section below)
- Sphagnum moss (optional, for surface cover)
- Rooting hormone powder (optional, for damaged roots)
Choosing the Right Soil Mix After Root Washing
This step is critical. Never reuse old soil after a root wash — it may harbor pathogens, pests, or compaction that caused problems in the first place.
A well-draining, inorganic-heavy mix is ideal post-root-wash because it:
- Prevents waterlogging around vulnerable bare roots
- Encourages new fine root growth quickly
- Allows oxygen to reach the root zone
Recommended mix for most species:
| Component | Proportion |
|---|---|
| Akadama | 50% |
| Pumice | 25% |
| Lava rock (kiryu) | 25% |
For tropical species, you can increase akadama to 60% to retain slightly more moisture. For conifers (especially junipers and pines), lean more heavily on pumice and lava rock for maximum drainage.
Step-by-Step: How to Repot Bonsai After Root Washing
Step 1: Prepare the New Pot
Before placing your tree, prepare the pot properly:
- Cut mesh screens slightly larger than each drainage hole and place them over the holes.
- Thread anchor wire (aluminum, 2–3 mm gauge) up through the drainage holes and leave the ends extending out of the pot. You’ll use these to secure the root ball later.
- Add a thin base layer (about 1–2 cm) of your coarse soil mix to the bottom of the pot.
Pro tip: Soak the pot in water briefly if it’s unglazed and porous — this prevents it from drawing moisture away from fresh roots.
Step 2: Inspect and Prune the Roots
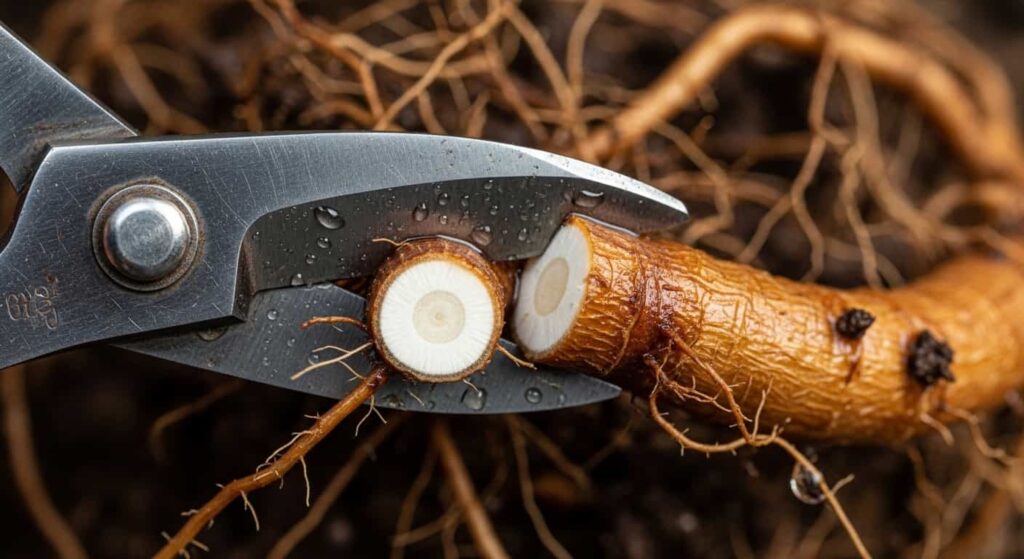
With roots fully exposed from washing, now is your opportunity to assess and correct:
- Remove dead roots: Any roots that are black, mushy, or have no white interior tissue should be cut cleanly with sharp scissors.
- Cut circling roots: Any root that wraps around the trunk base or circles the root ball must be removed or redirected.
- Shorten overly long roots: Roots extending far beyond the pot’s diameter should be trimmed to fit. Cut just above a smaller lateral root.
- Preserve fine feeder roots: White, hair-like roots are the tree’s lifeline — handle them gently and never let them dry out. Mist them with your spray bottle constantly during this step.
Only prune what’s necessary. Over-pruning roots after a root wash puts the tree under compounded stress.
Step 3: Position the Tree in the Pot
Placement is both functional and aesthetic. Take a moment here:
- Position the tree slightly off-center (roughly one-third from left or right) — this is the traditional bonsai placement rule.
- The front of the tree (the side with the most character) should face you.
- The nebari (surface roots) should sit just above the eventual soil line — not buried, not floating.
- Tilt the tree slightly if needed for better visual movement, then hold it in place.
Once satisfied with the position, hold the tree steady or have someone help while you complete the next step.
Step 4: Secure the Tree with Anchor Wire
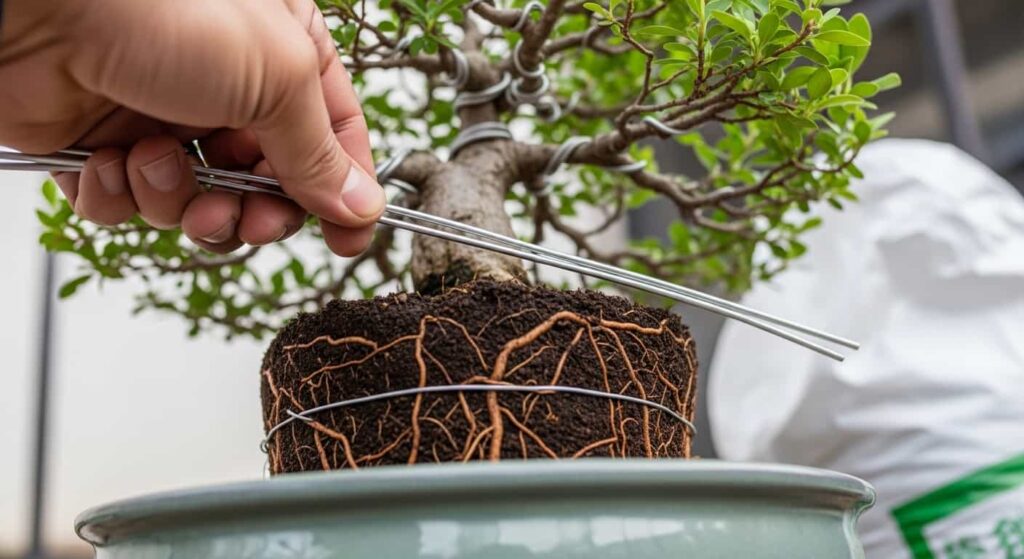
This is a step many beginners skip — and pay for later. An unsecured tree moves in the wind or when watered, tearing new root growth from the soil.
- Take the wire ends you threaded through the drainage holes in Step 1.
- Cross them over the root mass and twist them together firmly.
- The tree should not rock or shift at all. If it does, tighten the wire or add a second anchor point.
Step 5: Add Soil Around the Roots
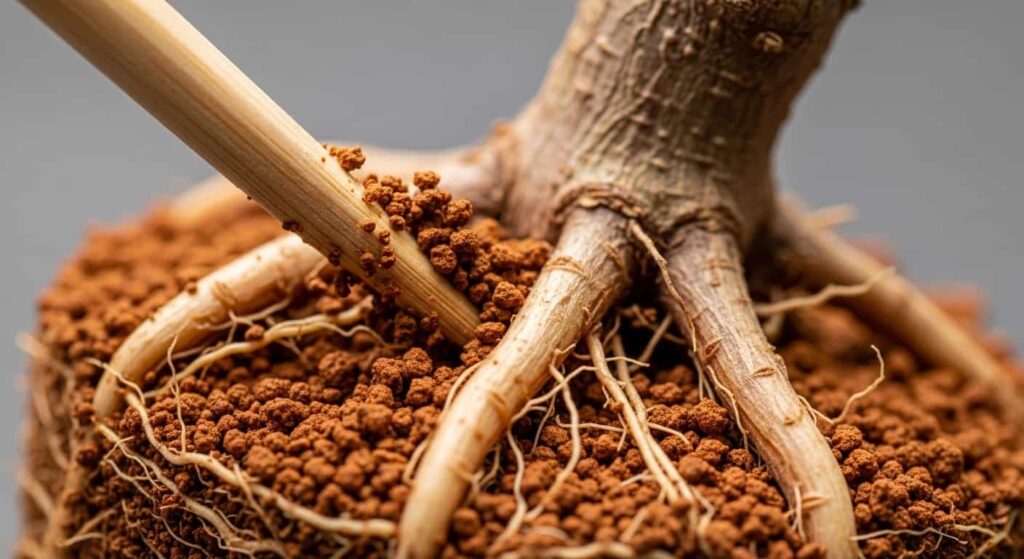
This is where patience pays off:
- Begin adding your soil mix around the roots gradually — do not dump it all at once.
- Use a chopstick or root rake to work soil into every air gap between roots. Unfilled pockets cause roots to dry out and die.
- Alternate between adding soil and gently working it in with the chopstick until the pot is filled to about 1 cm below the rim.
- Do not compact or press the soil down hard — it should settle naturally. Just eliminate air pockets.
- Add a thin top layer of fine akadama or sphagnum moss if desired, for moisture retention and aesthetics.
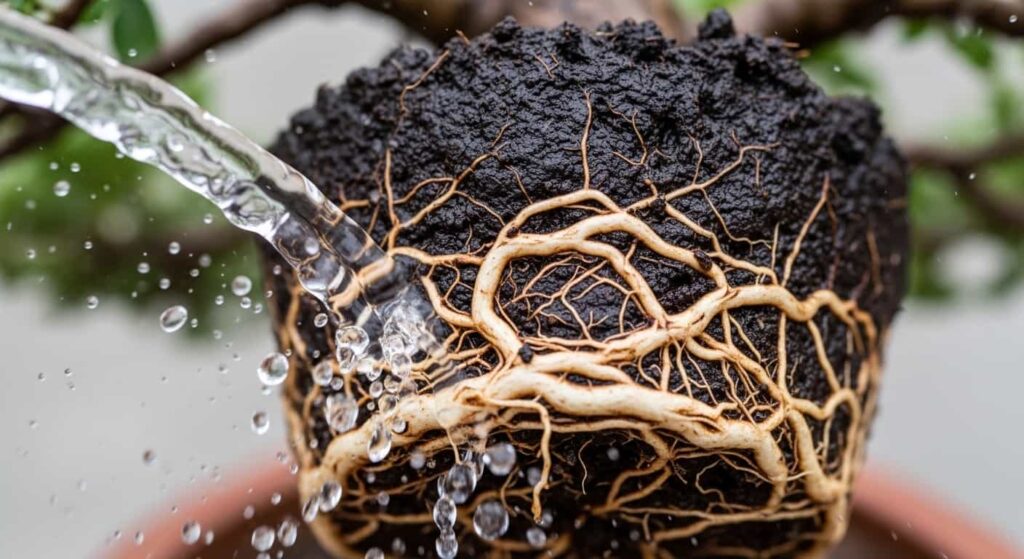
Step 6: Initial Watering
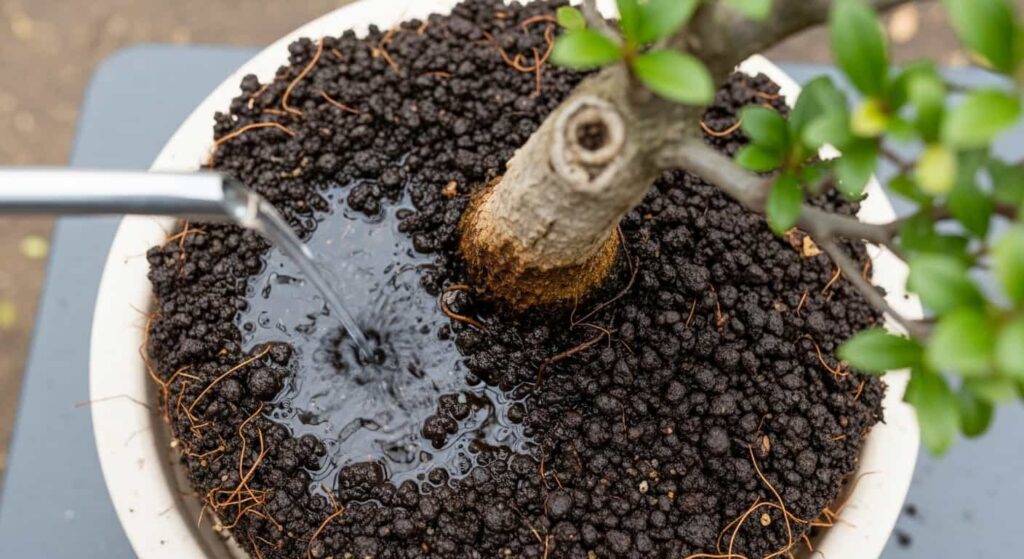
Water the tree carefully and thoroughly immediately after repotting:
- Use a fine-spray watering can or a hose with a gentle rose attachment.
- Water slowly and evenly until water runs freely from the drainage holes.
- Water a second time after a few minutes to ensure full saturation.
This first watering settles the soil, eliminates remaining air pockets, and gives roots their first moisture contact in the new medium. It’s not optional.
Aftercare: The Critical Recovery Period

Repotting after a root wash puts real stress on a tree. The next 4–6 weeks are the recovery window, and your care during this period determines long-term success.
Placement and Light
- Keep the tree out of direct sun for the first 2–3 weeks. Bright, indirect light is ideal.
- Avoid placing it in a greenhouse immediately — high humidity with low airflow can promote fungal issues on pruned roots.
- Protect from wind, which accelerates moisture loss from roots and foliage faster than the damaged root system can compensate.
Watering
- Water when the top 1–2 cm of soil begins to dry — not on a fixed schedule.
- Fresh bonsai soil drains fast, so check daily, especially in warm weather.
- Never let the soil dry out completely in the first month.
- Avoid fertilizing for the first 4–6 weeks — damaged roots cannot absorb nutrients effectively, and fertilizer salts can burn them.
Signs of Recovery
Healthy recovery looks like:
- New buds swelling and extending (deciduous species)
- New candles elongating (pines)
- Firm, turgid leaves with no significant yellowing or drop
- Resistance when you gently tug the tree — a sign roots are anchoring into the new soil
Signs of Trouble
Watch for:
- Severe leaf drop or wilting beyond initial post-repot stress
- Yellowing that spreads progressively
- No new growth 6–8 weeks after repotting in spring
If you see these signs, move the tree to a shaded, humid location, reduce watering slightly, and consider wrapping the pot in burlap or damp sphagnum to retain moisture.
Common Mistakes to Avoid
1. Letting roots dry out during the process. Bare roots exposed to air for even 10–15 minutes begin to die. Keep a spray bottle on hand and work quickly.
2. Planting at the wrong depth. Burying the nebari too deep prevents proper surface root development and weakens the tree’s visual base over time.
3. Skipping the anchor wire. Movement breaks fragile new root growth. Always secure the tree, even for short-term repots.
4. Over-pruning roots. After a root wash, the tree is already stressed. Only cut what’s dead, damaged, or structurally problematic.
5. Fertilizing too soon. Wait until the tree shows clear signs of active new growth before introducing fertilizer.
6. Repotting into oversized pots. A pot that’s too large holds excess moisture that roots can’t absorb, increasing rot risk. Choose a pot that fits the root mass comfortably.
Species-Specific Notes
| Species | Special Consideration |
|---|---|
| Japanese Maple | Extremely sensitive; root-wash only in early spring; keep humid during recovery |
| Juniper | Tolerates root washing well; ensure excellent drainage post-repot |
| Pine | Root-wash minimally; mycorrhizal fungi on roots are essential — do not scrub them off |
| Ficus | Can be root-washed year-round in warm climates; recovers quickly |
| Chinese Elm | Hardy and forgiving; recovers well when repotted in spring |
| Azalea | Prefers acidic, peat-based mix post-wash; avoid high-alkaline akadama |
Frequently Asked Questions
How long does a bonsai take to recover after root washing?
Most healthy trees show new growth within 3–6 weeks when repotted in spring. Full recovery — meaning a strong, established root system — typically takes one full growing season.
Can I root-wash and repot in autumn?
It’s generally not recommended for deciduous or conifer species. Autumn root washing gives the tree no time to establish new roots before winter dormancy. Tropical species kept indoors are the exception.
Should I use rooting hormone after root washing?
It’s not essential, but it can be helpful when significant root pruning is necessary. Dust cut root ends with a rooting hormone powder before planting to encourage faster regeneration.
Can I root-wash a bonsai that’s already in training?
Yes. Established bonsai in training are often root-washed at every repotting cycle (typically every 2–3 years for young trees, every 4–5 years for mature ones) to refresh the soil and inspect root health.
Final Thoughts
Root washing followed by careful repotting is one of the most powerful resets you can give a bonsai. It’s invasive, but when done with the right timing, the right soil, and attentive aftercare, the results are a healthier tree with a stronger, more refined root structure.
Work quickly, mist those roots, secure your tree, and give it the shaded recovery time it deserves. Your bonsai will reward you with vigorous new growth in the weeks ahead.