

What is the life cycle of an orchid?
The life cycle of an orchid plant begins with a microscopic seed that, under ideal conditions, germinates into a protocorm. This develops into a seedling, which then enters a long vegetative stage focused on leaf and root growth. Once mature, the orchid produces a flower spike, enters the blooming stage with distinct bud and flower phases, and eventually, the flowers fade. After a period of dormancy, this natural cycle can repeat, allowing the orchid plant to produce flowers for many years with proper care.
Orchids are captivating, with an exotic beauty that has fascinated plant lovers for centuries. Yet, many people feel intimidated by them, believing they are difficult to keep alive. Understanding the life cycle of an orchid plant is the key to demystifying their care and appreciating their incredible journey. From a speck of dust-like seed to a magnificent blooming plant, the orchid life cycle is a story of patience, adaptation, and resilience.

This guide will walk you through every phase of an orchid’s life. We will explore the intricate stages of orchid growth, from germination to the glorious orchid blooming stages. Whether you’re a curious beginner or an experienced grower, knowing the orchid growth cycle will empower you to provide the best possible care for your plant. We’ll answer questions like, “What is the life cycle of an orchid?” and delve into the specifics of the orchid flower life cycle, including the development of buds and the factors that trigger blooming.
What is the Life Cycle of an Orchid?
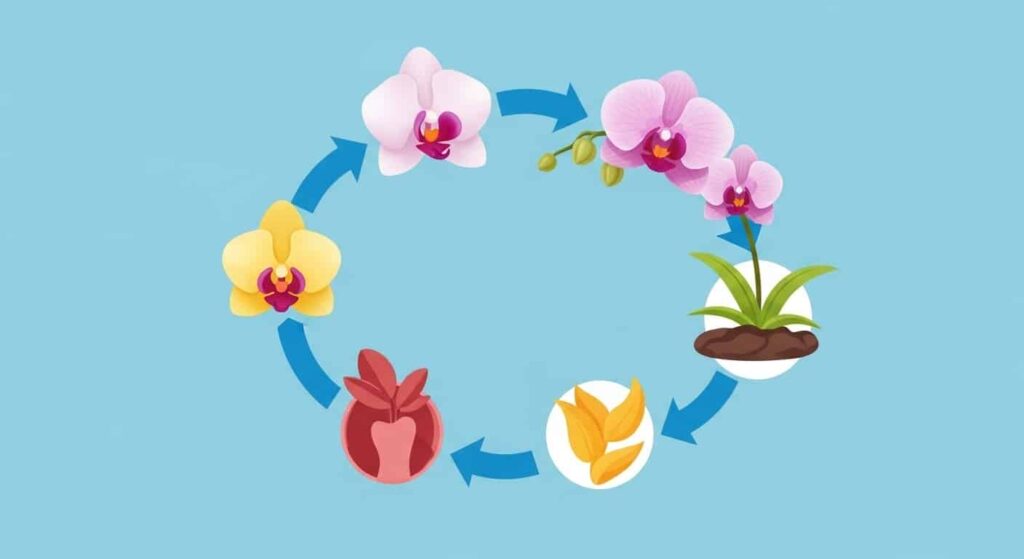
The life cycle of orchids describes the series of stages a plant goes through from its beginning as a seed to a mature, flowering plant that can reproduce. Unlike many common houseplants, the orchid lifecycle is uniquely slow and has specific requirements at each phase. The main stages of an orchid are: seed, protocorm, seedling, vegetative growth, flowering, and dormancy. Each stage has its own timeline and needs, making the life of an orchid plant a fascinating process to observe.
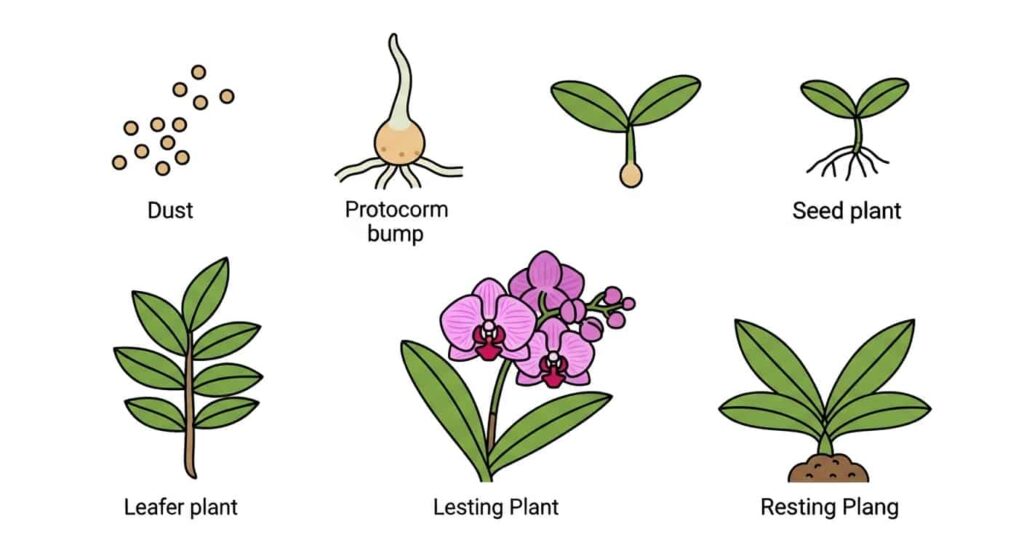
The Six Main Orchid Stages
To visualize the journey, imagine the orchid plant life cycle as a circle. Each stage transitions into the next, and with proper general care, the cycle of growth, blooming, and rest can continue for decades.
- Seed Stage: The starting point, where a microscopic seed requires a symbiotic relationship with fungi to germinate.
- Protocorm Stage: The germinated seed forms a small, tuber-like structure.
- Seedling Stage: The first true leaves and roots appear, marking the beginning of a recognizable orchid plant.
- Vegetative Stage: A long period where the orchid focuses on growing larger leaves and a strong root system.
- Flowering Stage: The mature plant produces a flower spike, buds develop, and the orchid blooms.
- Dormancy/Resting Stage: After flowering, the plant enters a rest period to conserve energy for the next orchid growth cycle.
Stage 1: The Microscopic Seed
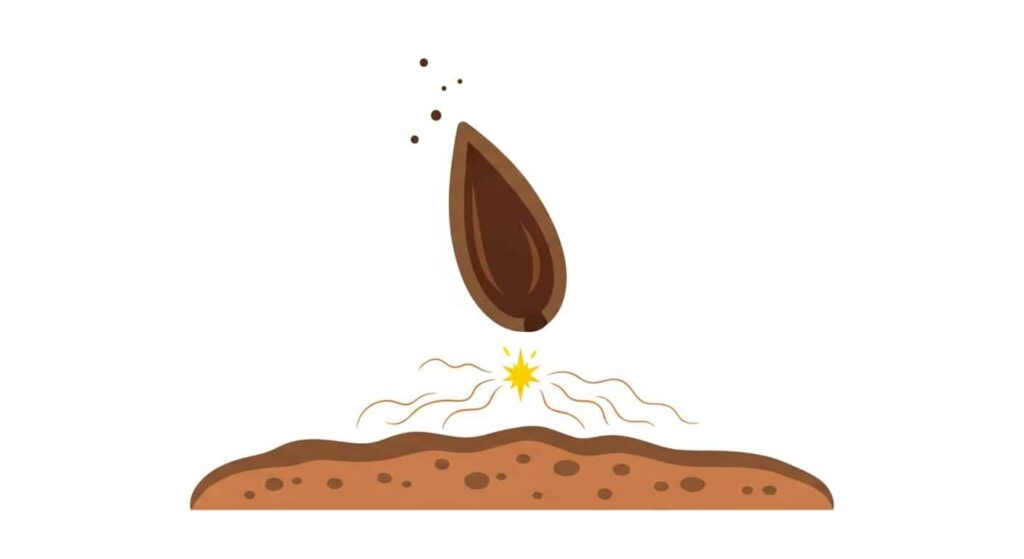
The life cycle of an orchid begins in a way that is vastly different from most other flowering plants. An orchid seedpod can contain up to three million seeds, but each seed is incredibly tiny, like a speck of dust. More importantly, these seeds lack an endosperm—the nutrient-rich tissue that feeds the embryo in a typical seed.
Because of this, wild orchids have developed a symbiotic relationship with mycorrhizal fungi. For a seed to germinate, it must land in a location where these specific fungi are present. The fungus penetrates the seed and provides the essential carbohydrates and nutrients needed for it to sprout. This is the first critical step in the natural cycle of an orchid.
How Long Do Orchids Take to Grow from Seed?
This is a common question, and the answer highlights the patience required for orchid cultivation. Growing an orchid from seed is a slow and delicate process. In a sterile laboratory environment, which mimics the role of the fungi by providing a nutrient-rich gel, germination can take several months.
From the point of germination, it can take anywhere from three to seven years, and sometimes longer, for an orchid to mature enough to produce flowers for the first time. The popular Phalaenopsis orchids, for example, typically take about two to three years to bloom from a flasked seedling. This long journey from seed to flower makes the first bloom a truly rewarding event.
Stage 2: The Protocorm

Once the seed successfully germinates, it doesn’t immediately sprout into a tiny plant. Instead, it enters the protocorm stage. A protocorm is a small, undifferentiated mass of cells that forms from the embryo. It looks like a tiny, pale green or white bump. During this phase, the protocorm continues to rely on its fungal partner (or the sterile nutrient gel in a lab) for energy.
Slowly, over several months, the protocorm will begin to differentiate. It develops rhizoids, which are hair-like structures that absorb nutrients, and eventually, the first primitive leaves, known as cotyledons, will emerge. This marks the transition from a simple cellular mass to the very beginning of a recognizable plant structure.
Stage 3: The Seedling to Vegetative Stage
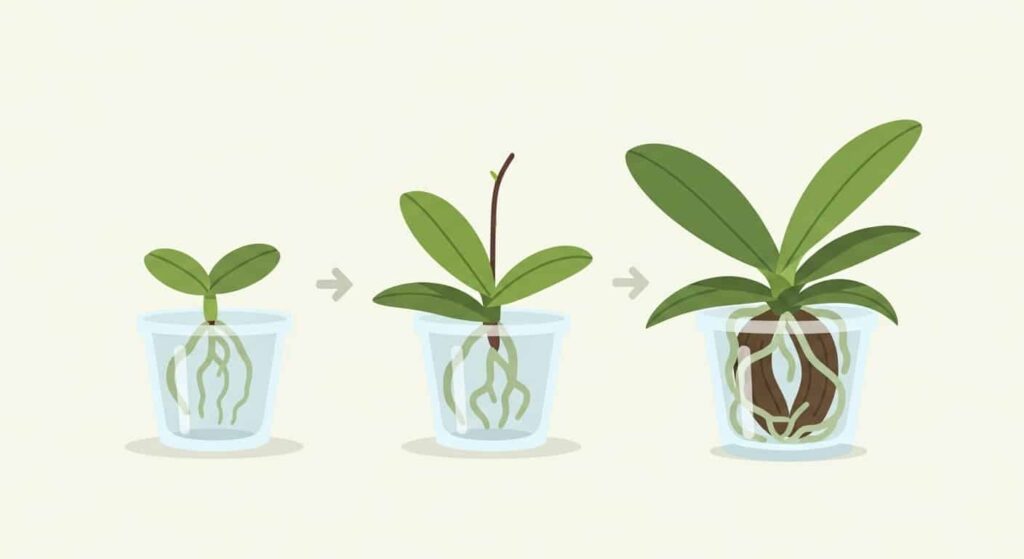
The seedling to vegetative stage is where the plant truly begins to look like a miniature orchid. Once the protocorm has developed its first tiny leaves and a rudimentary root system, it is considered a seedling. At this point, it can begin to photosynthesize, creating its own food from light, though it is still incredibly fragile.
These young seedlings are typically grown together in flasks for many months, or even a year or more, before they are large enough and strong enough to be potted individually. This is one of the most vulnerable orchid growing stages, as the young plants are susceptible to changes in humidity, temperature, and moisture.
Moving into the Vegetative Growth Stage
After the seedling is established in its own pot, it enters the long vegetative stage. This is a crucial part of the orchid life cycle. During this period, which can last for several years, the orchid’s entire focus is on growth. It will not produce flowers. Instead, all of its energy is directed toward developing a strong foundation for future blooming.
Key developments in this stage include:
- Leaf Growth: The orchid will produce new, larger, and stronger leaves. The number and size of the leaves are good indicators of the plant’s health and maturity. For a Phalaenopsis orchid, it typically needs at least three to four pairs of mature leaves before it can flower.
- Root Growth: A robust root system is vital for an orchid’s survival. During the vegetative stage, the plant expands its root growth significantly. These roots anchor the plant and are highly specialized for absorbing water and nutrients. For epiphytic orchids like Phalaenopsis, the green roots that grow outside the pot can also photosynthesize.
This phase of the orchid growing cycle requires consistent orchid care. Providing the right balance of light, water, and fertilizer will ensure the plant builds up enough energy reserves to eventually enter the flowering stage.
Stage 4: The Magnificent Orchid Flowering Stages
The transition from vegetative growth to flowering is the moment every orchid owner waits for. The orchid flowering stages are the most visually spectacular part of the orchid life cycle. This phase is triggered by environmental cues, which signal to the mature plant that it has enough energy stored to successfully reproduce.
Triggering the Bloom: From Spike to Flower
For many common household orchids, like Phalaenopsis orchids, a key trigger for blooming is a drop in temperature. A consistent nighttime temperature drop of about 10-15°F (5-8°C) for several weeks in the fall can encourage the plant to initiate a flower spike.
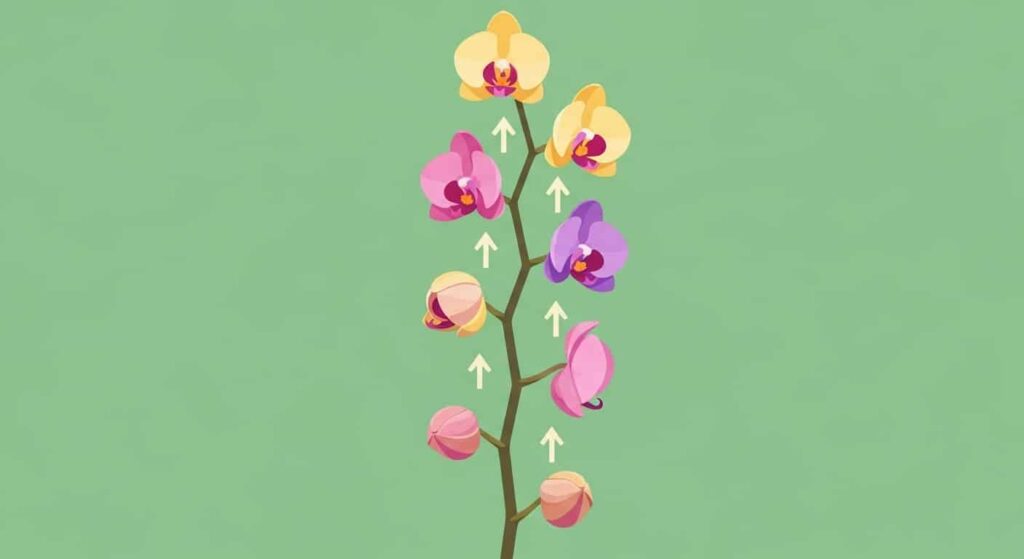
The stages of orchid growth leading to a bloom follow a clear progression:
- Flower Spike Emerges: The first sign of an impending bloom is the appearance of a new flower spike. It often looks like a flattened, mitten-shaped node emerging from between the leaves. It’s important not to confuse a new spike with an aerial root, which is typically rounded and has a silvery-green tip.
- Spike Elongation: The spike will grow and lengthen over several weeks or even months. During this time, it’s important to provide consistent care and avoid moving the plant, as it may orient its buds toward the primary light source.
- The Orchid Bud Stages: As the spike matures, small bumps will form along its length. These are the developing buds. The orchid bud stages are a delicate time. The buds will slowly swell and differentiate over several weeks. Any sudden stress to the plant during this time, such as overwatering, underwatering, or abrupt temperature changes, can cause “bud blast,” where the buds wither and fall off before opening.
- The Orchid Bloom Stages: Finally, the buds will begin to open into flowers. This is the peak of the orchid flower life cycle. The flowers may open one by one over several days or all at once. An orchid bloom can last for a few weeks to several months, depending on the species and the health of the plant.
Understanding the orchid bloom stages allows you to anticipate the plant’s needs and ensure a successful, long-lasting floral display. For a detailed view, searching for “stages of orchid growth pictures” can provide a helpful visual guide to differentiate between a new root and a flower spike.
Stage 5: Dormancy and the Natural Cycle of Rest

After the last flower has faded and fallen, the orchid plant enters a period of dormancy or rest. This is a normal and essential part of the orchid cycle. The plant is not dying; it is simply conserving energy after the demanding process of flowering.
During this resting phase, the plant’s growth will slow down significantly. It may not produce new leaves or roots at the same rate as it did during the vegetative stage. This is a time for the orchid to recuperate and gather strength for the next orchid growing cycle.
Caring for an Orchid After Blooming
Orchid care during dormancy should be adjusted slightly.
- Watering: Reduce watering frequency. Since the plant is not actively growing, it requires less water. Allow the potting medium to dry out more thoroughly between waterings.
- Fertilizing: Reduce or stop fertilizing. The plant does not need the extra nutrients while it is resting.
- The Flower Spike: Once all the flowers have fallen, you have a choice regarding the old flower spike.
- On Phalaenopsis orchids, if the spike is still green, you can cut it back to just above a node (one of the small brown bumps on the spike). This may encourage a secondary, smaller spray of flowers.
- If the spike has turned brown and dry, it will not rebloom. Cut it off at the base of the plant. This allows the orchid to direct all its energy into new leaf and root growth, leading to a stronger bloom in the next cycle.
By respecting this rest period, you help your orchid prepare for its next vibrant performance, continuing the life cycle of an orchid for years to come.
General Care and a Healthy Orchid Lifecycle
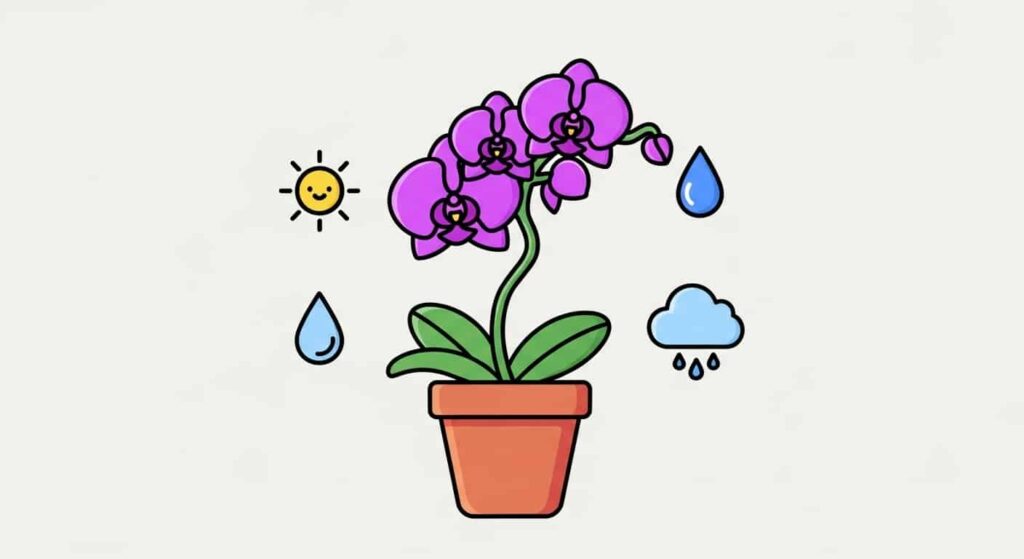
Maintaining a healthy orchid’s life cycle depends on consistent and appropriate general care. While each orchid species has unique needs, some universal principles apply, especially for popular houseplants like Phalaenopsis.
- Light: Orchids thrive in bright, indirect light. A windowsill that gets morning sun is often ideal. Direct, hot afternoon sun can scorch the leaves.
- Water: Overwatering is the most common reason orchids fail. The “soak and dry” method works well. Water the plant thoroughly, allowing water to drain completely from the bottom of the pot. Then, wait until the potting medium is nearly dry before watering again. The weight of the pot is a good indicator of its moisture level.
- Humidity: Orchids are native to tropical environments and appreciate higher humidity. You can increase humidity by placing the pot on a tray of pebbles with water or by using a small humidifier.
- Potting Medium: Orchids are not grown in soil. They are potted in a coarse, well-aerated mix, typically made of bark, sphagnum moss, or charcoal. This mimics their natural epiphytic environment, where they grow on trees, and it allows for excellent airflow around the roots. Repotting is usually needed every one to two years.
- Fertilizer: During active growth (new leaves, roots, or a flower spike), feed your orchid with a balanced orchid fertilizer, usually diluted to half or quarter strength, every two to four weeks.
The Orchid Life Cycle for Kids
Explaining the orchid life cycle for kids can be a fun and educational activity. You can simplify the stages of an orchid to make them easy to understand.
- The Dusty Seed: Start by explaining that an orchid seed is as tiny as dust and needs a special fungus friend in the ground to help it grow.
- The Little Ball: When the seed starts growing, it makes a tiny ball called a protocorm.
- The Baby Plant: Soon, the first little leaves and roots pop out, and it becomes a baby plant, or a seedling.
- Growing Big and Strong: For a long time, the orchid just grows bigger leaves and more roots. This is like when kids eat their vegetables to grow strong before they can do bigger things!
- Flower Power: When the plant is big enough, it grows a long stem called a spike. Buds appear on the spike, and then—pop!—they open into beautiful flowers.
- Time for a Nap: After the flowers are gone, the plant takes a long nap to rest up for its next big bloom.
This simplified explanation of the life cycle of an orchid helps children appreciate the long and patient journey of the plant on their windowsill. Looking at an orchid life cycle diagram can also make the process clearer and more engaging for young learners.
The orchid growth cycle is a testament to the slow, deliberate, and beautiful processes of the natural world. By understanding the distinct orchid stages, from the humble seed to the show-stopping bloom, you can become a more confident and successful orchid grower. The journey of the life of an orchid plant is one of patience and reward, offering a connection to nature that can last a lifetime.
Conclusion
In summary, the life cycle of an orchid plant is a remarkable journey from a tiny, dust-like seed to a stunning, blooming wonder admired across the world. Each stage—seed, protocorm, seedling, vegetative growth, flowering, and dormancy—brings its own beauty, challenges, and opportunities to nurture your plant. Success with orchids comes not from rushing the process, but from observing, learning, and providing the right care at each step. The patience required pays off every time your orchid enters a new growth phase or unfurls a spectacular bloom. Whether you are a seasoned orchid enthusiast or just beginning, every part of the orchid life cycle offers a chance to appreciate the wonders of nature and the joy of patient gardening.
FAQs About Orchid Life Cycles and Care
How long does it take for an orchid to bloom from seed?
Growing an orchid from seed to its first bloom can take anywhere from 3 to 7 years, depending on the species and growing conditions.
Why isn’t my orchid blooming?
Common reasons include insufficient light, lack of proper temperature drops at night, over-fertilizing, or the orchid not yet reaching maturity. Make sure you’re providing bright, indirect light and allowing nighttime temperatures to drop, especially for Phalaenopsis orchids.
What should I do after my orchid’s flowers fall off?
After blooming, orchids enter a resting or dormancy phase. Trim back the old flower spike if it has turned brown, reduce watering and fertilizing, and allow the plant to rest before the next growth cycle.
How often should I water my orchid?
Orchids prefer to dry out between waterings. Water thoroughly, let any excess water drain, and wait until the potting mix is nearly dry before watering again. Overwatering is the most common issue for orchid growers.
What is the best care routine for healthy orchids?
Provide bright, indirect light, good air circulation, and maintain high humidity. Use an orchid-specific potting mix and fertilizer, and avoid letting water sit in the crown of the plant to prevent rot.
Can I grow orchids outdoors?
Some orchid species can be grown outdoors in temperate climates, but most prefer the stable indoor environment where you can control light and humidity. Always protect orchids from direct harsh sunlight and frost.
When should I repot my orchid?
Repot your orchid every 1-2 years or when the potting medium starts breaking down. The best time to repot is right after flowering, when new root growth is beginning.
What are some signs of a healthy vs. an unhealthy orchid?
Healthy orchids have firm, green leaves, plump roots, and steady new growth. Signs of distress include yellowing leaves, mushy or shriveled roots, and a lack of new leaf or root production.
Are orchids suitable for beginners?
Yes! Many orchids, especially Phalaenopsis, are ideal for beginners thanks to their adaptability and stunning flowers. Start with one plant and learn its cycle to build confidence.
Where can I find an orchid life cycle diagram or pictures of orchid growth stages?
Many botanical websites, gardening books, and orchid societies share diagrams and step-by-step pictures of orchid stages. These visuals can greatly help in understanding and identifying each phase in your orchid’s journey.
Leave a Reply